Thursday, January 17, 2013

Kwik Sew 3597 Small Tote Bag

Kwik Sew's pattern photo for 3597
My first version of Kwik Sew's easy to sew tote bag pattern in the largest size has seen a fair amount of use, despite its floppy fabric. 

A lovely and super-generous friend gave me a whole stash of glorious upholstery fabrics last year. This woven houndstooth check is from that haul, made for my friend's Christmas present.


This version is the smallest size for the pattern. The strap attachment is intended to dress the bag up a little. The patch and rivets were installed after inserting the bag lining but before the top facing. First the leather patch (with its center slit already cut) was glue-basted and then topstitched into place. Then the strap was inserted into the slit and holes were punched with my much-used 1/8" leather hole punch. 

Without claiming expert knowledge, I would nonetheless humbly suggest that you use a barrel-style punch for making these types of holes, rather than the plier-style punch with rotating heads. Who in the world has the hand strength for that plier arrangement? Furthermore, I recommend avoiding the siren song of the very well-priced sets of barrel punches in a variety of sizes that come from China. I can tell you from experience that they are so poorly machined that they don't work.

Tandy barrel-style hole punch. Used with a hammer. Punches a clean hole through leather, fabric, cardboard, plastic and anything else that gets in its way.


The Tandy punch works.

When it comes to setting the rivets, I use a Tandy rivet-setting tool and Tandy snap rivets. If money and space were not limited, I would love to own a rivet, grommet and snap setting press. Anything less is always going to involve misfires and swearing. But it's worth it to be able to use rivets.

This time out I lined the thing. The lining is a Marc Jacobs raincoat fabric (now sold out) from FabricMart. It makes a nice bag lining because the fabric is double-sided and coated with a water resistant laminate. These features give it a nice stiffness without much weight. Even though the outer fabric is pretty heavy, it isn't very stiff. Using a crispy lining meant that I didn't need to interface the outer pieces.


I added a magnetic snap to hold the top edges together. Nicole Mallalieu's great tutorial changed the way I put in these snaps, much for the better. Another tiny change from the pattern was to add a little key lanyard made from a piece of ribbon and a small snap clasp from my box of metal notions. Even though I cringe when doing it, I now cut up any bags or satchels my family is discarding rather than giving the potentially-still-useful item to Goodwill. I save all that lovely hardware for just such uses as this. Buying snaps and rings and buckles is crazy expensive!


Between the lining and the outer fabric I inserted a bag bottom made from thin acrylic sheeting. I have several sheets of this nice material, which I think came from my husband's architecture school/model building days. It cuts easily enough with strong scissors but is nonetheless more rigid than what I find sold for this purpose in fabric stores. Wrapping the edges in masking tape eliminates the possibility of a sharp spot working its way through the outer or lining fabric, particularly at the corners. Kwik Sew considerately provides the dimensions for the bag bottom piece, which is a nice convenience some other bag patterns do not supply.

Bag feet would have been a nice addition to this project, but after attaching the straps I was done with punching holes!

Unlike its unlined, uninterfaced predecessor, this bag holds its shape and stands up on its own. I cannot abide a floppy handbag. That's a big part of the reason I love vintage Coach bags.

My friend was thrilled with the bag. She said her 20-something daughter was eyeing it enviously, but she refused to give it up. Now that was a great compliment!

Thursday, January 10, 2013

Vogue 8859: Am I Dreaming?

Love this pants pattern. Could it be the one I've been looking for? All my life?

I'm not saying there's anything aesthetically too exciting about these pants. Mostly I appreciate them for what they are not: uncomfortable, bulky, difficult to sew, demanding of just the right fabric, hard to care for.

The first pair is of ponte knit.


I made several fitting changes, shortenings, combinings of sizes, all of which seem pretty specific to me. But what might be relevant to my friends out there: I had to take in the center back seam a lot to reduce bulk in that area. Like, more than 1" per side of the center back seam, starting at the top of the back yoke and tapering down to the original seamline about 2/3 of the way to the crotch.

Unexciting back view that showed me I am knock-kneed!

For my 5'2" frame, I shortened the pattern 1" above the crotch (by using 2" elastic for the waist rather than 1"), 1" between the crotch and knee and 1/2" below the knee.

Since I widened the "waistband," I ran into troubles with the yoke seam. That is, the waist seam threatened to fall below the yoke seam. Seeing as how I had already serged the two-inch-wide elastic into place and didn't care to remove it, I topstitched the elastic just 1/2" from the top (with a twin needle). Though I wasn't so sure how this would work out, it is absolutely fine and comfortable to wear. Everything stays in its place and the pants stay up nicely.

Inside view of the waistband, showing how the line of topstitching is far above the lower edge of the elastic

Outside view of the waistband
Today I finished up a second pair of these pants, from a stretch cotton/poly/lycra denim from Joann's. Marcy Tilton recently blogged that stretch wovens would work with this pattern and, by golly, she was right.

The Joann's fabric wasn't bad at all. I washed and dried it twice in a bid to remove all shrinkage prior to sewing. But after wearing the pants for an hour or so, they've definitely grown larger. The recovery could be better. But I'm so comfortable I really can't complain!


Seriously, when we wear long tops and tunics, is it really necessary to have a fly, and front pockets, and coin pockets, and belt loops, and a structured waistband, and rivets, and a jeans button? All of those things are great, but I wouldn't want to sleep in them. These pants are so comfortable I could easily wear them to bed.

I used 3/4" elastic in waist of this second pair (without shortening the pattern correspondingly), and I don't think that worked out as well. That wide elastic, either 1 1/2" or 2", feels so secure and just-right to me. I need to order a big spool of it from Wawak, because it is quite expensive by the yard from Joann's, Hancock's or our independent local fabric stores.

Future plans for this pattern include making a version without the knee detailing, just to see if I like it as much as an even plainer pant.

These pants are a dream come true, and I hope I'll continue to feel as excited about them in the future as I do today. I can envision many pairs in different colors and fabrics, each more comfy than the last!

Sunday, January 6, 2013

Toxic Vest

I knew in my bones this project would be a bust before I even ordered the fabric, before I even selected a pattern, before I even finalized the style. And why proceed in the face of that nearly-certain knowledge? Curiosity and cussedness is all I can figure.


Strangely, though, the failure doesn't flow from my initial misgivings. Since last year I've admired the look of sleeveless furry vests. Even though I realized such a thing would not be practical, I like the whimsy and texture. I thought I could maybe benefit from a little whimsy and texture. Vests aren't much use to me generally, because I always need the warmth of sleeves. But, what the heck--I couldn't get the idea out of my mind and Fabric.com tempted me with a great sale on what looked to be a gorgeous fake fur.

The fur arrived and I adored the color of it. But it was seriously furry, so much so that I couldn't imagine what the effect would be when worn. On the one hand, I thought a short vest would be advisable, to limit the volume. On the other hand, that would put all the fur volume on top of my maximum area of volume and that didn't seem wise.

After much consultation with Pinterest, I decided to throw caution to the winds and to make a longer, princess-seamed vest. I returned to Simplicity 4032, a pattern used with great success in last year's fleece coat.


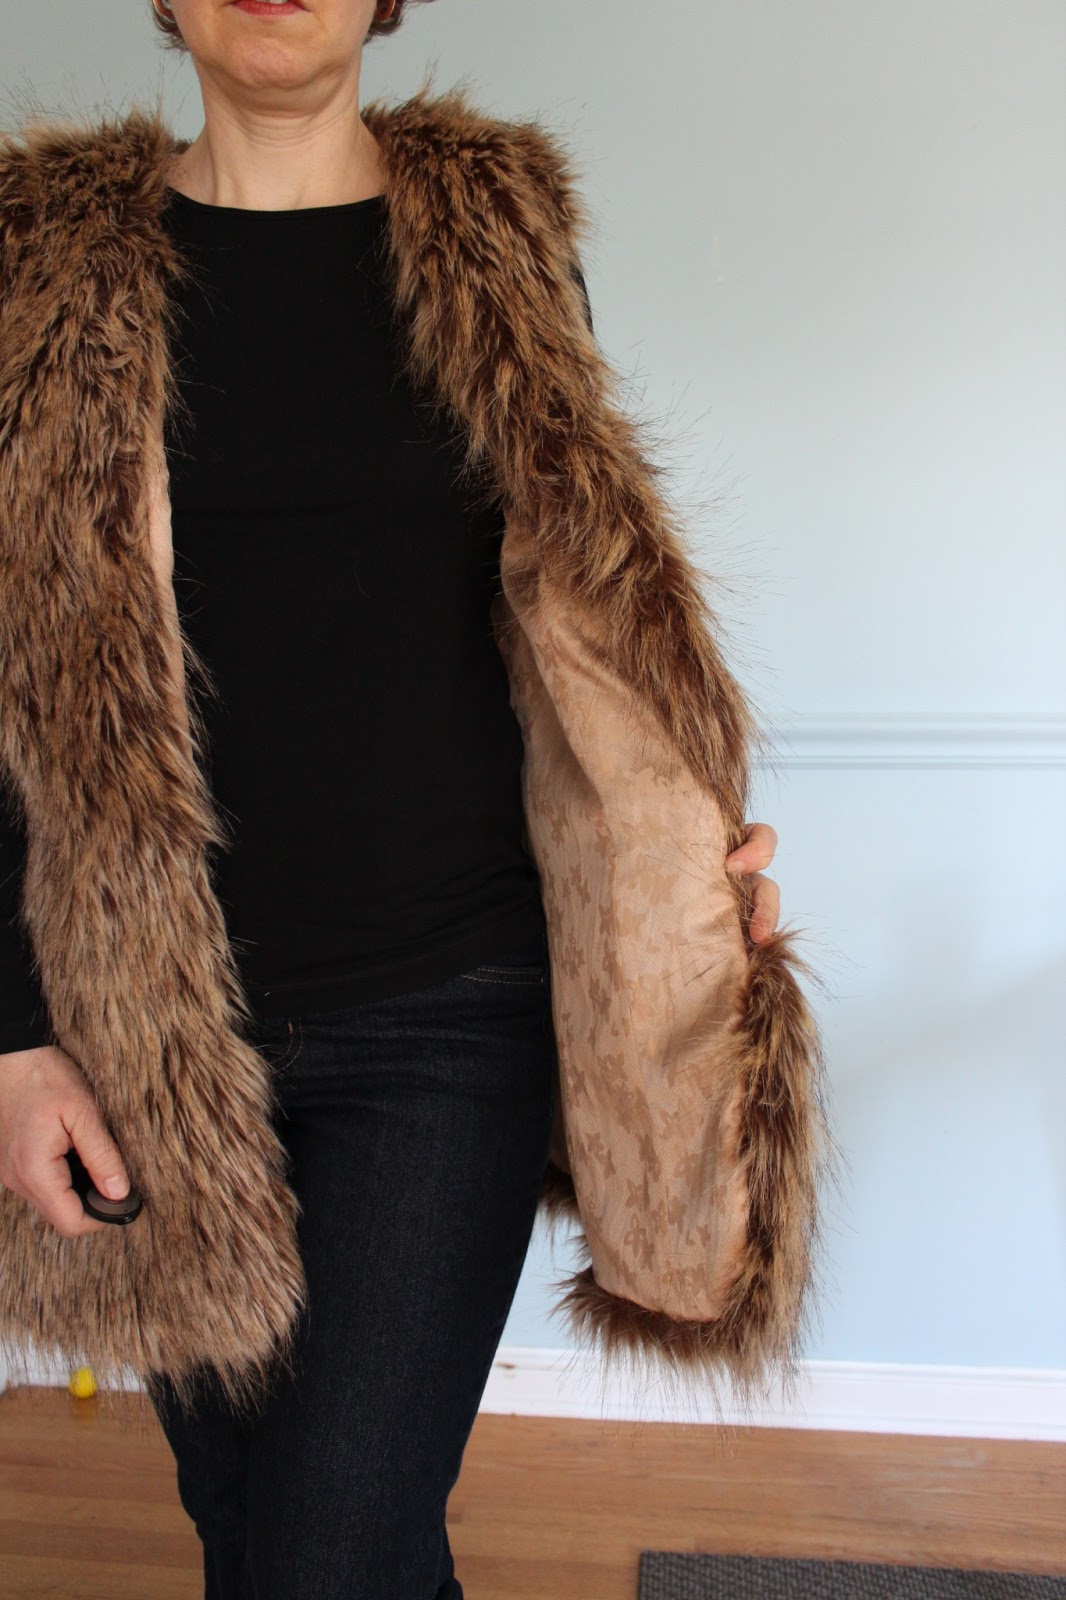
I worked hard on the construction of the vest. Internet research indicated that working with fake fur is one part sewing, two parts vacuuming. I disagree; it's at least three parts vacuuming. I used my hair clippers to remove the pile from the seam allowances before sewing them together, and I would highly recommend that approach. I stabilized the neck edge with a strip of the selvedge of the silk used for the lining.


The lining itself is a gorgeous Marc Jacobs silk/cotton jacquard from FabricMart.


I was so worried this vest would be wildly unflattering. I don't think it is. It's not slimming, of course, and it is far outside of my usual look, but yet I find it cute and fun.


And yet I doubt I'll ever wear it, because the moment I put it on, my head swims from the petroleum-product fumes, my throat burns and my head starts to hurt. I truly did not notice this effect during sewing. I thought the fumes I was smelling were from the marker I had used to trace the pattern pieces onto the back side of the fur before cutting out. And I intended to trim off those edges after sewing it up, which I did.

But once this thing is on me, I am engulfed in a toxic cloud and I can't wait to get it off. It's also very ticklish around my neck and static-y, but I could live with that. The fumes, though--they won't fly. I have hung it in a faraway corner of the laundry room to see how a bit of time affects it, but I'm not very hopeful. The fabric has been laying out in the sewing room for over a month, so it may not off gas much more, at least not in this decade.

My expression here kind of sums it up

Wednesday, January 2, 2013

Vogue 8837 Katherine Tilton Jodphur-Style Pants

I'm an enthusiastic follower of sewing blogs. I don't comment enough, but several years on, I still enjoy the day-to-day voyeuristic glimpses into what fellow sewers are creating and thinking.

Over time, I've learned that there are some blogs I love for their unique voice and humor, some I love for their focus on process and technique and some I love for the quality of the visual presentation. But I've noticed that, strangely enough, my love for a blog and its point of view is not necessarily any predictor of how well that blogger's amazing projects will work for me. Who among us hasn't hastened to interpret something awesome we saw on a blog, only to have it flop for us?

Somehow, though, I've never gone wrong in slavishly copying Shams of Communing With Fabric. This time, it's a pants pattern that appealed to me, but which I probably wouldn't have actually purchased without Shams' intrepid leading of the way.

Like other bloggers, I have so far omitted the cuff and the line of gathering stitches at the back of the leg 
 I was so uncertain about how to fit these pants that I made a muslin, which isn't pictured here (it was rather yucky stretch velvet, which didn't show any details anyway). I made the muslin in size medium, which was roomy, especially since the fabric had a good deal of stretch. Although the pattern provides lines for shortening above the crotch and below the knee, there is no provision for shortening below the crotch and above the knee. So naturally that's what I needed. Without that adjustment, the curved shaping got lost in the bend of my knee.

I measured down a consistent depth from the above-crotch shortening line (about six or seven inches) and drew a line on both front pattern pieces and the back pattern piece. I reduced the length there by one inch, below the knee by one inch and effectively above the crotch by one inch by using two inch elastic for the waist casing rather than one inch as specified by the pattern. Then I think I removed a bit more from the lower edge. I'm 5'2", so that all makes sense.

For the second version, in black ponte, I used the size small back piece, since the pants seemed most baggy in the back. I liked the resulting fit, which isn't tight at all but still is slimmer than I have been wearing in pants recently.
This is more a photo of me in which I happen to be wearing the pants than a photo of the pants. Unfortunately, they got covered in lint in the wash (new towel) and now I must purchase a sweater stone to remove the pills before they will be fit to wear again.
For the third version I used a stretch cotton velvet herringbone that I've been hoarding for the right pattern. I think it came from FabricMart two or three years ago. I did not make any further changes to the pattern, and I was pleased to find that there was still plenty of room using a stretch woven rather than a knit.


Rear view. Wish the boots didn't push up the pants quite so much--I guess I need to rig some stirrups or other straps to hold them down when wearing them tucked into boots

With my new-to-me vintage Coach Court bag in British Tan. I've been eyeing these for over a year on eBay and finally made a present of one to myself for Christmas. 
I really like this pattern and I am actively searching for some stretch denim to make more. But look for some thoughts on another new slim pant pattern from Vogue, 8859, this one from Marcy Tilton. Shams inspired me to also try that pattern, and I think I like it even better than this one.

Thanks so much for all the great inspiration, Shams!

Tuesday, January 1, 2013

New Sewing Room for the New Year

Though it's been configured many different ways in the eight years we've lived in this house, my sewing room has always been located in the basement. Despite its flaws (prone to flooding, cold as ice), the basement has two great advantages: first, it's roomy and second, it has lovely south-facing windows.

In the winter, there's no getting around the essential chilliness of the basement. No matter how long we run our electric space heaters, the concrete slab never warms up, and it draws the heat right out of your body.

So when my recently-turned-thirteen-year-old son started campaigning to move his "office" to the basement, freeing up an upstairs bedroom for the sewing room, I was filled with excitement...and dread at the thought of moving all my gear. Just to be clear, my son still has his bedroom on the main floor of our house, not in the cold basement. It's a tiny room, though, only big enough for a single bed, a dresser and a bookcase, and we've always given him the other bedroom for his computer and toys. He's not the greatest sleeper, and I feel that separating daytime and nighttime activities into different rooms promotes better rest. The joys of being an only child (which I am too)!

So we set about the switch three days ago, and only finished yesterday evening. My new room is just lovely and snug. I am excited to know that I can step in and sew any time, without thinking about warming up the space first, or adding multiple layers of clothing to my already-layered usual attire. It's at least a third smaller than my previous space, however, so I've been engaged in a massive clean-up and clean out.

New ironing board cover, my Pfaff 130 in an industrial table, Juki F600 and Juki MO-654 DE serger

The first project of the new year and the new room was a fresh new cover for the ironing board. Since the Rowenta cover it came with fits nicely, I copied it in some Denyse Schmidt County Fair canvas from my stash. The ironing board occupies a large part of the room, so covering it with a cheerful and fresh fabric made a great change from the stained muslin cover.

The cutting area, such as it is, is to the right of the ironing board in this photo.
The biggest disadvantage of the new space is a lack of cutting space. There simply isn't room to set up a table of any size. The options seem to be buying one of those drop leaf tables that expand to the size of my cutting mat, or setting up on the dining room table whenever I need to cut out. I'm going to take my time in deciding the best option. We took two loads of unwanted chairs, tables and stools to Goodwill in making room to rearrange things, and I am not eager to replace any of that volume with new "stuff".

My beloved pattern cabinet, along with the "sewing library" and notions storage
Though the basement windows were nice and quite wonderful for a basement, the street-level view from this room is even better. I think it will be such a happy place to work. The pressure will be on to stay organized and tidy, and to find a good solution for cutting out, but I am optimistic that it will be a nice change. My son is thrilled with his new-found privacy and space in the basement, by the way. He is fairly impervious to cold, so the chill doesn't seem to bother him.

Monday, December 17, 2012

Burda 7287 + Semi-Crazy Hair Color

I was born a redhead and though I'm swiftly going gray, it doesn't take much to remind my hair of its previous inclinations. The past few years I've been striving for a natural-and-yet-not-too-drab shade, and it's been tricky. Any bit of actual red in the hair color is seized upon by my hair with a fierce intensity, with results that are not likely to pass as natural in any light.

In this quest for a natural appearance, though, I'd gotten more and more monochromatic. I noticed I could hardly wear any colors, and black was too harsh, too. Only tawny shades, peaches, golds. Which are nice. But what about everything else?

Cutting to the chase, I didn't mean to go this red. But my hair surely did. The color is L'Oreal Feria 56, and my neighbor dropping in halfway through the coloring process probably didn't help my focus.

Even though it's nothing like my supposed color goal, it's growing on me. I feel an obligation to rise to the occasion of this bright hair, and that can't be a bad thing.


The dress is Burda 7287. I'd made it before as a top, which I thought a success.


For this dress, I wanted the great fit of those French bust darts, but with a slightly different neckline. I wanted the dress to work as a jumper, but also as a casual dress for evening (read: swing dancing) with no shirt underneath. The Burda neckline is very high and round. So I borrowed the neckline of New Look 6130, that cute peplum pattern that so many people have made, and that I have attempted with unflattering results twice.


I had already narrowed the neck edge of the New Look pattern to fit my very narrow upper chest, making it a good candidate for remixing with the Burda dress. Here are a couple of views of the altered pattern tissue. The white is a tracing of the New Look neckline and the tan tissue is the Burda pattern. You will see that I left the original neckline in place, and just turned it back to cut my alternate neckline. This way I can keep my options open for the future (without totally retracing the entire pattern).

Front

Back

The big thrill of this dress is NO GAPING at the armholes!! High and tight! Without a shirt underneath, my bra straps are covered and stay that way.


I do hope the unfortunate striping of the stretch velvet fabric (which came from it being rolled on a bolt and sadly did not disappear with washing) is less striking in real life than in photos. Even so, I'm not deterred from wearing my comfortable and versatile dress in many different combinations.


Oh, I did make the t-shirt too. It's some bastardization of a Kwik Sew pattern.


Sunday, November 11, 2012

The Tunic That Became A Dress

I try not to love them, but tunics are just so...easy. Comfortable. And they never expose the area around the midsection to cold drafts.

Inspired by Vogue 8691, I adapted another princess-seamed Vogue tunic pattern, 8699.


Looking at the line drawing again, I see a couple of things I missed before: the ruffles overlap at the points on the hem and the back ruffle is gathered.


No matter: I enjoyed and learned from the exercise of drafting/altering my own version of this pattern, though it turned out so long I decided to make the ruffle deeper and call it a dress.


The body fabric is a polyester jersey kinda thing from the sale section at Hancock's. I was so drawn to the print, but unsure about how to use the fabric, since I hate polyester in summer (too sweaty and sticky) and in fall and winter (so cold!). A commenter here on the blog suggested lining knits to make them beefier--brilliant idea. I had some modal-spandex knit from FabricMart. Actually, the solid sleeves and cowl and hem are that same modal knit. I also bought five yards in white. While the white is soft and drapey and wonderfully comfortable, it's a strange, sad-looking white. Bad for the outside of garments, but perfect for a lining. I made a complete lining for the body of the dress and attached the outer fabric to the lining at the neck and armholes.


The cowl is twisted. This is easy to do: sew the center back seam of the cowl as usual. Fold wrong sides together, but instead of matching the center back seam on each edge, offset it by about 1 1/2 inches. Mark the center back between the two points of the seam, then mark the center front and the two sides. It helps to baste the raw edges together. Mark the center front, center back and sides (not the shoulder seams!) of the neckline and attach cowl by matching the the marks.

The sleeve cuffs are gathered to the fuller upper sleeve. I can wear them folded up as shown for a bracelet-length sleeve, or unfolded for a full long sleeve.


The body hem is left raw, as is the hem edge. I used 1/2" Steam-A-Seam 2 to fuse the ruffle into place before topstitching with a zigzag stitch. Very easy and looks nice.


The print is so modern, but the handkerchief hem gives me a bit of the feeling of wearing a twenties-era dress. Whatever its period, this dress is the height of comfort, with its roomy shape and heavenly-soft lining!