Tuesday, February 18, 2014

Riding the Bandwagon in the Kitschy Coo Lady Skater Dress

For many, many months I successfully resisted the urge to follow the crowd in making the Kitschy Coo Lady Skater dress, even though every member of the crowd had a very nice, flattering, simple but lovely dress to show for her efforts.

I kept thinking that surely (surely) with all the knit top and dress and skirt patterns I've got laying around here, I ought to be able to assemble the equivalent of this dress without purchasing yet another pattern. But deep in the most rational reaches of my brain, I knew it wasn't true. I wish I had the skill to combine different elements into a perfectly pleasing, yet completely simple, whole, but...well.


So I bought the PDF already, and I feel ironically better knowing that, yep, I couldn't have gotten the same result through my own pattern drafting efforts. Look at the way that skirt falls!


The fabric used here is a doubleknit in "deep mint" from FabricMart. It doesn't really have the 40% stretch specified by the pattern, so the bodice is a bit on the snug side, especially in the back.


I cut the size 3 in the shoulders and upper chest, tapering to size 4 for the waist and skirt. I shortened the bodice 1" total and then took an additional 5/8" swayback tuck at the center back.


This is the unaltered full-length sleeve with a narrower cuff than specified by the pattern. If you are taller than my 5'2", you may need to lengthen the sleeve, particularly if you prefer to turn up a hem rather than use a cuff.


I wore it with a corduroy jeans-style jacket for my day of substitute teaching for the eighth grade. Several girls said I looked "cute", which suggested the possibility of age inappropriateness, or else cheerful with-it-ness. I'm going to go with the latter!

Emerald Green Simplicity 1882 in Action!


The last time this dress appeared, it was hanging over a lampshade in a half-finished state. I was inspired to hem it up for Swing Into Spring, a swing dancing weekend workshop in Columbia, SC.

Now that I've danced several hours in this dress, and sat on the floor in it, and sweated all over it, and washed it gently by machine, I can say with confidence that it is a worthy addition to my wardrobe!

The polyester crepe back satin was not, as I rather feared it would be, unbearably hot, though the evening was chilly and the venue not overly packed. More investigation is needed before I sew with this fabric again, but I enjoyed working with it and I appreciate its easy-care nature. Plus it was just the color I wanted and reasonably priced at Hancock's Fabrics.


And here's another dress, Simplicity 2247, which I blogged about back in 2012, in action at the Friday night dance of the weekend.

Monday, February 3, 2014

Style Icon: Again with the Helena Bonham Carter

The new season of Project Sewn starts later today with the first challenge: style icon.

The world doesn't lack for vintage and modern celebrities with admirable personal style, but very few of them are what I would consider a "style icon": someone whose style has relevance to me. I might admire Audrey Hepburn and Lauren Hutton and Iris Apfel, but I just don't feel the least inclined to appropriate any part of their look for myself. Most of my style icons are sewing bloggers, a class of people I find a whole lot more interesting and inspiring than celebrities.

But I do love me some crazy Helena Bonham Carter, as I have written before.

Yesterday I finished a new wool tunic sweater which lends itself to some HBC interpretation:


HBC reference: messy red hair, long layers, pantaloons and laceup boots

Obscure HBC reference: lace ears
In the wild, sans ears. I couldn't wear the ears into my yard for all to see, but the outdoor photo shows the details of the pieces much better.
The tunic is a mashup of the various knit tunics and dresses I've been making lately (New Look 6700, Butterick 5203, Vogue 8699). It's made from chocolate wool jersey from FabricMart and it is accordingly warm and soft. I don't mind a bit of wool next to the skin if it's a fine jersey. The long top under the tunic is a t-shirt dress (Burda 7287) in a white modal jersey, which I then dyed to this indeterminate brownish rose color. And the bloomers were a creation from just about exactly a year ago

So this kind of wacky Bohemian style is accumulative, but with a theme. It's not "all about the mix" in the current fashion editorial parlance, but rather about assembling a lot of ruffly textures and layers with a kind of "more is more" philosophy.


The much more conventional way to wear this top, with jeans (and maybe a crazy big fabric flower).
I've found that I go through phases with my appetite for channeling Helena Bonham Carter. Sometimes responding to the attention generated by wearing ruffly bloomers feels like a little too much effort. I don't suppose HBC has this problem so much, because she is going to generate attention just by being herself and walking around in the world. But the style is extremely comfortable to wear, and the whimsical theatricality of it really does appeal to me. 

Another prospective style icon: Vivienne Westwood

She is so tall and regal, which I am not and am not likely to become, which limits her appeal as a personal style icon.

Thursday, January 30, 2014

Polar Vortex Sweater + Costume Glasses


What does this arch look mean? Why, I need some more warm clothes, of course. I've gotten quite weary of my old standbys over the past few weeks of chill, and they no doubt of me.

But first...what do you think of the glasses? I love 'em, but they're a tease: not just fake, but too blurry to wear for longer than five minutes. My head starts to ache if I persist. Nonetheless, they have got me to thinking about finding some cute crazy frames, for no reason beyond accessorizing.


This is another Butterick 5203 (version one here), but with this version, I was also attempting to channel Vogue 1261, an Alice + Olivia design which recently went out of print:


Or maybe even something like an Eileen Fisher petite tunic:


This is an acrylic and wool boucle sweater knit from FabricMart (they still have a few yards of this blue and a couple of other colors). So far, I really like the depth of colors in the knit and the relatively non-scratchy feel of it. It remains to be seen how it will wear. Boucle knits are very prone to pilling and becoming fuzzy.

/

To the basic pattern I added a cowl neck, cuffs and one slanting pocket. I really only need one for my cell phone, and that seemed more "design-y" looking than a pair.


Center back seam with swayback adjustment: working pretty well! Next time I make this, I think I'll add a center front seam just as a design detail and to match the back.


Always the question: how will I finish the hem? This knit presses well, so I could have folded up a hem, but I decided to face it with an adorable Liberty of London bias tape that's been waiting patiently for a use.  Very cheerful and nice and flat!

Wednesday, January 29, 2014

Tutorial: Try On Fabric Using Free Online Photo Editor Pixlr.com


What image editing program do you use? For years, I sniffed at the notion of using anything but Adobe Photoshop. As a marketing director, I knew just enough Photoshop to complete rudimentary photo editing tasks. Adobe InDesign was my page layout software of choice, and I was a pretty fair hand with it.

But then I left the irritations and comforts of my nice salaried job to become whatever it is that I am now (mother, freelance writer, dressmaker), and the price tag for the Adobe products became much too steep for personal use. Adobe now offers web-based subscription access to most, if not all, of its software, and I have taken advantage of this service when I needed a particular software for a freelance project, but it's not an expense I can justify in the normal course of things (Adobe allows month-to-month subscriptions, which can be placed on hold indefinitely).

Some folks have had great success with The Gimp, an open source program that is similar to Photoshop, but for some reason it is just different enough from the Adobe family of products that I have never managed to get comfortable using it.

About a year ago I discovered Pixlr.com, and it has become my (free! no log in! on-line!) image editing solution of choice. Today I am talking about Pixlr Editor, which is the most powerful of the three versions of this software (the others are for use on mobile devices, I believe--I actually haven't used them).


Few things are more tedious than writing or reading a software tutorial, but I have been thinking that a lot of sewers might like to learn how to use Pixlr or another image editing program to virtually try on fabric before buying on-line. I can't tell you how many mistakes this technique has helped me to avoid! I will be thinking that a particular color or print will look fantastic on me--until I pop it into my Pixlr template. The immediate visual feedback isn't perfect--of course there are variations and inaccuracies in the way fabrics are photographed and displayed on a screen--but it gives me a great general idea of how a color scheme or design will look on me.

So here we go: a simplified method for combining a photo of yourself with a fabric swatch. We won't get into scaling or shading or anything complicated: just the basics!

Step One: Rustle Up a Clear Photo to Use as a Template

I took a new photo for this exercise. You want a nice clear, uncomplicated photo on a plain background, wearing a solid color top with as few details as possible.


Step Two: Erase the Color of the Top

After opening your photo in Pixlr, you will be selecting all of your garment and changing its color to plain old white. Or another color would work. It's not the color that will matter, it's that you create one solid block of color with no shading or variations.

Select the "Wand Tool" from the tool bar. In the image below, it's highlighted. It is a little stick with a light pink burst at the tip.


With the wand tool, click on your top. Lots of little white lines will appear, showing which pixels have been selected. Your goal is to select (eventually) all of the pixels that are your top, and none of the pixels that are your skin, hair or background. To select more pixels, hold down the Shift key, move the wand tool to an area that hasn't yet been selected, and click again. Once you've got a good amount of your top selected, you can hit the Backspace key to erase the color from that area. If you have a pretty good outline at that point, you can clean up any little remaining bits by using the Eraser tool (it is two tones of pink in the image above and looks like the eraser you used in grade school). Remember, if you erase too much, you can always Undo your last changes by clicking Control + Z.

There are lots of ways to refine your selecting. For example, at the top of the image above, you see a box that says Tolerance. It is set at 21 as a default. If you select a lower number in that box, your wand tool will be less tolerant; that is, it will select a smaller range of shades of pixels. If you select a higher number, it will be more tolerant and will select more pixels per click.

Our selecting doesn't have to be perfect to yield a useful image.


Step Three: Create a Duplicate Layer


The Layers menu will probably open on the right side of the screen. If not, you can open it from the View menu in the top menu bar.

Right click on the Layers menu, and select Duplicate layer.


In the image above, you can see the new layer called Background copy in the Layers menu. It is bright blue, which means it is active, and it has a check mark in the box on the right side, which means it is visible. The original Background layer always stays put. It has a lock beside it, meaning that it cannot be moved or hidden.


Step Four: Create a Layer Mask


With your newly-created layer highlighted (Background copy on the Layer menu; you can tell it is highlighted because it is a darker blue. If it isn't highlighted, click on it), use the Wand Tool to select your white top area again. Then, from the Edit menu on the top menu bar, select Invert Selection.

Next, right-click on the image and select Add layer mask.


When you see a new icon pop up beside the Background copy layer, you will know you have created the mask.


Step Five: Add Fabric Layers!

By clicking on it, highlight the original Background layer. Then go to the Layer menu in the upper menu bar and select Open Image URL as layer.


A dialogue box will pop up. Open a new tab in your web browser, and find the fabric you'd like to "try on". Right click on the image of the fabric and select Copy image URL.


Go back to the Pixlr tab and paste in the URL you just copied. The fabric will appear as a new layer between the Background layer and the Background copy.


We can see that the fabric layer needs to move down. Select the Move tool from the left hand tool bar (the one with the arrow and the cross). With the fabric layer selected in the Layers menu box, click the image and drag the tool down to reposition the fabric within the white area.


You might notice that the fabric does not quite fill the white area. In this case, I don't mind that little gap at the edge. I am just trying to get an idea of whether the fabric is totally wrong for me. Lots of times it is! I was in love with the skulls and roses print shown at the top of this post, if you can believe that. This technique showed me right away that it is not the fabric for me.

When you try this, you might find that the fabric seems really tiny within the white area. This could mean that your original photo is a much higher resolution than the resolution of the fabric swatch. The easiest way to deal with this problem is by resizing your photo. Select the Image menu item from the top menu bar and then select Image Size.


To be compatible with fabric swatches sized for the web, make your image between 400 and 500 pixels wide. If the fabric is still showing up very tiny, resize your photo again smaller, or see if you can find a higher resolution photo of the fabric.

Another refinement to this technique could be to hold a ruler when you take your original image, and then scale the fabric swatch to match that guide (if the swatch is photographed with a ruler). And yes, it is possible to scale the size of the fabric swatch within your composite image. We won't cover that process today. 

Things to Keep in Mind

  1. Different fabric-selling websites format their swatch images differently. FabricMart, for example, uses a technology (maybe frames?) that makes it impossible to save the fabric swatch directly. You can save the image as a webpage and then insert a fabric layer from the saved file. On Fabric.com, you must save the expanded fabric view as a file and then make it into a layer, rather than opening it directly from the URL. You would do this in Step Five by selecting Open Image as layer rather than Open Image URL as layer.
  2. You can keep adding layers to your image file for different fabrics. Just make sure you are adding the new layers between the Background and Background copy layers so that your new fabric will show up. You can turn off various layers (by unchecking the box next to them in the Layers menu) to go back and see your previous fabrics. You can even name the layers with the name and source of the fabrics they correspond to.
  3. To preserve the layers, save your file as a PXD format. If you save it as a JPEG file, only whatever is visible on the screen at the time you saved it will be retained in the file. All the layers will be flattened into one layer. If you save as a PXD (same as a PSD in Photoshop), all the layers will be saved so that you can go back in and audition new fabrics anytime using the same methods. Be warned, though--the file size can get quite big if you only add and never delete layers. You can make additional copies of the file in PXD format if you'd like to save lots of fabrics without creating excessively large file sizes.

Well, I'm tuckered out! I hope that all makes some sense, and that you will find something of use in this technique. As I've said, I find it invaluable. It's a bit fidget-y to figure out at first, and there are always different considerations based on your source files, but still, very helpful in the end.

Let me know if you do something like this! I'd love to hear.

Friday, January 24, 2014

At Last, My Simplicity 3833 Has Come Along

A few things changed in my thinking since the last time we spoke about Simplicity 3833.

I was agonizing about whether I should use a highly prized piece of lime green wool doubleknit for this dress, or whether I ought to save it for a more practical tunic top or cardigan (um, yes, the latter). But I didn't want to put this pattern away, after having taken the time to test it, without making a wearable dress or top (the muslin still reeks of petrochemicals, so I think it was indeed just a muslin, destined for Goodwill or the garbage).

Inspiration struck: what if I combined a leather bodice (an of-the-moment trend) with a wonderful vintage wool boucle tweed that came to me by way of a yard sale a few years ago (a use of stash)? Even though this idea simultaneously broke a few sewing semi-resolutions (wearing gray, making dry-clean-only garments, making pieces that don't really fit my work-at-home, swing dancing mom lifestyle), I was seized by it and forged ahead.


The lambskin for the bodice was another stash item, purchased from FabricMart two or three years ago for $20. I used slightly less than half that skin, and half of another, much smaller and lighter weight, lambskin for the piping. In total I would guess it was about $15 worth of leather, plus $6 worth of wool boucle. I lined the dress in a teal blue acetate from FabricMart, which I stocked up on for $2/yard, so certainly the lining cost no more than $4. Total cost for a wool and leather dress, including the invisible zipper, thread and button, was under $30.


As I worked (and worked) on the dress, I was haunted by the worry that this would be a successful but never worn garment. I was happy to be using materials I have hoarded for some time, happy to be incorporating leather into a garment and happy to be using Simplicity 3833, but anxious about wasting precious sewing time.

The neckline, sleeve hems and hem band are trimmed with very tiny piping made from a thin, lightweight lambskin

And do you know what? A beloved, but elderly, aunt died last week, and I otherwise had nothing appropriate to wear for her funeral, which will be held tomorrow. She was a beautiful woman, the wife of a doctor and a fabulous dresser. Through the eighties and nineties, she wore designer ultrasuede suits, St. John knits and all sorts of other wonderful things. It wouldn't feel right to wear some sad old black career jacket and skirt to her funeral. But I have this! So the making of it turned out to be worthwhile after all.


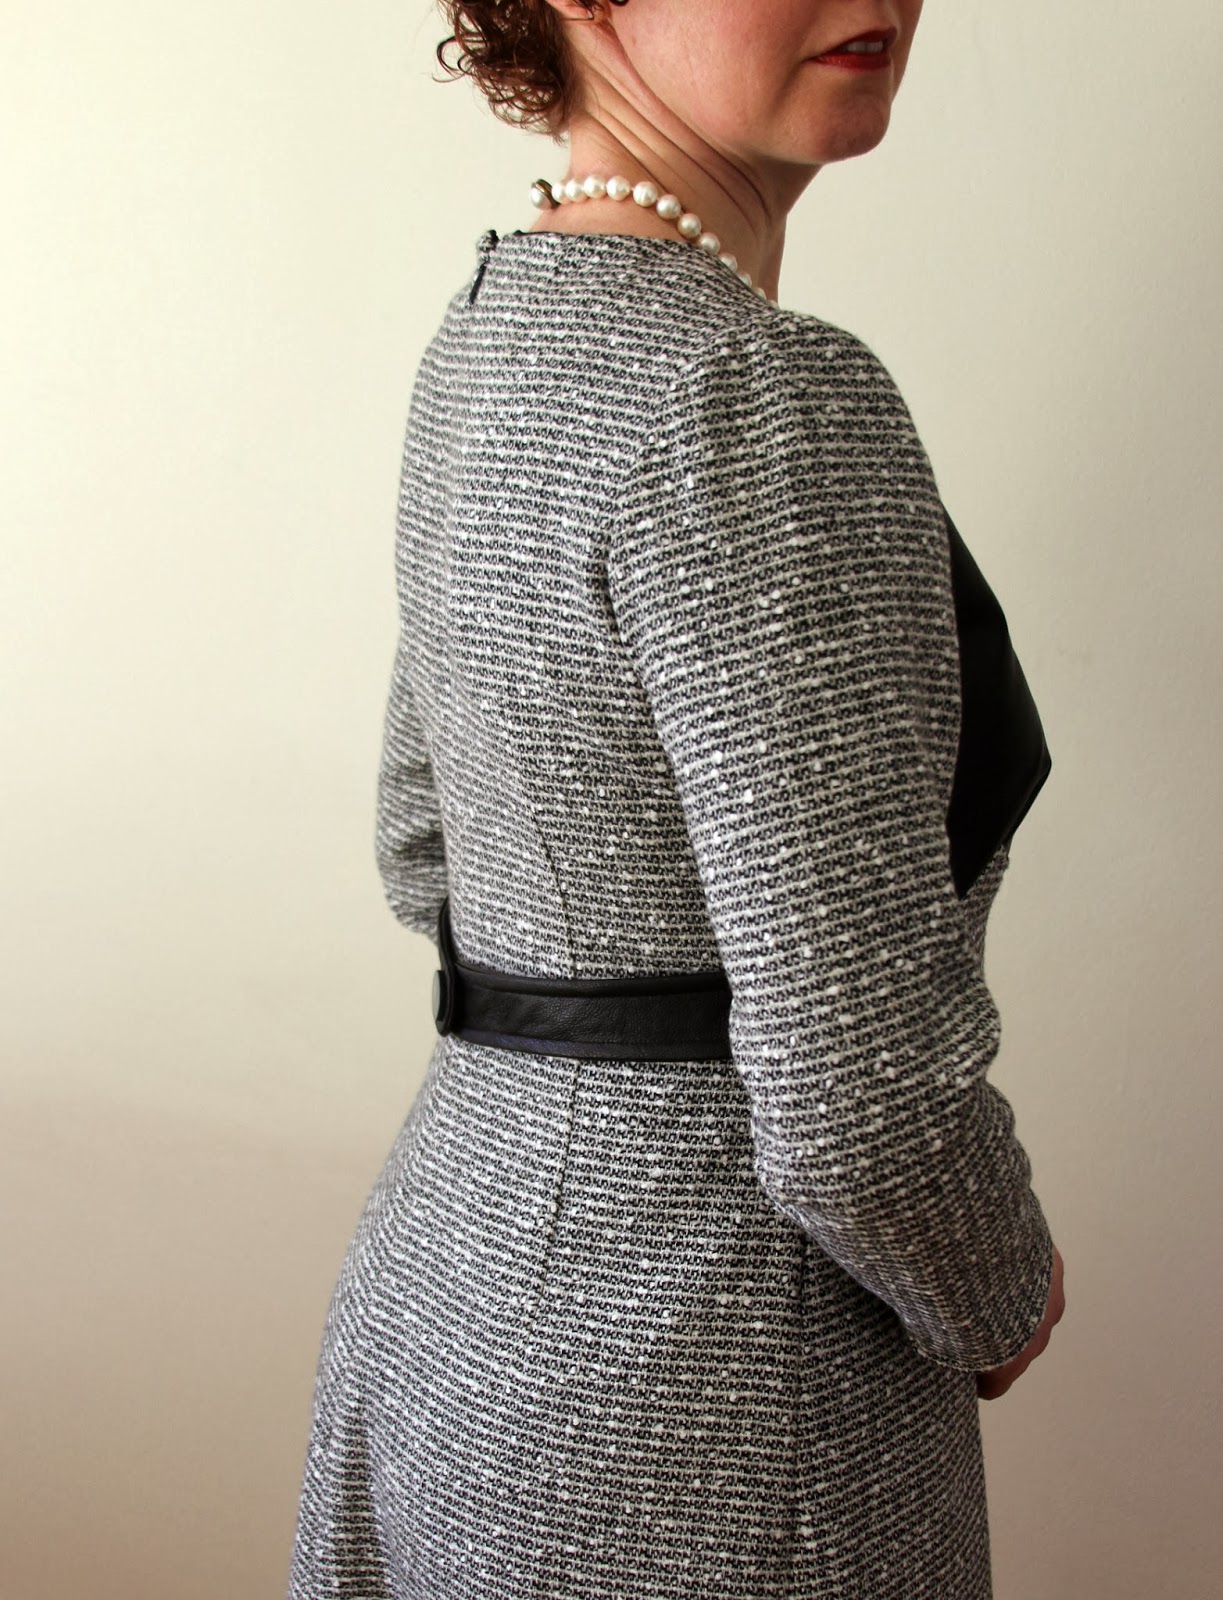
This time around I made a 1" swayback alteration which helped the fit in the back greatly. I'm holding my hands up so you can see that I attached the back belt higher than specified in the pattern. The pattern would have you align the top of the belt with the bottom of the bodice, but that looked too jagged to me.


The top of the center back seam needs a hook and eye, but who knows if I will get around to installing one before tomorrow? I'm happy with the belt closure. Making a buttonhole in this leather did not work out at all, so I used one of my SnapSource snaps for the functional closure. Then I removed the shank from a gray pearlized plastic button with a pair of wirecutters, and hot-glued the flat button over the snap. It seems pretty secure and it lays nice and flat.


The belt does so much to add detail and interest to the back of the dress.


Here is an in-progress photo of the bodice, showing how I cut a shaped piece of lightweight fusible knit interfacing and applied it to the neckline to prevent stretching. (I also staystitched the neckline.)


I would love to have cut the sleeves from the leather, but I didn't have anything like enough. Also, the length of the dress turned out much too short, which is why I added the hem band. Although I like it fine, I wish I had cut the dress longer to begin with.


Glad I made it, glad I have it to wear tomorrow and very glad to be done with it and moving on to something else!

Sunday, January 12, 2014

Muslin Complete: Simplicity 3833

Hearing that my muslin-in-progress photos were helpful for a couple of folks who are thinking of trying this dress was so gratifying! And, as you will see, Lauren of Rosie Wednesday's comment that I might want to consider a swayback adjustment was certainly right on the money.


Really, I hate this fabric. It is has a quality of stiffness, despite being a knit and not actually feeling stiff. See how the hem folds into little pointy...peaks? But whatever. It has served its purpose.

I cut a bunch off of the hem since showing you the first pictures of this muslin (maybe 4" or something like that). Finding the best length for these kinds of tops is tricky, just as everything having to do with proportion is tricky, but I'm happy with the length this ended up (26" from the base of the back neck). The dress-over-pants look is fine by me, but since I have so many dresses, I decided that this should be clearly and only a top.


In unpicking the center back and side seams to give myself a bit more room through the waist and hip, I managed to make a hole in the seamline of the center back. Thus, I had to sew that seam back just a tiny bit snugger than it started out. But the sides seams, thankfully, came apart without incident and I was able to let them out about 1/4", giving me a total of 1" extra ease. That little bit makes all the difference in feeling comfortable.

The back is a mess and I rather hate to show it. But...yes, clearly I need a swayback adjustment and I won't be skipping it again, even at the muslin stage!


All those draglines from the shoulder blade to the underarm also seem to be suggesting a sloping shoulder adjustment. I did deepen the shoulder seam by 1/4", but apparently something more is needed. I'm still thinking on this one. It's a common issue for me. Sometimes I need to increase the shaping at the upper back (rounded back alteration, shudder).


Instead of a neck facing, since I knew I could pull this over my head and didn't need a zipper opening, I used a binding to finish the neck edge. I have learned that double knits need a longer binding strip than stretchier jersey knits. For jersey knits, I usually use a strip that, once seamed at the center back, is 20% shorter than the neck opening at the seamline. But for double knits, 10% to 15% shorter is what is needed: if the binding is too short, the neckline will pucker.

All this care and thought is going into the muslin for this garment because my prospective "real" fabric is so lovely: a lime-ish green wool doubleknit. Now I'm seized with indecision: should the "good" fabric become this dress or should it become a long cardigan? On the one hand, a cardigan would see more daily use, but then it would need careful cleaning to avoid shrinkage. A dress would be lovely, but I have lots of them. I just don't know!