Monday, November 23, 2009

One-Yard Wonder T-Shirt Tutorial

Last winter, I made a bunch of t-shirts with 3/4 length sleeves. That length seemed to be in style, and I was loving that I could make them out of just one yard of 60" wide fabric. But do you know what? I am cold, cold, cold natured these days, and I need a whole sleeve, darn it!

Even so, I persist in buying just one yard of fabric. It's easy to get a smaller sized front and back out of a yard, but obviously two 22" sleeve length from shoulder to hem can't be cut from a 36" long piece of fabric (I'm short, but I do have two arms!).

But there is a way to get that yard to yield long sleeves, and the way is called cuffs. Cutting this out is a bit improvisational for each piece of fabric, but I've tried to give you an overview of how I have gone about it. Prewashed fabric may shrink, your cut may have been off grain and you had to straighten it, your arms may be longer than mine: I can't guarantee that you can get a true long-sleeved shirt out of one yard. But now that I've done it four times, I have to say I think you have a good chance.

First, here is a sketch of the general approach:

After cutting the front and back, I fold the remaining fabric in half from top to bottom and mark the center of the fold. One sleeve can be cut above the mark, one below. Measure the distance from the top of the fabric to the mark. Knock of a half inch or so just to give yourself a tiny bit of wiggle room. Measure from the top of the sleeve pattern to that measurement and make a mark. That is your cutting line for the sleeve. You can fold that bit back so as not to cut your pattern. Then cut two sleeves. I try to stagger them in order to leave a larger scrap to one side for cuffs. Don't forget to turn the pattern over for the second sleeve!

Look how close I had to cut it to get my two sleeves:

Now you will make your cuff pattern. Lay your sleeve pattern flat and place a piece of tracing paper on top of it. Trace the part of the sleeve you omitted, but fold up the hem allowance. Add two seam allowances at the top (1/2" to 1", depending on what you like). I say add two because you didn't add one to the upper sleeve section.

Then make a duplicate of this piece and put the two together in an hourglass shape, like this:

Now, wherever you can fit the whole length of the neckband on the crosswise grain (from selvedge to selvedge), go ahead and cut that strip.

Assemble the t-shirt in your normal fashion. After applying the sleeves and stitching the side seams, you will be ready to attach the cuffs. Here is a view of the cuff seam folded right sides together, and then beside it the cuff folded in half.

Attach the raw edges of the folded cuff to the end of the sleeve, fold it down, and your sleeve is full length...and hemmed!

With this busy print, the finished cuffs are hardly noticeable.


But in a stripe, there are lots of options for playing up the cuffs as a design feature. Notice that the sleeves are cut with the stripes on the bias. I couldn't get even two shortened sleeves from one yard with the stripes running horizontally because I couldn't work out the repeats properly. Now that it's done, I am so much happier with all the crazy stripe directions than with a standard stripe layout.


Thursday, November 19, 2009

Necchi Mirella

A few months back, I spotted a Necchi Mirella on eBay. As is so often the case, the photos were few, dark and fuzzy. It was difficult to know what I was bidding on, but I was eager to see one of these machines up close. The very unusual thing about the Mirella is that it is designed for both motorized and hand crank operation. Switching between the two is simple and requires nothing more than loosening the motor clutch, pushing in a button and attaching the crank.

In no particular order, here are some things I've learned about the Mirella:
  • Straight stitch only, with reverse
  • Rotary hook
  • Mirella-specific bobbins required; no longer made and very scarce
  • Low shank, but Singer attachments don't seem to work well
  • Motor is difficult to access
  • The body is made of aluminum, so the machine is extremely light and easy to carry
  • The free arm is accessed by unscrewing a knob underneath the machine and removing the extension. A separate cover is provided to protect the bobbin area.

Accessing the gear area on a Mirella, or on one of its sisters (such as the Lydia or the Silvia), requires loosening a set screw in the knob located in the middle of the handwheel. Then the knob can theoretically be unscrewed by holding the handwheel steady with one hand and loosening the knob with the other. In actuality, this proved very difficult. I eventually got the knob free by removing the set screw, oiling with Tri-Flow through the set screw hole, cushioning the knob with a rubber jar gripper pad, grabbing the pad with pliers and applying force. It took some effort!

With the end plate removed, you can see the very simple inner workings of the machine. If this were a Lydia or a Silvia, you would see the nylon camstack between the top and bottom gears. This camstack is very often cracked and is no longer made. It is my understanding that repairs are all but impossible. If the crack is small, the machine can often operate and perform some of the stitches but not the ones controlled by the cracked area.


Thursday, October 22, 2009

Ta Da--A Treadle


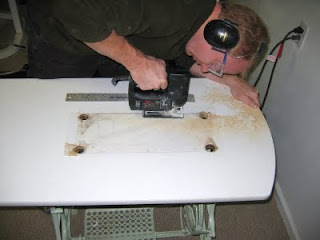
Thanks to the Craigslist generosity of David, of North Street, Asheville, and the carpentry skills of my husband, Eric, I can treadle!

But, um, I need a lot more practice to get good at it.

This, as much as anything, I love about the project: it was free save for the three cans of spray paint required to coat the rusty base. We were able to repurpose the center section of a now-unused drop leaf kitchen table for the top. All tools were on hand, even the fancy-schmancy Forstner bits necessary to cut the round holes for the hinges. By the way, Necchi-lovers, the White hinges matching the treadle base fit perfectly into my BU, with no alteration (such as is needed with Singer hinges).

Thank you, Eric and David.

Friday, October 16, 2009

Variations on a Theme


Simplicity 2614 again. Now that I've tried out a new sleeve, a new sleeve cuff (both lifted from the Everywoman's Favorite Cardigan from the 2/2009 edition of Ottobre Woman magazine), a center back seam and covered buttons, maybe I'll be able to try out a new dress pattern. Goodness knows plenty of them are calling from my pattern stash!

This version is Sophia knit (polyester, rayon and spandex) in teal. Currently available, along with any number of other items that just keep arriving on my doorstep, from fabric.com.


Friday, October 2, 2009

It Has Happened to Me


A free haul of vintage sewing treasures...or trash. Hard to say which! The listing for two free machines and a treadle base showed up this morning on our local Craigslist. I called the moment I saw the ad, only to find that I was fifth down the list, and that someone else was on the way to pick up the machines.

I expressed my appreciation for the owner's generosity in offering the machines and went on with my day. Thirty minutes later he called back and said the first person had taken a look and passed on the machines. He happened to have my number handiest in his cellphone and called me back first! I threw on my clothes and hustled Finn into the car.


I can't lie: the machines as found in the basement were in daunting condition and covered with rust and cobwebs. I don't know how functional the machines will be or whether I will want to restore them. But they are so beautiful! I can't wait to clean up the painted surfaces to see those gorgeous designs.


Even better, the treadle turns like a dream, despite her rust and grime. I think she's lovely, and I know she will clean up and function well.

Thursday, September 24, 2009

Not a Dress

But rather half of a World War II paratrooper outfit. Strict historical accuracy not demanded. Ability to withstand frequent laundering essential.

Trying to purchase a dark colored, long-sleeved, woven twill shirt in a boy's size is amazingly difficult. Seems so basic, but apparently not the variety of basic that retailers think we want this year. My young trooper was quite specific in his requests, and he seems happy with the result.

Except that now he wants the matching pants...on the double.


Tuesday, September 22, 2009

Director of Buttonhole Operations


"A Sewing Life is pleased to announce the promotion of Singer 128, originally of Elizabeth, New Jersey, from Mysterious Vintage Attachments Specialist to Chief Buttonholer. Mr. 128 has overcome a number of challenges in his rapid ascent with the operation, including musty smells, tension shortcomings and chronic snarling in the bobbin region. His triumph today over Bernina 160 and Necchi BU is made all the more impressive by his recent conversion to hand crank operation."

Many bloggers have posted helpful tutorials and videos on vintage buttonholers, but the one who posted the very morning of my successful first run was Brian. Thanks for the information and inspiration! One of Brian's insights was that using the provided feed dog cover can make for tight quarters underneath the buttonholer, and I found that to be very true. In the case of this wool jersey (Vera Wang, from fabric.com), the attachment had no trouble moving the fabric around, but it was a bit nerve-wracking getting everything lined up without distorting the knit. Since Mr. Singer lacks a control to drop the feed dogs, using the cover was mandatory, but happily, everything worked out well in the end. For two of the buttonholes I used some water soluble stabilizer to smooth things along, but it simply added another layer to wrangle and didn't seem to improve the result.


Brian also showed using a center needle position buttonholer with a left needle position machine (in his case, a Kenmore). I bought a Kenmore-branded Greist high shank buttonholer that refuses to attach to my Necchi BU (the shape of the needlebar seems incompatible with the groove in the buttonholer?). Inspired by Brian, I decided to test the Kenmore buttonholer with another recent machine acquisition, a left needle position Japanese machine from the 1960s. All went well until we reached the top left edge of the buttonhole, when the needle hit the rim of the buttonhole opening (the rectangular area where the buttonhole is created) and broke. Too bad! Nothing ventured, nothing gained. The real investment in these vintage machines is not the purchase price (small), but the time in researching and testing the various combinations and settings.

Pending better light for modelled photographs (rain, rain, rain here in Western North Carolina for the last four days), here is a preview of the finished cardigan, from the 5-2009 issue of Ottobre Woman.