Sunday, June 30, 2013

Spot of Bother: Simplicity 2174 Dress

My mother recently gave me this hat.  Sadly, I doubt I will have too many occasions to wear the dress and the hat together. That's what blogs are for, I guess--showing off one's hats!

Oh, I did wrestle with this one. Though I'm dissatisfied with it on several points (and foolishly inclined to make the pattern up again just to prove I can overcome the challenges), at least it is finished and wearable.

The fabric choice, a thin cotton lawn from Maggy London via FabricMart, was my first mistake. Originally purchased with the idea of using it for a blouse, I knew that this limp piece of goods lacked drape and substance. But I had two whole yards of it and I liked the dots, so I fooled myself into thinking it would be fine as a dress. I considered adding a lining, but decided to wear it with a full slip instead. That turned out to be a good choice, because I would never have persisted in trying to alter it if there had been a lining to deal with. Underlining, however, might have made a positive difference.

I may have cut one of the front skirt panels slightly off-grain, because it won't hang well no matter what I do. "Hang" is a bit of a misnomer, really, since the fabric is so light. "Float" is probably more accurate. It floats crookedly.


The major difficulties lay in the fit of the bodice. I mistakenly thought that cutting a size 6 in the upper chest and back would be narrow enough to avoid gaping. Not so. It was necessary to remove the center back zipper (and facing) to take out 1/2" of width per side, curving to rejoin the seamline five or six inches further down the back.

"Styled", if we can call it that, with red beads in place of the pearls 
In the front, it simply wasn't obvious until the dress was constructed (the first time), that the center front section would stick out an inch away from the body, especially when reaching forward. Taking in the armhole princess seams removed sufficient width (1/2" per seam, 1" per side, 2" total) to make the center front lie flat, but it seriously distorted the armscye seam. Since I was in the dark about how to alter the sleeve that came with the pattern to fit the reduced armhole (and I didn't want the dress to be sleeveless), I used a little half-sleeve from another pattern. Since this type of cap sleeve is only stitched to the top part of the armscye, it is fungible in how it fits into the opening.

After applying the sleeve, bias tape was used to finish the entire circumference of the armhole. Unfortunately the whole business feels a little uncomfortable. I can move my arms just fine, but it rubs a bit under there. This is often a problem for me: providing enough room for comfort while covering the bra and avoiding gaping.


In for a penny, in for a pound, I finished it up with a self-made belt, using the last of my belting and buckles to cover in the process. Must restock!


After sweating it out trying to make this simple dress fit, I am conflicted about the pattern. No, I'm conflicted about how suitable the pattern is for me. Nothing wrong with the pattern at all; it's very nice. Just out of foolish persistence, I'd like to see if I can work through the bodice fitting issues to achieve a non-gaping and comfortable fit with this style. On the other hand, perhaps the sweetheart neckline is not the best choice for a person with a narrow chest and a full bust. Not to mention that it might be a little too "sweet" (though when that's ever stopped me before, I'm sure I don't know).

Simplicity 1882, which I've made before, may be a better choice for a comfortable summer dress with a vintage flavor. The curving v-neck and collar are flattering without presenting such difficulties of fit.


Do you ever find yourself struggling to "let go" of an idea, even when you know it's probably a waste of time and material? This dress threw down the gauntlet, and it's hard to just let it lie there and move on to the next thing, though I really think that's what I ought to do.


Friday, June 28, 2013

Yet Another Wrap Dress: New Look 6097 Again

Apparently, someone didn't get the memo that wrap dresses and border prints have had their moment, and it has passed.


In my defense, though, this fabric was very inexpensive from FabricMart (it's a polyester ITY knit), and it has lots of good colors in it. I particularly like the touches of coral.

As to the pattern, I needed something with a straight-ish skirt to make use of the border around the bottom. So, again with the New Look 6097.


Sleeve and hem edges were left raw.


To use a bit of border for the neck binding, I had to cut on the straight grain rather than the crosswise grain. Since the straight grain has a lot less stretch, the neck binding feels a little tight and it draws in the neckline just a bit too much. I also should have trimmed 5/8" or so from the neck edges prior to adding the binding to accommodate the binding's width (since the pattern is designed for a folded-over facing). I knew that, but yet I didn't do it. Why? Not sure--maybe I was worried that it would end up showing too much bosom if I trimmed it (which makes no sense, but it's a potent fear). Even though it could be "perfecter", I do like that brighter bit of the fabric up around the face, and there's certainly no danger of showing any cleavage.

Thursday, June 27, 2013

Tip: Sewing Machine As An Extra Hand

The other day I was contemplating the (frequent) need to rip out a sewn seam, and I was thinking gratefully of my friend Gretchen and the trick she showed me. Actually, she didn't so much show me, as she simply did this amazing thing.

When ripping out a seam, you know how you often wish you had a third hand? One hand to hold one side of the seam allowance, one to hold the other (with gentle tension to separate the two layers) and one hand to hold the seam ripper. And it is true that there are gadgets made to provide this extra grip: I even own one, a metal "bird" with several clamps to hold the fabric. That tool is usually buried in the drawer and, though heavy, it slides around unless anchored to a table top.

What Gretchen did was to sit at the sewing machine and place one seam allowance under the lowered presser foot. The foot becomes your third hand! And the sewing machine is right there, heavy as can be and even providing its own lighting.


I'm down a hand in this view, since I needed my right one to snap the picture. The right hand would normally hold the seam ripper...or the razor blade.

Do you know about the razor blade? That's a great tip, too. Sometimes a seam ripper is still best, but much of the time I use a naked blade to make quick work of seams that must be opened.

So as I thought gratefully of Gretchen's helpful example, it occurred to me that you, like me, might never have seen or thought of this trick either.

Now you have!


Saturday, June 22, 2013

More Leopard: Simplicity 1666 Lisette Peplum Top


It's no coincidence at all that this project uses a leopard print, just like the leopard leggings of a few days ago. When I was searching for leopard print knit at Fabric.com, I was entranced with this Kaufman leopard print knit, even though it seemed perhaps too substantial for the leggings I had in mind.


I popped a yard into my shopping cart (to contribute toward the free shipping, you know), and I was very pleased with what I received. Nice and cottony, with plenty of stretch. It's substantial enough that I'm tempted to get another yard for a straight skirt to wear as a two-piece dress with the top.


Because the pattern is designed for wovens, and because this knit has a lot of stretch, I had to take things in a goodly bit after basting the seams together (I removed about 5" of total circumference at the front and back princess seams).  I lowered the neckline 1 1/2" at the center front and trimmed off 1/2" all the way around to allow for the binding (since the original pattern uses a facing). Then I measured the neck seamline and cut a binding strip 80% of that length, which is a formula that generally works out pretty well for me.


I shortened the top an inch in the front for a very slightly curved hem.


The center back piece was cut on the fold rather than with a seam.

Even with pinning out the fitting changes and deepening the seamlines, this was still a quick and easy top to make. I have expected this pattern to take off among bloggers and have been surprised that it hasn't yet. Here is a wonderful version from new-to-me blogger Terri K of Sew Terri. I'm excited to have found her!

Tuesday, June 18, 2013

McCall's 6360: Leopard Leggings


Quick and simple, but somehow critical to my survival: leopard print leggings! I got the idea from the fabulously eclectic The Secondhand Years, who put together an awesome outfit (dang, I envy her inventiveness AND her height):


The pattern, McCall's 6360, is so simple it could make you cry. Cry that you thought you needed a pattern for these, that is. But it is well designed and drafted, and I wouldn't have had the idea to add a little ruching on the side (made by stitching a piece of short elastic to the seam allowance at the lower leg) without the suggestion from McCall's.


Other than getting the size wrong (I went for the 12 and had to sew the seams larger to overcome some bagginess), the only creative contribution I made to these leggings was using a band for the hem rather than turning up a hem. A little in-process trying on and fiddling made me think that a turned up hem would be inclined to flip to the wrong side if used in conjunction with the gathering at the side seam. The band stays in place very well.

The fabric is a poly-spandex blend from Fabric.com. It has the look I was after, but it remains to be seen if I'll find these too hot for summer wear.

This picture is purely for informational purposes. Rest assured I will never, ever try to wear these as pants.

I think they are kind of cute with denim too.

Although I have another legging pattern or two, I do like this one for its straightforward shape. It seems to me that leggings are something that it can pay to make yourself (especially since RTW versions in cute fabrics can cost upwards of $25). You can get nearly any color or print, fit them the way you like and whip them up in an hour or less.

Saturday, June 15, 2013

New Look 6097 Wrap Dress with Full Skirt

Here we have a middle-of-the-road outcome: I like it, I'll wear it plenty but I'm not delighted with it.


I thought it might be good to revisit New Look 6097, and make some of the fitting changes from the first go-round to the pattern tissue. I reduced the side seams to the size 10 and shortened the bodice 1 1/4" (thereby eliminating the fourth of four pleats on the right front bodice piece).  I took a tuck in the each side of the neckline to reduce its length by 1/2", and I shortened the binding piece considerably. The collar width was reduced by 3/4". For a change from the first version, I used a fuller skirt from another knit wrap dress, Butterick 4788, now out of print.

After making those changes to the pattern, I thought I'd be good to sew and go, but it didn't work out that way. The bodice was still 5/8" too long and the sides still required a lot of taking in at various points, including at the underarm area and the lower edge of the sleeve. If I make this bodice again, I think I will reduce the length above the bust by at least 1/2".

That extra fabric below the pleats and above the waist is making me crazy. Might have to do something about that.

Lesson, learned over and over again: patterns that start at size 10 are too big for me in the chest, and it is a lot of work to adjust them.

On the positive side, the collar and binding method used in this pattern give a very nice result. The binding is folded in half, right sides together, and the raw edge is sewn to the right side of the neck line. Then the binding is turned completely to the inside and topstitched in place. Maybe this is what is called a French binding. I think so.

Another positive: I'm pleased with the back.


So there we have it: a black knit dress, very comfortable, can be worn many ways. Yawn.


Wednesday, June 12, 2013

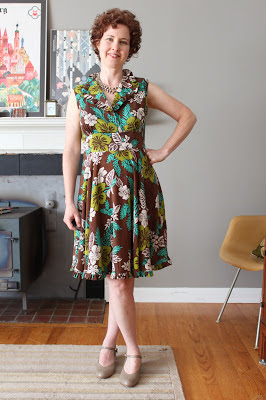
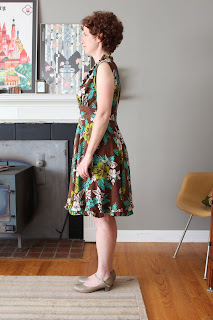
McCall's 6503: A Sweet Summer Dress


McCall's 6503 eluded me for many months--possibly years--as I searched faithfully for it in the pattern cabinets of Hancock's and JoAnn Fabrics during every pattern sale. I would spy the cover art and think, "Finally, you will be mine!" to discover that the only copies were the wrong size. It's a sign of how much I wanted the pattern that I finally broke down and ordered it for the princely sum of $7 from an eBay seller.


For my first try, I chose a drapey Maggy London rayon challis, purchased on sale from FabricMart. One of the many, many lovely versions of McCall's 6503 online is Gertie's, also in a Hawaiian-ish print.


Without Gertie's example, I'm sure I would have skipped the ruffled trim around the turnback lapels. Luckily, she made me see that the extra texture is an unexpected and happy addition to a busy print.


Another blogger (and I'm sorry I can't recall who) mentioned that she was able to omit the side zipper and pull the dress over her head. I wanted some of that action! Fitting the dress loosely through the waist is necessary for this to work. I used the size 6 at the upper chest and shoulders--thank you, thank you, McCall's, for going down to a 6 in this style--and then graded up to a 12 by mid-waist. The other alteration was shortening the bodice by 1 1/4" at the petite adjustment line printed on the pattern. Putting the dress on is pretty easy, even without the zipper. Taking it off requires a bit more wriggling, but it's very doable. 


Even without a center back seam or a rounded back alteration, the back of the bodice seems to fit very nicely, with no gaping at the back neck or at the armhole. Too bad the hem isn't really level at center back, but I'm letting that go. I tried to level the hem by marking it with the dress hung over a lampshade (after hanging it for 24 hours to stretch out the bias bits), but the lampshade doesn't necessarily have a booty like I do.


My slightly obsessive desire to not waste fabric has taken on a new twist lately: now I want to use it all up on the garment at hand. This determination has grown out of an awareness that oddly-shaped scraps of brown print rayon will not be of great utility either now or at some point in the future. I had three yards of 54" wide fabric, and the dress only required about two yards as designed. I gave myself permission to be lavish with the skirt, substituting a 3/4 circle for the gathered and pleated options provided with the pattern. 


With the final half yard of fabric, I made ruffled trim for the whole 150" hem! That required nearly 10 yards of unruffled strips (cut on the straight grain, 2 1/2" wide), folded in half and run through the ruffler attachment. The added weight of the ruffles gives the already swingy skirt an almost frightening amount of bouncy momentum.


Don't worry, there are some bloomers under there. Even though a circle skirt is not period-correct for the heyday of Lindy Hop (which would have been more in the 1930s and 1940s), it surely does make for good fun while dancing. Wouldn't a lime green crinoline be cute underneath the skirt? I also want to find a nice chartreuse orchid or hibiscus to wear in my hair with this dress. But last night I stuck with a fifties-era multi-strand bronze "pearl" necklace as an accessory. I was so comfortable and happy in my new dress!