Sunday, December 22, 2013

Double Knit Sheath Dress...With Pockets

The spirit is finally moving me to post this dress, which has been complete for two or three months now. I'm wearing the dress as I write this post, but the photos are from a much brighter day earlier this fall.


I've made Vogue 8699 several times before (and at least once since)--it's a wonderful pattern for a princess seamed, cowl neck top and tunic. And, as you can see, it can easily be lengthened to make a dress.


Even though it's not particularly photogenic, I am crazy about this fabric, a knitted-in digital animal design from FabricMart. I knew from the start that this polyester double knit couldn't possibly be warm on its own, but layered with a silk tank and fleece-lined tights, it makes a great piece for cold or sloppy weather.


Though it's subtle, the design does have horizontal and vertical repeats, so I worked hard to mirror the pattern symmetrically on both sides and to cut the pockets so that the pattern would flow continuously across the upper side panel into the lower side panel. On the back, I centered the largest vertical element and mirrored the pattern on both side panels.


The big change to the pattern is the addition of the pockets. I wanted to do these the "right" way, so I pulled out another pattern with princess-seam pockets (or whatever we should call these), Simplicity 2798.


I must admit that I didn't document my steps exactly, so I can't describe them in detail, but it involved matching up the upper and lower side pieces from the Simplicity pattern with the Vogue pattern to determine where the upper side panel and the lower side panel should start and stop, and how the seamline should be modified to most smoothly incorporate the pocket. Then I used the pocket piece from the Simplicity pattern directly.


This afternoon I went to a party with a friend. Her first question was "Did you make your dress?" and her second was "Can you make me one? I want those pockets!".

Tuesday, December 17, 2013

Burda 6990: Raglan Funnel Neck Top


Thank me for the headless photos: this color palette looks horrible on me! But not on my lovely mother, for whom this top will be a Christmas present. It's funny: the older I get, the more I do resemble her, but for all that we are similar, the details are very different. Although we wear much the same clothing size, she is a bit taller than me, has a longer neck, broader shoulders and generally different proportions. She has delicate coloring (brown hair, hazel eyes, fair skin), but wears brighter colors and higher levels of contrast much better than I.

Burda 6990 is a newer envelope pattern, but I think it must be based on the popular Burda magazine 9-2010-121 funnel neck top pattern that was so popular on the blogs a couple of years back (a quick search turned up this post on Miss Celie's Pants, for example).

My mom does like some softness around her nicely-long neck, but she doesn't like to feel constricted. So I thought this pattern might fit both requirements. I made it to go under a black wool knit tunic (McCall's 6607) which I simply can't bring myself to show on me. It is so unflattering on my shape, but I certainly hope it works well on hers!


Anyway, Burda 6990: I think this pattern is really nice. See how it doesn't have excess fabric under the arms, despite the raglan construction? Nice.

I made a combination of size 10 through the bust, tapering to 12 through the lower torso and hem. I removed 1/2" of length at the upper length adjustment line, which runs mid-chest (5'2" me really needs this, but I think it will also be appropriate for my 5'4" mom), and shortened the very long sleeves by 3".

The fabric is a poly ITY knit from FabricMart.

That's about all there is to say about this top, but since the pattern hasn't been widely reviewed in its envelope incarnation, I thought I'd mention that I had a good experience with it.


Wednesday, December 11, 2013

Blouse with Embellished Collar: Because Separates


There's a downside to everything, even such a nice thing as loving to wear and make dresses. It's hard to make separates, even when I know I need, want and will wear them. Making a blouse like this is exactly as much work as making a dress and at the end of it, only half of my body is covered!

But: pants. In the winter I do like to wear them. Even for dancing. And mixing things up with jeans from time to time helps me feel just a little less matronly. So. I should do this. I should make more separates.


Vogue 1573 had its second outing here, this time as a variation on view B (version 1, the black lace dress, here). See the spread collar with facing? I wanted that. See the shoulder gathers? I didn't want those.


Below is the altered front pattern piece showing four things:
  1. Shortened the bodice 1".
  2. Based on my previous making of this pattern, added a smallish FBA to increase the length at the center front only (not at the side, where I had removed it) and also width.
  3. Narrowed the front shoulder 1 1/4" to remove gathers. I determined this amount by comparing the unaltered front shoulder width to the back (which did not have gathers); the difference was the amount to remove.
  4. Narrowed the front shoulder an additional 5/8" based on previous make of this pattern.


 My point here (yes, there is one) is to say that I was nervous about reducing the shoulder width so much (1 7/8" on the front). The back shoulder width was narrowed to match. Wonder of wonders, it all worked out. I feel very empowered to know that I can make both fitting and style adjustments with success.


This rayon challis from FabricMart appealed to me for the combination of a color that works well for me (rust) with one that doesn't (black). I thought that the two together, plus the geometric design, would be useful for pairing with black separates. But then as I was envisioning this top, it seemed rather dark and gloomy. I admire vintage blouses and dresses with white collars, which play such a good trick of directing the eye to the wearer's face.


The plain white collar, though, was too stark against the fashion fabric. It put me a bit in mind of a bowling shirt or a waitress uniform. I started playing around with this vintage black cotton trim and loved the way it related the collar to the rest of the garment and especially the buttons.

And then I decided it needed rhinestones, which I have never, never used or even considered using before. Off to Hancock's, which didn't have what I wanted, and then to A.C. Moore, which did.


Since neither store I visited had a heat set tool that looked sturdy, I simply applied these stones with adhesive. If they come loose during washing, I'll just glue them back on. I have lots more. A heat set tool might be in my future, though--let me know if you have any suggestions!


Paired with a beloved Ann Taylor black rayon cardigan. Yes, I did make a matching skirt, but I don't like either the skirt or any of the pictures of the two pieces together. After the holidays, I hope to make the skirt work better (mostly, it's just too big).

This dress pattern, made as a blouse, combines two things that I need in a top: a collar and a defined waist. I'd like to think I will make a bunch more, but it isn't a quickie garment. We'll see.

Thursday, December 5, 2013

Vogue 1573 DKNY Dress in Black Lace


Looking back in time, I believe I remember buying this pattern, probably about 1998, from a bin of discounted Vogues at Winmill Fabrics at the edge of Boston's Chinatown. I have never been anything less than in love with it since, but it intimidated me with its "Advanced" rating.


And now, at least 15 years after this pattern went out of print, I am kind of scratching my head over that difficulty rating, because Vogue 1573, at least version A, turned out to be quite straightforward to fit and sew.


Because view A is designed for sheer fabrics, it includes instructions for using small pieces of silk organza to interface the front placket and the side zipper. The collar is simply a folded piece of the self fabric (with no interfacing). The pattern instructs the sewer to create narrow seams (I first sewed each seam and then serged it with a three-thread overlock), and to finish the lower hem with 1/2" scalloped lace. The sleeve was to be finished with a turned up hem, but I didn't like how that looked, so I used the same lace there. If you can believe it, I bought three yards of lace (rather than the 2 3/8 yards specified in the pattern) and ended up with the right amount to the 1/2". Seriously. An inch less and it wouldn't have been enough.

This particular nylon lace came to me, as so many fabrics do, as the result of a great FabricMart sale. I ordered 2 1/2 yards for around $15. The lace trim was $3 a yard, for a total of $9, while the buttons were $1.25 from a 50% off sale at Hancock's. And of course a black invisible zipper for about $1.50. Not counting the black thread and small amount of silk organza which I had on hand (or the cost of the pattern, which I have long since depreciated!), the total cost of the garment was well under $30. I'm not hung up on low or high cost, but I think the resulting dress really does look expensive!


Although I made adjustments, the dress didn't pull any punches in terms of fit. I made my usual changes and I think they worked out pretty much perfectly. I used the size 8 at the neck and shoulders, through the armhole notches. At that point I transitioned to size 10, and then to size 12 by the bottom of the bodice pieces. I shortened the bodice by 1" at the printed lengthen/shorten line, and then shortened the waistband pieces by 1/2". From the waist through the hem I used the size 12 pieces. The shoulders were narrowed by a good bit, probably 1/2" to 5/8" when all was said and done (against my better judgement, I waited to do this until after basting the sleeves in place to check for fit; that was the safest approach, but it did take me more time). I ended up shortening the sleeves about 1".

The skirt section I did not shorten at all. It finishes out two to three inches below my knee, which I would usually find too long and dowdy. But with the openness and lightness of the lace, that length seemed rather elegant and more appropriate to the 1940s style than my usual at-the-knee length.


At the side zipper (very necessary to pulling this non-stretch lace dress on), I chose to keep the full width of the seam allowances all the way down the side seam. I might have been able to reduce them somewhat, but I felt that doing so might make the zipper area more fragile. As it is, I do need to be careful when zipping the dress. The zipper application is fine, but it is still easy to snag the lace and to catch it in the zipper. Other than that, this delicate-looking dress should be quite sturdy and washable. It's completely comfortable.


This pattern makes use of three different grainlines. The bodice, collar and sleeves are cut on the straight of grain, the waistband is cut on the length of grain and the skirt sections are cut on the bias. The pattern photo shows a striped lace, which really highlights these variations of the grain. On my dress it is more subtle, but I think it's a nice touch.


I plan to make or buy another slip to wear with the dress. The one I have on here is a fairly standard-issue beige vintage nylon full slip. It doesn't cover my bra straps in back and it ought to be longer. The pattern includes a slip, but I have other pattern options as well. On someone else, I think a red slip would be rather gorgeous under this dress, but it's too much for my coloring. Black would also be nice, but I believe that I prefer the lightness of the beige. It keeps the black from being too harsh for me. A little black dress that is more flattering than a solid--I like that!

When will this dress get its first outing? I'm not sure yet. I will have a swing dancing holiday party, my husband's office party and then lots of dressy evenings at Lindy Focus, a week-long swing dance camp happening the week after Christmas. I can't wait!

Oh, and by the way--I'm already working on the next version of this pattern, this time a blouse length version. I'll look forward to showing it soon.

Tuesday, November 12, 2013

Finally Wearing the Family Jewels


Jenny and Ethel: the great-great aunts who shaped and absolutely ruled my mother's family. To do justice to their stories will be another post, but for now I'll say that this amber necklace was bequeathed most particularly to me by Aunt Ethel, on account of how well it suited my coloring, in her expert opinion. Aunt Ethel was a dressmaker, a chicken farmer, a flower gardener, a tyrant. She was a handsome and stately woman who kept her long straight hair colored honey-blond and idiosyncratically arranged in Heidi braids coiled on top of her head far into her eighties.

This necklace came to her by way of her youngest niece, my Aunt Polly (now herself in her eighties), a souvenir of Polly's unusual visit to the Soviet Union in the early 1980s. The amber is a spectacular color, and has always been much admired in my family for its beauty and exotic provenance. I knew I was to receive this necklace from my teens, and even then I wondered when and how I could ever possibly wear it.

For I, unlike Aunt Ethel, am neither stately nor handsome. On a good day I am rounded and curly and petite and modestly pretty, but as I progress into middle age it is becoming ever clearer that I will never be queenly in the manner of my formidable great-great aunts. It's not easy for me to stand up to this necklace.

But I think I've finally got a dress that can serve as a foil for the amber! Another variation on the New Look 6700 t-shirt dress theme.


If you too are destined from birth to be flattered by amber tones, FabricMart Fabrics still has some of this poly stretch velvet! If only it were actually warm to wear, this would be a perfect fabric to me. I have big plans for a silk jersey full slip to wear under this and other poly dresses this winter, so I hope to overcome this issue.


For this version of this dress, I was smart enough to use a center back seam. I shortened the skirt a total of nearly two inches at the center back (using a combination of a wedge swayback adjustment and a further reduction at the waistline seam), and the fit in the back is greatly improved from last week's version of this same dress. Last week's dress attempted to use darts to remove the excess fabric at the swayback, but it turns out I needed to reduce the length at that area rather than the width.


Originally I planned a high cowl or relaxed turtleneck finish for this dress, but it just didn't look right. The velvet did not drape nicely, so I removed the cowl and replaced it with a band.


I'm super-duper happy with this dress. I've worn it comfortably all day, through cleaning and cooking and sewing and driving, and now I'm getting ready to take it out dancing tonight! Minus the necklace, though--that would be a real hazard flying around!

Tuesday, November 5, 2013

Knit Dress + Tights = Comfort and Happiness


New goal: reduce the number of items congregating around my waist in winter clothing. On a cold day, a jeans-and-top type of outfit could include pants, long underwear, underwear, undershirt and shirt--and all of these would be stopping somewhere in the region around my middle.

Putting the issue of flattering a middle-aged figure aside for a moment, the process of keeping all these bits and pieces in the right position with relation to one another makes me crazy over the course of a day.

So I am exploring different outfit formulas that minimize the number of things that meet around my middle. Dress + tights (with the addition of scarves and a cardigan for warmth when needed) could be a great formula.

Simple as it is, I am still enjoying New Look 6700, an oldie but goody from the (guessing) late 80s or early 90s.


To eliminate the need for a separate half slip (another thing sitting at the waist!), I lined the skirt portion of the dress with knit tricot. This could work out really well. The tricot is almost weightless, inexpensive and it should eliminate any clinging to my tights or leggings. I must wait to see if static becomes a problem in the dry winter air.


The sleeves and flower are from a former tube dress, found at the Goodwill Outlet (locally known as "the bins"), where everything is sold by the pound. This piece of trash/treasure probably cost about 50 cents (it was one of several items, so I don't know exactly, but a tube dress is not heavy). Of course I should have taken a photo of the piece before cutting it up, but it was this type of dress:


I used the shirred portion of the bodice to make the lower edge of the sleeves. Although it was a little difficult to line up for cutting, it worked out great. I love a tight-fitting lower sleeve; it keeps me warmer and makes layering cardigans much easier.


Not a fan of this view, but I am committed to honest reporting and an honest self-image. I added some darts to the area of the lower back to reduce the excess fabric there.

Even though the colors are not the greatest on me, I know I will be reaching for this dress a lot this fall and winter: something easy to throw on, with less bulk around the middle.

Friday, November 1, 2013

Butterick 5727 Fur Collar


Here's a small project that nonetheless represents a fair amount of time and trouble. Just cleaning up the mess from any faux fur project takes time.

It is rather retro and romantic, for all that.


Even though it would in theory be easy to draw a collar shape and a tie shape, cut them out and sew them together, I used Butterick 5727, a current accessories pattern. The pattern does offer two small refinements: a center back seam, to make sure the nap is the same on both ends of the collar and a separate, slightly smaller undercollar piece to be cut from a lighter-weight fabric.


Even though I had plenty of doubts about the wisdom of their methodology for constructing the ties (finishing each edge with a double-fold narrow hem), I dutifully put it to the test because I didn't have enough of my preferred fabric to cut four tie pieces from. The narrow hemming was a bust; the edges were not perfectly straight and the wrong side of my crepe fabric had a different appearance from the front.

So I went with Plan B, which would have been Plan A if not for the fabric shortage. Cutting four tie sections (from a salvaged skirt lining from a thrifted Pendleton skirt that my mother cut up and hooked into a rug), I sewed each tie right sides together and turned it right side out. This of course worked fine. If I had even more fabric, I would have cut the ties on the bias for a more drape-y bow.


I'm not so sure about this collar with the very subdued color of the top I am wearing today; my red sweater dress might be a more appropriate foil. The face-framing effect is nice, though--I can envision more collars in more colors to add a touch of whimsy to any number of basic dresses.

Wednesday, October 30, 2013

Swinging Amish Halloween Couples Get-up

Congratulations to us! My husband and I won the Halloween costume contest at our local swing dance organization's Halloween dance last night!


My philosophy about Halloween: I don't like it. I resent that the sweet and spooky low-key holiday of my childhood memory has somehow morphed into today's decadent, wasteful and entirely over-sexualized week-long season of adult bad behavior.

So I had to submit to the will of the genius who is my husband when he suggested that we dress as an Amish couple for our local swing dance Halloween party ("Amish people swing dancing would look really funny"). The only thing that was purchased for this costume was the feather duster. No, I did not have one--what do you think I am, an Amish matron?

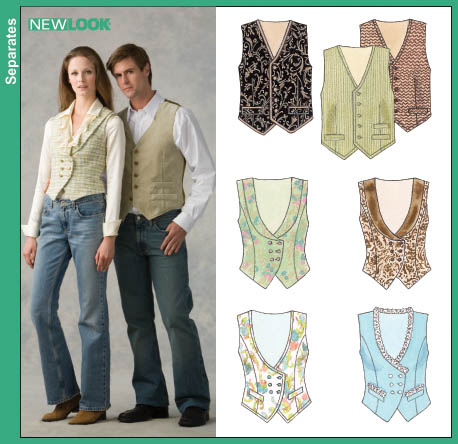
New pieces sewn for the costume include my husband's vest, New Look 6659, my cap and my very simple apron. My black linen dress is Simplicity 2247 (another version in rayon challis) and the blouse is this Burda 7831 blouse, dyed blue for the occasion.

More on the blue-ification of the blouse: although I haven't done very much dyeing of any kind, all of what I have done has been using RIT dye. Several years ago I bought a whole box of Procion dyes at a yard sale (for $4, what a find), but somehow had been too intimidated by the process to use them. Salt! Washing Soda! Multiple settings of a timer! But somehow it seemed contrary to the thrifty spirit of the Amish to buy a new package of dye when I had so much on hand. Guided by instructions from Dharma Trading (link to their method) and Asheville's Earth Guild (link to their method), I used two teaspoons of navy and one teaspoon of aquamarine dye and was so pleased with the color--it was just what I had in mind. This fabric has some synthetic content to it, though I'm not sure how much. Procion dyes are for natural fibers, but there must have been enough natural stuff in there for the color to fix to.


Sewing the prayer covering or cap was the part of the costume that required a little research and figuring. There are many, many styles of head covering used by women in different sects and locations throughout the so-called plain communities. I had this style in mind, but I wasn't sure how it was put together. Since I didn't allow myself enough time to order a pattern, I looked at a lot of pictures and also watched a couple of videos on YouTube.


Fortunately I had some scraps of cotton organza on hand. This is a perfect fabric for the style, since it is crisp and holds its shape even without starching.

I learned that this style of cap is made from a good-sized circle (10" to 12" in diameter) with one edge sliced off. The band portion is sized to reach from the bottom of the wearer's ear on one side to the other. I just pinned the pleats in place and tried the cap on to determine their arrangement.

Now that I've made and worn one, I can see the practical appeal of wearing this style of cap: it certainly covers the hair and simplifies the process of getting oneself neat and presentable.

The straw hat was borrowed from my step-father. I hope he won't mind that I changed the band and steamed and blocked it into a different shape!

I kept asking my husband whether he would prefer to wear suspenders or a vest. And don't you know, he kept answering "A vest"?! Apparently my subtle repeated questioning was too subtle to suggest to him that buying suspenders would be a lot less trouble than making a vest.

But having a pattern cabinet full of out-of-print classic styles doesn't come without its pitfalls, and I had to concede (only to myself--he was blissfully unaware of the interior struggle) that making a vest would be easily possible. I had a wonderful wool-rayon double crepe on hand (previously destined to become a dress), which teamed up with a wrinkly, but cool, cotton voile as the lining. The vest front is fully interfaced with Pam Erny's fusible hair canvas. Since the Amish vests I saw did not have pockets or a back belt, I was happy to leave those details off this garment.


Though it is out of print, this pattern is highly recommendable as a basic lined vest with both men's and women's versions. The sizing was spot on (I made the large, which is listed as sizes 42 and 44). Men are so darned easy to fit!

I hope to eventually have some pictures of us at the dance--I'll post them if I get them. Even though I was the opposite of sexy (I didn't even wear makeup!), this costume was lots of fun to make and wear. We had never dressed up as a couple before, and I must admit that having a husband (or a wife) on one's arm was the perfect accessory for this costume.

Like many in the mainstream culture, I can't help but find the practices and dress of the plain communities fascinating. I worried a bit about whether wearing an Amish costume might be somehow disrespectful of these communities. A bit of online reading on the subject soothed my concerns, though of course I don't know how all Amish people would feel about my costume. Generally the consensus from my reading was that "English" wearing Amish dress is not offensive to the Amish as long as those wearing it are not engaging in profane or otherwise inappropriate behavior. Basically, the Amish are not super-worried about what we do and why we do it, which is consistent with their rejection of superfluous worldly concerns.

I hope the Amish would at least approve of my sewing skills!

Thursday, October 10, 2013

On Trend for 1997: New Look 6149

Mixed lace and knit pullovers are apparently very "on trend" just now. Generally I prefer to stay "off trend" if at all possible--and very successful I am at it, too. In this case, however, I suppose some combination of looking at Pinterest, reading sewing blogs and substitute teaching at the middle school has planted the notion of lacy casual clothes firmly in my mind.

Also popular at the moment are raglan sleeves (a no-no for the narrow of shoulder, but what the heck). Raglan sleeve patterns are thin on the ground in my pattern cabinet, but here's an out-of-print New Look pattern from the 90's, 6149.


The wrap top in this pattern has gotten most of the attention on Pattern Review, but I didn't have enough fabric for it. From the three yards of this heathered orange 60" wide rayon-wool knit I had ordered from FabricMart, there was an irregularly-shaped approximately yard-sized piece left over after making up a sweater dress (yet to be photographed). I wanted to use the scraps from the dress project while the serger was still threaded in orange, which is not a daily occurrence.

The sleeve is cut in two pieces, and perhaps this helps it follow the curve of the shoulder and arm better than a one-piece sleeve would do.

The mesh dot knit lace also came from FabricMart in a different order. Interesting what a good match the two fabrics turned out to be. The front panel was cut from the solid knit and the mesh knit. The mesh layer was basted on top of the solid and the two fabrics were thereafter handled as one.


Lots of people delight in eliminating facings from their garments whenever possible, but I am not in their camp. I used the facing pieces included with the pattern because I wanted a clean, well-supported edge that would not require topstitching. Because the front panel has two layers, I slipstitched the facing in place by hand at the bottom of the V portion to the lower layer. The facing was also tacked in place at the shoulder and neck seam allowances. Now there is no possibility of it moving around or flipping out at all.


I cut a size 8 for the sleeves and for the neck and upper chest pieces of the shirt. Below the armhole I tapered out to a size 12. I shortened all the pieces 1/2" at the middle of the armscye, and I'm glad I did. Otherwise the batwing effect would have been more exaggerated, and the V would have been too low. Instead of a turned up hem, I used a two-inch band at the lower edge of the top and the sleeves, in imitation of the finishing on the mixed-media lace tops I saw on Pinterest.


It will be interesting to see how much I wear this top. It feels very slouchy and comfortable, and I think the orange color suits me better than a more typical sweatshirt color scheme would.