Sunday, March 24, 2013

Ruffled Marc Jacobs Knit Dress

Maybe ruffle knits are over, so of course it's time for me to get some and make a dress! I don't plan it this way, it just seems to happen.

My mom took me for a birthday shop at Waechter's, which is always a treat. This fabric doesn't seem to have made it to their website yet, but it is a black and white ruffled knit from Marc Jacobs. Some of the ruffled knits I've seen in both garments and as yardage have been very flimsy and delicate. The combination of the neutral color scheme with the texture of the ruffles, plus the nice quality, drew me to this ruffle knit particularly.

Although I love all the ways designers and home sewers have been playing with stripes, I thought it would be best to keep the style simple for this dress. I wish I could have made it a straight tube, with the hem a straight line, but that geometry doesn't suit my figure one bit! So the bodice is straight, with the skirt portion slightly flared.


I had to puzzle over the best way to finish the neckline for some time (turn and topstitch? fold over elastic? black knit binding?) to finally hit on the most obvious solution--use a strip of the black ruffle fabric. I'm glad I didn't introduce another element or a line of stitching over the ruffles at the neck edge; this treatment looks natural and clean.

The weather hasn't been warm enough yet to wear this dress. I need to take it for a test drive to really know how I like it, but I think it will be a good summer staple. 

Tuesday, March 19, 2013

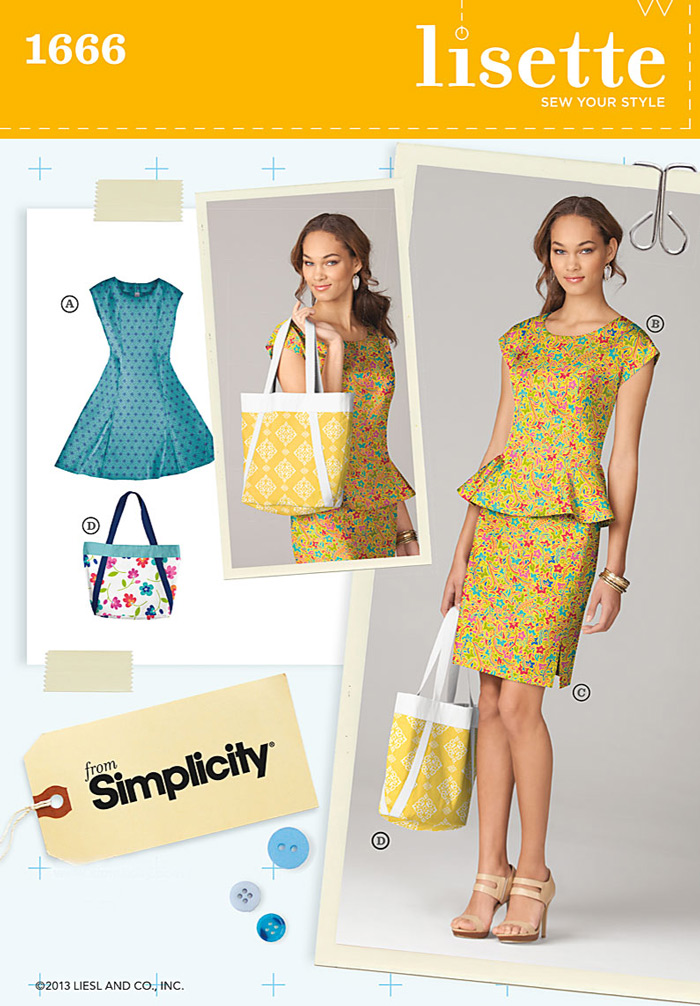
Simplicity 1666 Lisette Peplum Top

The minute I set eyes on Liesl's new Lisette pattern for Simplicity on the Sew Lisette blog, it went to the top of my to-sew list. I had to wait a couple of weeks for either Hancock's or Joann to get the pattern in stock. This happy event coincided with a 99-cent sale on Simplicity at Hancock's, which I appreciated.

Both the dress and the top have an extended cap sleeve which gives the illusion of a wider shoulder line, something I certainly can use. The peplum portion of the top flares only at the sides, keeping the front and back panels straight. Since I consider my front-to-back depth to be more of an issue than my side-to-side width, I thought this type of peplum might work better for my figure than those which have a flare that goes all the way around the body.

I was so anxious to have a good experience with this pattern that I went so far as to construct a muslin! I cut the size 8 to accommodate my narrow shoulders and upper chest. To my surprise, the front waist length and the front princess seams both appeared to hit in the right spots. Many modern patterns with princess seams hit me to the outside of the bust apex; that is, the center front panel is too wide. I like the more balanced drafting of this pattern so much better!

With front seams released to 1/4" starting just above the bust apex

With back seams released to 1/4" starting at the level of the shoulder blades and a 1/2" tuck taken to remove length above the small of the back
I didn't expect the waist area to fit when sewn as a size 8, and it was indeed too tight, but letting out the side front and side back seams gave the necessary additional room. In addition to shortening the center back seam as shown above, I also altered the top of the center back on the flat pattern. By adding 1/2" there (round back alteration), I actually kept the net length of the center back seam the same, but made it curvier to match the curves of my spine.

The fashion fabric version is intended as a second and wearable muslin. This black fabric has been hanging around from the famous Vera Wang $2/yard blowout sale at Fabric.com in, what was it, 2008? It is a very lightweight, semi-sheer black tropical weight wool with some lycra. It doesn't have enough substance for pants. I used most of my yardage on a Jedi robe for my kiddo. I know from that garment that it washes well (thankfully). Unfortunately it is one of those fabrics that likes to pucker. Pressing just seems to add different puckers. This top only requires one yard of 60" wide fabric!

Because of the stretch in the fabric, I ended up removing some of the width I added from the first muslin!

I know it's hard to see any details here in the black, but you get an idea of the shape.

Love how it has no flare at the center front and center back!
Maybe because of the pucker-y tendencies of the fabric, I felt a need to hand sew the hems at the cap sleeve edges. None of my sewing references seem to have much advice about finishing this sort of sleeve construction, and I would love to know if there are other methods or tricks for turning the edge under smoothly while avoiding ripples.

The drafting for this pattern is really well done. The number and location of the markings and notches are helpful but not excessive. Everything lines up well, and I really appreciate the flattering shape of the front princess seams. It's a fun top to sew.

From the fitting standpoint, I still have some wrinkles at the underarm, but they may be inevitable for a cut-on cap sleeve. Overall the fit feels comfortable, the top is very secure (no gaping or slipping around) and I have a full range of motion.

I want to make this again right away, but I'm torn between testing the dress, making another woven peplum top in a fun vintage cotton (maybe with bias binding to finish the neck and sleeve edges) or trying the top in a knit. So many possibilities with this one--I hope I can stick with it and not get distracted by the next shiny new thing too soon.


Thursday, March 7, 2013

Simplicity 3775 Wrap Dress--in Vintage Polyester Polka Dots


Today is my birthday and I'm too self-indulgent to write much, but I've been wanting to show this dress on the blog.  Even though it is breezy and chilly, I couldn't pass up the chance to take a sunny photo. The pattern is (mostly) Simplicity 3775, which was popular a few years back.

I "spotted" the fabric from many booths away in a vintage mall. It is pure polyester, with a none-too-appealing feel to it, but the color and dot size are just so perfect. There were 2 1/2 yards of 60" wide fabric, and I wanted to use as much of it as possible. Instead of the a-line skirt of the original pattern, I made this one circular and it is darn twirly.


My big birthday treat was getting hair color at the salon. I've been thinking of a adding a blond patch, and today was the day. What freedom to realize that, at 44, I can wear green and orange, combat boots and crazy hair--most of which I wouldn't or couldn't have done as a younger person.

Tuesday, March 5, 2013

Cozy T-Shirt Dress for a Dark Day


Sometimes you just want to go ahead and photograph a thing, bad lighting or no. I mean, you are wearing it, you are thinking about it and you just need to get the job done.

So despite it's being a dreary day, here is a cozy new dress. Perhaps the first thing to tell about is the fabric, which is a rayon wool blend from FabricMart. I first ordered a yard of this in the hot chocolate color, and I liked it so much that I re-ordered varying amounts of yardage in four more colors. All of the colors are muted and heathered. Although the care instructions recommend dry cleaning, I tested my first piece in the washer and have by now pre-washed all the pieces and washed one finished garment. So far, it washes very nicely and even submits to a bit of tumbling in the dryer without apparent shrinkage or other derangements.

Anyway, I recommend you get some of this fabric, because it is soft, it washes well, the colors are pretty (if you like subdued), it is easy to work with, it is $10/yard and wide and this combination of qualities is tough to find (as I know you all know). It's nominally heavy enough for a dress, though I lined the skirt portion of this one for extra smoothing and opacity. Darn, I meant to get a shot of the dress inside out to show the lining. It's a nude-colored poly ITY knit, also from FabricMart at some time in the murky past. I bought it especially for linings, but I would also like to find some nylon tricot for this purpose. Tricot would be lighter in weight and perhaps less prone to static.

The pattern is New Look 6700, an out of print pattern presumed to be from the eighties. When I do a search for it, I come up with images of another out of print New Look 6700, but that one is a sundress.


This dress is size 8 through the bodice, tapering to 10 at the waist and through the skirt. The sleeves were shortened 1 1/2", and I think I might have shortened the skirt a bit. Can't remember now (and it's only been a couple of days since I made this--oh dear).


Even in bright light the only extra "feature" I added to this dress is very subtle. Perhaps you can just barely see that I stitched seven rows of double needle pintucks at the center front. This was done before cutting out the pattern piece, in case the stitching drew the fabric in and reduced its width (which I don't think it actually did, but no harm in making sure!).

I lengthened the front bodice by about 3/4" in the front, but I'm not sure if it was necessary, at least in this very soft and drapey fabric.


The pattern called for a center back zipper, which of course was unnecessary and therefore was omitted. I kept the center back seam so that I could do a rounded back alteration (love it!), and I reserved the possibility of shaping the center back portion of the skirt seam as well. As it turned out, I didn't really feel a need to shape that seam and it could have been cut on the fold. The seam hardly shows, however.

What I see in these photos is that the armholes look low. Do you think I should address that by shortening the pattern above the bust? I'm not quite sure, but I want to tweak that.

While I like it as a dress, this would also be a perfect nightgown! Though the pattern drawing looks dated, I think the simple waist seam does me good. A straight t-shirt falling from the shoulder does not work out as well. And the neck shape is pretty. I'm very happy to be wearing this dress today, and I bet it will go out dancing tonight.
Monday, March 4, 2013

Ivey Abitz-Inspired Cardigan

The new-to-me work of Ibey Abitz is chock-full of inspiration. Her Eliot Jacket particularly appeals to me with its vague Victorian/steampunk visual references, asymmetry and flexible practicality.


I'd like to make this more than once, but for my first interpretation I decided not to study the images of her garments closely. Working with not-big-enough-for-any-practical-purpose scraps of double knit wool, my goal was only to explore the basic idea of a curving front panel with one longer side on a cropped sweater.

The size of my fabric scraps limited the length of the "point" which could be achieved.
Although it looks like a vest, this is really a little jacket with sleeves. I had to piece the gray fabric to have enough length for long sleeves. That seam is topstitched, which I hope makes it look more intentional.
As you can see, I used hook and loop tape as the closure. To make this trim as visible as possible, the hooks are upside down, making them a bit of a struggle to fasten!


Strangely, I used an 80s-era New Look pattern as the starting point for this project. Though it needed lengthening, that short bodice section was a good compliment to the limited fabric. I traced a full front, redrew the neckline and the curving front, cut the two pieces apart and then (true confessions), added a seam allowance to the center front when cutting out the pieces in fabric. In hindsight, I should have added more to each center front to provide for a bit more overlap. The neck and front edges were finished by turning 1/2" to the inside, fusing with 1/2" Steam-A-Seam 2 fusible tape and topstitching. Looking at the Ivey Abitz jacket now, it's clear from some of the lighter-colored examples that she has used curved front facings, which I would also do in future jackets (when not struggling with a fabric shortage!).
My jacket is slightly asymmetrical in the back, which was a bad idea. Not terrible, but it would work out better for the two front pieces to be the same length at the side seams, and for the back to follow suit. I did a curved upper back adjustment on this pattern and I think it makes a wonderful difference. I get much less diagonal wrinkling at the lower part of the back armhole when I add length to the top of the center back.


Since the jacket was looking too short, I finished the lower edge with a band (just a rectangle pressed in half lengthwise and attached to the jacket at the lower edge). Again, necessary due to fabric limitations. I also considered a ruffle (from a slightly lighter-weight and color gray wool knit), but it changed the overall look to a much fussier one.


The different-ness of this short sweater really appeals to me. Working from something other than bits and pieces, I would never have combined these elements, but I like the way they play together. Most wonderfully, this little topper is nice and warm!