Monday, December 17, 2012

Burda 7287 + Semi-Crazy Hair Color

I was born a redhead and though I'm swiftly going gray, it doesn't take much to remind my hair of its previous inclinations. The past few years I've been striving for a natural-and-yet-not-too-drab shade, and it's been tricky. Any bit of actual red in the hair color is seized upon by my hair with a fierce intensity, with results that are not likely to pass as natural in any light.

In this quest for a natural appearance, though, I'd gotten more and more monochromatic. I noticed I could hardly wear any colors, and black was too harsh, too. Only tawny shades, peaches, golds. Which are nice. But what about everything else?

Cutting to the chase, I didn't mean to go this red. But my hair surely did. The color is L'Oreal Feria 56, and my neighbor dropping in halfway through the coloring process probably didn't help my focus.

Even though it's nothing like my supposed color goal, it's growing on me. I feel an obligation to rise to the occasion of this bright hair, and that can't be a bad thing.


The dress is Burda 7287. I'd made it before as a top, which I thought a success.


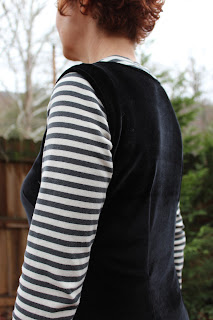
For this dress, I wanted the great fit of those French bust darts, but with a slightly different neckline. I wanted the dress to work as a jumper, but also as a casual dress for evening (read: swing dancing) with no shirt underneath. The Burda neckline is very high and round. So I borrowed the neckline of New Look 6130, that cute peplum pattern that so many people have made, and that I have attempted with unflattering results twice.


I had already narrowed the neck edge of the New Look pattern to fit my very narrow upper chest, making it a good candidate for remixing with the Burda dress. Here are a couple of views of the altered pattern tissue. The white is a tracing of the New Look neckline and the tan tissue is the Burda pattern. You will see that I left the original neckline in place, and just turned it back to cut my alternate neckline. This way I can keep my options open for the future (without totally retracing the entire pattern).

Front

Back

The big thrill of this dress is NO GAPING at the armholes!! High and tight! Without a shirt underneath, my bra straps are covered and stay that way.


I do hope the unfortunate striping of the stretch velvet fabric (which came from it being rolled on a bolt and sadly did not disappear with washing) is less striking in real life than in photos. Even so, I'm not deterred from wearing my comfortable and versatile dress in many different combinations.


Oh, I did make the t-shirt too. It's some bastardization of a Kwik Sew pattern.


Sunday, November 11, 2012

The Tunic That Became A Dress

I try not to love them, but tunics are just so...easy. Comfortable. And they never expose the area around the midsection to cold drafts.

Inspired by Vogue 8691, I adapted another princess-seamed Vogue tunic pattern, 8699.


Looking at the line drawing again, I see a couple of things I missed before: the ruffles overlap at the points on the hem and the back ruffle is gathered.


No matter: I enjoyed and learned from the exercise of drafting/altering my own version of this pattern, though it turned out so long I decided to make the ruffle deeper and call it a dress.


The body fabric is a polyester jersey kinda thing from the sale section at Hancock's. I was so drawn to the print, but unsure about how to use the fabric, since I hate polyester in summer (too sweaty and sticky) and in fall and winter (so cold!). A commenter here on the blog suggested lining knits to make them beefier--brilliant idea. I had some modal-spandex knit from FabricMart. Actually, the solid sleeves and cowl and hem are that same modal knit. I also bought five yards in white. While the white is soft and drapey and wonderfully comfortable, it's a strange, sad-looking white. Bad for the outside of garments, but perfect for a lining. I made a complete lining for the body of the dress and attached the outer fabric to the lining at the neck and armholes.


The cowl is twisted. This is easy to do: sew the center back seam of the cowl as usual. Fold wrong sides together, but instead of matching the center back seam on each edge, offset it by about 1 1/2 inches. Mark the center back between the two points of the seam, then mark the center front and the two sides. It helps to baste the raw edges together. Mark the center front, center back and sides (not the shoulder seams!) of the neckline and attach cowl by matching the the marks.

The sleeve cuffs are gathered to the fuller upper sleeve. I can wear them folded up as shown for a bracelet-length sleeve, or unfolded for a full long sleeve.


The body hem is left raw, as is the hem edge. I used 1/2" Steam-A-Seam 2 to fuse the ruffle into place before topstitching with a zigzag stitch. Very easy and looks nice.


The print is so modern, but the handkerchief hem gives me a bit of the feeling of wearing a twenties-era dress. Whatever its period, this dress is the height of comfort, with its roomy shape and heavenly-soft lining!


Wednesday, October 31, 2012

Rosie the Riveter, by way of Colette Patterns


Not a new costume idea, but it combined three great advantages for me:
1. (Most important) I've been longing to make overalls!
2. World War II era
3. Comfortable and swing danceable

I sure did agonize over what pattern to use. The candidates included Folkwear's Rosie the Riveter


and Decades of Style's 1930's Sweetheart Overall.


Of course there are many vintage patterns, but nothing that I found was just right (though I may keep looking for a coverall pattern).

Even though the straight waist of the Folkwear pattern would be more historically correct for the 1940s, I couldn't stop thinking that a pointed, 1930's style waist would be more flattering to me. So in that sense I was leaning toward the Decades of Style pattern, but I worried about fitting it, and about wrestling with those crossed straps during visits to the loo.

So, taking a deep breath, I decided to use the Colette Parfait, which I have made and carefully fitted in its "real" form as a dress (no photos of that one, unfortunately, but it came out great).


Conceptually, adding wide pants to the bodice wasn't a difficult matter, but I knew that it would take a little thinking. My steps were:
  1. Instead of cutting the back bodice pieces on the fold,  cut as left and right sides and add a seam allowance to prepare for a center back zipper.
  2. Using New Look 6100, which I had previously made as shorts, combine the leg sections with the waist yoke sections and extend to full length
  3. Make a muslin!
  4. Tinker with the back darts to make them align vertically (this was only modestly successful; another muslin would have allowed me to make the dart angles perfect, but they were good enough for what is probably mostly a costume).

I knew from the book Pants for Real People that it would be better to make the crotch depth too short than too long (as it can be lengthened by stitching the crotch deeper, but not easily shortened), but even so I decided I needed to add another 1/2" to the crotch depth. In sewing, I further deepened the crotch by a full inch. That worked out very well; the crotch is neither baggy nor (ouch!) too short.

The order of sewing things together is much the same as it would be for the dress, except for the differences in constructing a side invisible zipper versus a centered back zipper. By the way, I did originally use an invisible zipper at the back (so that's definitely an option), but I decided to go for greater period authenticity as well as strength. 


I was so thrilled to find what I consider the perfect fabric for this project at Waechter's Fine Fabrics, a local fabric store which also happens to do a booming internet trade. It's a substantial rayon gabardine, with a perfect drape for the wide legs of these pants. I'm not finding the brown color on their website, but the pretty bright blue shows you what it's all about. This fabric seems like something you might actually have found in the forties, though perhaps not for factory togs!


I had a piece of red quilting cotton with white polka dots that would have been fine for the head scarf, but I have two problems with using that type of cotton for a scarf. The reverse side is very definitely white and not nice looking, and it's bulky to tie. Wonder of wonders, I also had a silk dress from Ann Taylor via Goodwill in a lovely red with white dots. Since I hadn't gotten started on trying to alter it to fit me better in the year since I bought it, and since I had never worn it, I decided that cutting it up for a scarf wasn't too much of a sacrifice. 


The whole outfit, including the white blouse, was made by me, which is rather in the spirit of the era, if I do say so!

The Never-Ending Quest

That's the quest for a "perfect" t-shirt, naturally. Truly, I don't know if I get closer or farther from that objective the more I work at it.

Though I do like the Ottobre Basic Design t-shirt shown in my last post, it does pose a fitting problem that I have yet to solve. Even though the shirt overall seems to have sufficient ease and looks fine when I'm standing still, when I lift my arms, the bodice hikes up over my bust. When I lower my arms, the shirt stays put in the wrong location.

Another aspect of this "hiking up" problem is that the neckline also seems to pull a bit toward the bodice.

I have done the sort of minimal FBA that consists of drawing a bump at the side seams, which is then eased to the back. I have cut different sizes at the neck and shoulder area. I have added more room at the side seams generally. And I've made the top in a variety of fabrics. To a greater or lesser extent, all of these variations still yield the "t-shirt stuck above the bust" situation.

A lack of sufficient width must be a part of this problem, but it seems to me that something about the angle and/or length of the shoulder and the armhole is also not quite right.

Thus was the stage set for experimentation with Kwik Sew 3740.


This is an odd choice because, first, Kwik Sew patterns are generally cut extremely large in the upper chest for me and second, this pattern specifically had been tried last year and found guilty of this fault. On the other hand, it is much straighter than the Ottobre pattern, so I thought the comparison might be instructive.

The two views in the Kwik Sew pattern have the same neckline but different armscyes to accommodate sleeves or not. The sleeveless top has an armscye that curves back in and up toward the underarm, which I thought might eliminate some of the folds that I get at the armhole. Below you can see the difference. 


On the left is View A, the sleeved version, with various alterations. On the right is View B, with the sleeve from the Ottobre t-shirt. Much to apologize for here--hair, lack of makeup, wrinkles--but onward! Both of these are made from cotton interlock knit, bought in scant one yard pieces at a recent local warehouse sale. Many choices derived from fabric shortages.

What I see in these pics, and I'm open to different interpretations:

  • On the left there is pooling of the fabric above the bust which I think is a result of excess width across the chest at that point
  • On the right there is less pooling above the bust. A similar amount of width was removed from both View A and View B, but View A has a different shape at the armscye.
  • On the right, the shoulder width may be getting too narrow.
But in neither case does the shirt hike up above the bust and get stuck when I raise my arms.


May I just say that as much as I love wearing 100% organic cotton interlock, a little spandex would not go amiss in these tops?

Here are some shots of my alterations for View B. I hope you can see them.


On both the front and the back, I have drawn a line from the apex of the most prominent feature (bust in front, shoulder blade in back) to the lower third of the neck edge and then downwards, parallel to the center fold through the hem. I then slashed both lines, leaving a pivot point at the apex, and overlapped the neck edge by 1/2", spreading the lower edge the same amount. This alteration narrows the chest width and increases the circumference at the lower edge at the same time, both of which I need! If I didn't need the extra width at the hem, I could remove the corresponding amount at the side seam.

I've also filled in the neckline and raised it 1" at center front, but I need to add more for a round neckline.


From here I messed around with another scrap of fabric, a thin cottony sweater knit from Fabric Mart. I wanted to replicate Vogue 1261, which has been positively reviewed and made up into any number of adorable versions, but which is said to be very wide in the neck and shoulders. Looking at the photos, I can well believe it!


I should have and would have added more width at the lower edge, but I was very short on fabric. So my top is not as full at the hem as the pattern's. And my cowl is much narrower, so much so that's it's scarcely a cowl at all. But that was the maximum depth I could achieve with my fabric!


See how easy it was to turn this t-shirt into an approximation of the other pattern? I think this was a lot less work than purchasing and cutting out a whole new pattern.


Sure wish this knit had more body and didn't show every bump and strap and seam beneath it.


So it will probably be mostly worn beneath a long jacket, like my fabulous, aging Oilily sweater coat. I have had this coat for thirteen years and I love it more every year that passes. It is full of holes and I need to replace a button. I saw the same sweater on eBay recently, but sadly in XL. If I see one in my size, I will buy it without a second thought!



Thursday, October 11, 2012

Write Myself a Letter T-Shirt

 Three goals for this project:

  1. Make a start on my resolution to add at least five new simple t-shirts to my fall wardrobe.
  2. Use fabric on hand.
  3. Convince myself that I do not need to purchase an embroidery machine to add graphic interest to sportswear.


Pattern = Ottobre Woman T-Shirt pack (available from Banberry Place).

Sizing and alterations = Size 38 on top, 40 on bottom. Shortened sleeves 1 1/2" and added a small cuff. Lengthened the neckband slightly (I've noticed before, it's too short on this pattern). The shoulders are a bit wide and more room is needed at the bust, which I will address in future versions.

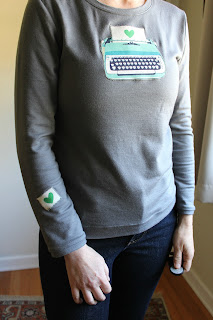
Fabric = wonderful wool jersey purchased two years ago from Fabric.com. It didn't get used for a while as I've come to realize that gray is not my best color, no matter how much I love it. I thought perhaps adding a bit of color in an applique would mitigate the unflatteringness of the gray, and so it does, a bit. The applique is a Kokka print on canvas which I bought at Waechter's Fine Fabrics in Asheville, N.C.


I use Steam A Seam II Lite in the 8 1/2" x 11" sheets for this kind of raw edge applique. Yes, there is still a little distortion, but it's not bad. Past projects using this technique have held up very well through wear and laundering.

After applying the Steam A Seam to the reverse side of the applique fabric, I trim the edges, remove the paper backing and position the embellishment on the unsewn front garment piece. It sticks well enough to then hold the shirt front against myself to check the placement. The applique can be repositioned until I am satisfied. Then I gently press to fuse it in place. 

I have started using a hand embroidery hoop to hold the fabric taut while I zigzag it in place, which is very helpful. Even though my hoop is not tiny, I did have to reposition it halfway through attaching the typewriter. The little heart on the sleeve was small enough to attach all in one go. Lowering my presser foot pressure helped prevent rippling.


The sleeves are finished with a narrow binding strip the same width as the neck binding. I really like this finish, as it stretches and lasts better than a twin needle hem on a sleeve edge, which gets pushed up and down the arm throughout the day. The lower edge of the top is turned up and stitched with a twin needle.

I like this approach, but I'm not sure it's totally cured my embroidery machine longings. Maybe I need to try silk screening!


Sunday, September 30, 2012

Fancy Pants and Vest

Oooh--pants, vest--let the Britishisms fly! Do you think that will protect me from being googled by those with untoward interests in lingerie?

No matter, I'm not modelling these on the internet. My tiny little torso form (which is completely flat on the backside) wears them just fine.


The camisole is Kwik Sew 3115. Fitting this super-simple piece over several iterations has been very interesting. I am so extremely narrow from underarm to underarm that the XS was still too wide across the upper chest. I narrowed the XS another 1/2". But since I have a reasonably full cup size, I then swing right out to the medium 2" down from the underarm seam. And the fullness just keeps on going...through the waist and the hip.

Made like this, a camisole (a type of garment I've rarely, if ever, worn due to poor fit) is surprisingly cute and comfortable.

The pattern includes a shelf bra, which I doubt I'd ever install. Instead this camisole is made with a front, a back and a little ruffled elastic trim at the neckline. The bottom is finished with a 1 1/2" stretch elastic trim.


The boy leg briefs are from Ottobre Woman's 5/2009 issue. This issue contained both a boy leg and a high cut panty, as well as a brilliant camisole with center front ruching and shaped seaming through the torso. Each is as well-conceived as Ottobre's patterns generally are. Short of fabric and inspired by the brilliant Sarah of Ohhh Lu Lu, I added a contour panel in solid black at the front of the pants, accented by a bit of the lace from the neckline of the camisole. I didn't want to carry the lace all the way down to the leg opening, as I thought the bulk of the trim there might rub, so I curved it out into the seam allowance midway down the front panel. The legs are trimmed in the same stretch lace as was used to finish the hem of the camisole.


The general notion of these underoos is that they will serve as bloomers under my skirts for swing dancing. I have a silly girl-crush on international Lindy Hop instructor and champion Jo Hoffberg, who recently commented, "Ladies, if we can't see your panties, you're not kicking high enough." This statement struck me as rather...profound. She was totally goofing around when she said it, but I still loved the notion of dancing boldly and energetically, confident in one's modest yet fetching under-accoutrements. 

Bloomers like this cover more than most swimsuits, and are only seen in tiny flashes as a skirt swirls up during a spin, yet the whole idea of it is still pretty saucy.

So here we have polka dot panties, inspired by Jo.

Wednesday, September 19, 2012

Kwik Sew 3672: Knit Skirt

The skirt with the uneven hem attracted me to this pattern but, ha ha, that's not the one I've made (twice). View B is as simple as can be, but nice.

Kwik Sew's description:

FABRICS: Designed for two-way stretch fabrics with 75% stretch.
Suggested Fabrics: Cotton Lycra®, Nylon Lycra®, Rayon Lycra®, swimwear fabrics. Flared skirts fit slightly below waist. View A skirt has low-cut waist in front with lapped waistband and shaped bottom edge. View B skirt has wide waistband.


Not as sporty as the Kwik Sew photos and illustrations when worn with a blouse and heels!


This skirt is short as drafted. Not deceptively so: it's clear to see in the pattern photo. But when I made a first version (in a black lycra swimwear fabric), I found myself adding a circular ruffle to the bottom to increase the length. For this go-round, I added 2 1/2" to the skirt length. I also noticed on my first version that the hem was hanging much higher in the back (due to some...fullness there), so I did a 3/4" full seat adjustment to the back pattern piece for this one. Now it's much more level with much less tugging and adjusting.


Fabricmart was the source for the fabric (as it so often is), a modal/spandex blend of which I bought five yards. It's really a bit thin for a "bottom", but this skirt is destined for swing dancing duty so I thought I'd try it. It's super comfortable. I should have sewed the waistband smaller, though, as the soft fabric has a lot of stretch and I'd prefer it to feel a bit snugger around the waist.

I finished the bottom with an elastic net ruffle trim. It bounced around very satisfyingly during last night's Charleston class. One bohemian fellow I danced with told me my knee socks looked perfect for the kicks.


Here I look more like an Irish step dancer than a flapper, though!


Friday, August 31, 2012

Kwik Sew 3597 Tote Bag

Making this tote bag was part of my quest to test beginner sewing patterns.

Though simple, the Kwik Sew 3597 pattern is sophisticated in some ways I didn't expect. Instead of having rectangular pieces for the sides of the bag, the pattern pieces have subtle shaping that narrows the bag very slightly toward the upper edge. A facing piece finishes the top edge nicely.


A double interior pocket is attached beneath the facing. The upper edges of the pocket are subtly curved, which causes them to stand slightly away from the back side of the pocket, making it easy to slide items in and out.


I do have one complaint about this pattern. Though it contains three sizes of bag, they are nested together on the pattern tissue (which is a single sheet for the whole pattern). Cutting out the small or the medium would destroy the larger sizes. It hardly seems fair to make the sewer trace the smaller sizes, since this pattern goes for the same price as more complicated Kwik Sews. Could they not see their way clear to providing another half a sheet of pattern paper?!

Other than that, great pattern, wonderful instructions and a nicely-finished basic product.


This fabric is a misprinted Sunbrella-type knock off. I wish I had interfaced it, but I was again striving to test the simplest methods for making the bag. With just one layer of fabric, it's not very rigid, so it doesn't stand up on its own. But I love the colors in this piece--so autumnal!