Friday, March 30, 2012

Treadle Turned Ironing Station

Depending on your perspective, I made a very lucky or seriously unfortunate Craigslist discovery a few days ago. Two treadle tables (both broken in different ways), one Singer 27 (highly decrepit) and one pink Atlas straight stitch machine in a cabinet (with warped veneer). Total cost: $50. How could a person resist, right?

Apparently it was easy for most people to resist, because the machines went unsold for several days before I responded to the ad.

Treadle one has a broken-off leg on its cast iron base, a deteriorated top and six lovely (though very dusty and dank) ornate drawers.

Treadle two has a sound base, but a mostly missing top, two plain drawers and a center accessory drawer.

The Singer 27, a vibrating shuttle machine, is heavily corroded, but very pretty.

The pink Atlas is essentially in good condition, though certainly not pristine, but the wires leading to its motor were cut off just a couple of inches from the motor.

My first task was triage: what could be saved and what was trash? Tackling one of the sounder components of my "treasure", the base from treadle two, I thought about possible reuses. Garden table? Hall table? Laundry room folding table?


At the same time, I had a yen to copy Elizabeth's TV tray turned ironing table to set next to my machine. In its current incarnation, my sewing room is long and narrow and the ironing board is a good 15 feet from the machines. I notice a lot less pressing going on during project construction, and that is not a positive development.

The two strands of thought coalesced into my plan--use this base to make an ironing station!

I had everything needed for this project on hand. The board for the pressing surface was formerly a shelf out of an Ikea media center/bookcase thing. The main piece of furniture we sold on Craigslist last year, but apparently we shorted the buyer a shelf! We didn't realize it until quite a while later, by which time we had lost their contact information. At any rate, it's fine to use and abuse this shelf, which is otherwise a sad orphaned scrap of a thing.


I covered the shelf with upholstery grade batting, which in the end seems a bit more lofty than would be ideal. A thick but not puffy batting or wool blanket would be perfect. I cut the batting several inches larger than my shelf all the way around and stapled it in place.


After doing the same with my outer fabric (which I noticed as I started this post is the exact same Denyse Schmidt Flea Market Fancy home dec print as Elizabeth used in her project!), I trimmed the excess batting and fabric close to the staples.


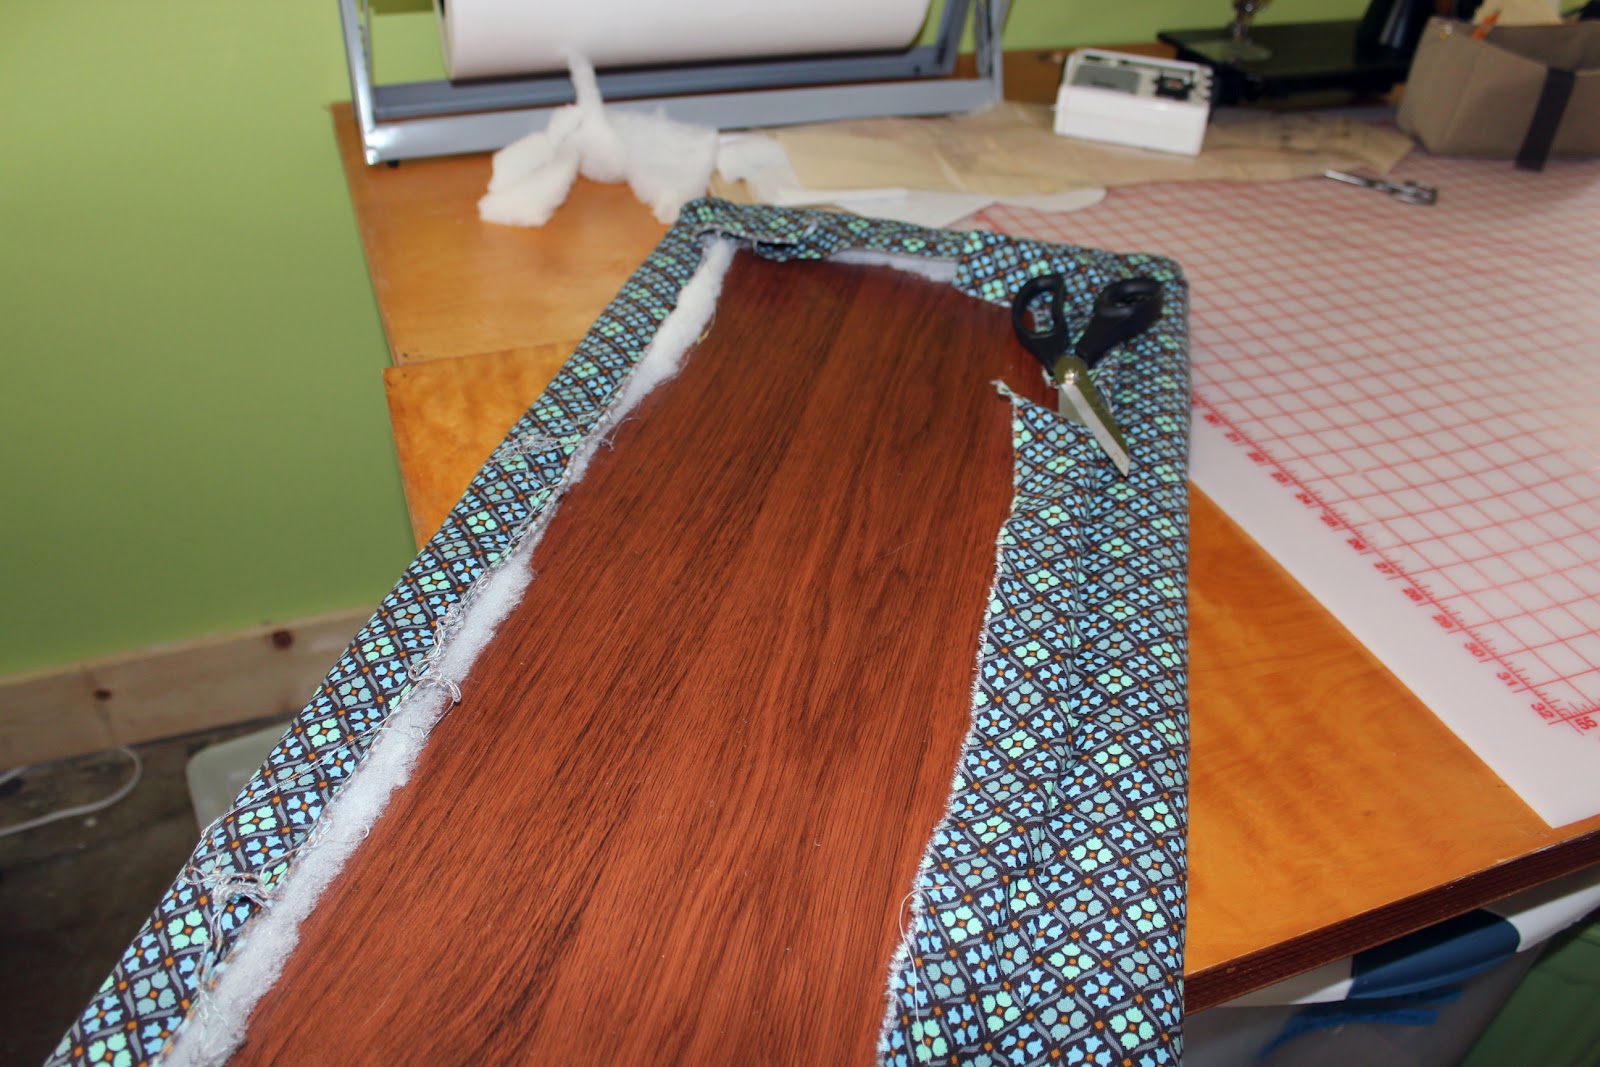
Originally it seemed as though that would be plenty good for an ironing board, but after I placed it on the base I felt I could still see a bit of the raw edges of the fabric and batting peeking out underneath, so I added a finishing piece of cloth to the underside. This would be the same as a dust cover on an upholstered piece of furniture. No dust cover fabric (technically called "cambric") being immediately at hand, I used a scrap of drapery lining. Any type of fabric would do. The edges are simply turned under and stapled into place.


You may notice that I have a "real" staple gun connected to an air compressor. I fear it, but I fear crippling tendonitis of the wrists and arms more, and that's exactly what I get if I try to staple anything with a manual staple gun. I know everyone won't have access to this tool, but it surely does make projects like this go more smoothly.

At this point, the surface is complete except for drilling holes to attach it to the base. But I haven't done that yet. I do air compressors but, strangely, not drills.

After I set the surface in place, however, I started to wonder if I even want to screw it to the base. It's pretty stable, and if I can lift it off at will, there is another use I might put this treadle base to. More on that in an upcoming post.


The finished ironing station! It is so handy. I love swiveling in my chair, pressing a small seam, and turning back to continue sewing. The free end is unexpectedly handy. I found I could slip the lower edge of the blouse I was hemming over the end and press up the hem very easily. Lining the underside of the board was the right decision, as there is nothing for the fabric to catch on underneath.

The wheels on this base roll freely, so the little table can be moved as needed.

Putting this old treadle base back to work in the sewing room is very exciting. Stay tuned for more projects with my Craigslist find!

Saturday, March 24, 2012

Burda 7287 Dress Turned Top


I always enjoy hearing the story associated with the following sewing blog sentiment: "...and this is why I sew." The blogger will be expressing how a particular item is something that couldn't be obtained through any means other than to make it oneself or have it made.

This is not why I sew, however. I sew because I literally don't think I can help myself. Even if the outcome is just equivalent to what I could buy and at a similar price, I still need to sew to be happy in my life.

Still, this top is the type of thing that I can't see being available at retail. It is a fitted wool jersey long-sleeved shell or t shirt. Only Eileen Fisher or a similar designer would offer a basic but not sporty top in wool jersey, and then likely not in a color that would suit me (oh, the endless black!). The additional limitation of being firmly in the petite category further restricts the possible offerings. In this instance, sewing enables me to have something I value that I could not otherwise find or afford.

This pattern interested me for its french darts, a curving dart that starts just above the waistline. The sewing literature occasionally mentions this type of dart as offering more attractive and subtle shaping throughout the torso than a more typical straight dart. I've wanted to try one, but hadn't found the right pattern. This one looked promising and I was not disappointed. The fringed cowl, capelet and arm warmers make me laugh, however.


Here's a closer look at that dart. I shortened it a tad, maybe just a tiny bit too much. Other alterations to the size 8 were a 3/8" reduction in length at mid-armhole on the front and back. I altered the sleeve pattern to match, and then shortened it a good bit more. After a test version, I found the sleeves to have too much width for my taste, and I slimmed them down considerably toward the wrist, maybe 5/8" per side. The cuffs I added due to fabric limitations, but they work nicely to give a little bit more detail to this very basic garment.


I didn't really change anything about the back (other than the petite adjustment already described).


The side view really tells the story of the benefits of the french dart. Without controlling the fabric needed to cover the bust, the shirt will be very shapeless. By removing the excess fabric gradually, the shaping can be spread over a larger area. There can be no doubt that I have a considerable swayback. In a t-shirt without darts, I look as deep as from the apex of the bust to the apex of the fanny (barrel-like), and the back hem rides up on my rear.


The neckline has a doubled binding which is turned completely to the inside and topstitched in place. After making and wearing so many tops with more open necks, I enjoy the coverage this one provides as a change of pace, even though all the style advisers will say that a short person benefits from showing more skin. But look! If the neck were more open, I wouldn't have room for this beautiful pin, inherited from my late, great Great Great Aunt Ethel. And it points downward, which is lengthening! So this gives me ideas to perhaps apply to other pieces.


Another idea for accessorizing this top: my recent eBay purchase. It's an Oscar de la Renta silk scarf from (I'm guessing) the seventies, and I do love it so! I feel very inspired to go crazy with scarves and pins. Burda 7287 is a good canvas!

Thursday, March 22, 2012

Simplicity 2209 Lissette Unlined Jacket

Rarely do I lead with the back view of a garment, but that's where the action is on my version of Simplicity's 2209 jacket.


That little peplum and belt there? You like that? I drafted it myself--crazy how excited I am about such a simple and minimal tweak, but that's life in these parts.

Here is Simplicity's line drawing:

In this boxy jacket, there's not much curve to the back, and that spells trouble for my swayback. Instead of trying to make the princess seams more curved, I thought of adding a little pleated panel and a belt. 

Despite being maniacally pleased to have had and executed this idea, I must confess it's quite simple to do. I measured to find where my back waist curve begins, and split the back pattern piece, plus a seam allowance, at this point. Then I added a second panel for the peplum portion.


The peplum was altered for swayback, and extended by the amount that I wanted to pleat out in the center.


The little belt thingy I just made up as I went along. It's a tube, turned, pressed, topstitched and sewn into the princess seams.


Front view, showing standaway collar (not sold on this for me one bit), welt pockets and asymmetrical lap.


I needed small shoulder pads. Love this button, which I got in a two pound assortment from Fabric Mart. The fabric is Sophia double knit from House of Fabrics.

The second version is from a remnant of silk tweed. I had just enough for this short and very simple jacket, with no collar or pockets.


It's a nice enough jacket, but the fit isn't the best. I need a little more room in the bust, as the jacket kind of rearranges itself during wear. Also the armholes seem a bit low.

I used two large snaps to hold this jacket closed. I may add a button on top for decoration, or I might make a removable embellishment. Or I might just move on to the next thing, as is my wont!


Again there are tiny shoulder pads, custom drafted for this jacket.


A plain back this time, which worked out fine after all!

Tuesday, March 20, 2012

Butterick 5046: It's a Top/Smock/Success

The good news: this pattern turned out very cute.

The bad news: it is now out of print. But still available on Butterick's website.


 I don't know what to call it. If I make the dress version, that will be more straightforward. Butterick says: "Front wrap top or dress has inset at waist." Since I prefer it over another shirt, is it a vest? Or a smock? Or a tabard?


Sleeveless, not as cute on me. Yes, I really am that pale.


Shockingly few alterations were required. I made the size 8, grading to 10 at the waist. Only one piece required any tweaking, and it got a lot, in terms of inches.


This represents a 1 1/4" swayback adjustment (this much height was removed at the center back of the waistline seam). Then the same amount was added back at the hem. As has happened to me before, this addition caused the center back hem to be slightly too long. I am thinking that my new rule should be to add back to the hem half the removed amount from the waistline. I also slashed and spread the pattern piece 1", adding a total of 2" of fanny room to the back skirt. I think this must have been a good amount, because the skirt does not ride up at all.


I hate that unintended vertical repeat of the pattern in the waistband and skirt, but the fit of the back is great (I will focus on the positive!).

Gaping has been a problem for me with both crossover tops and sleeveless garments in the past, but not so much here. I can't really explain why, but I am happy about it. Another problem I usually have is too much width in the shoulder area. I measured the pattern and determined that this one was the right width. Thank you, pattern designer.

Construction was straightforward, but I did have a little trouble adding the bias binding to the armhole and turning it to the inside. This must be a sign that the armhole is very curved, which might account for the lack of gaping I mentioned.


If one wanted to use bias binding on the front and neck edges, that would work well too. I used the facing pieces provided with the pattern because I wanted to use a bit of self-made bias trim that was too narrow to actually wrap the edges. I only had enough to sew it into the facing seam with a scant 1/8" seam allowance. It's cute though.


The fabric is Fortune in Chocolate from Anna Maria Horner's Good Folks collection. I've had this piece for long enough to imagine it as lots of different things. Even though it was purchased with the notion that it would become a piece of clothing for me, I had my doubts about its suitability for a 43-year-old woman. But I'm happy to suppress those, because it's such a happy print, and I love the Eastern European feel of it.


Saturday, March 17, 2012

Butterick 5676 Muse Dress

This particular version of the Butterick 5676 dress isn't seasonal anymore, but I must work through a big backlog of finished projects to show you. Even though this dress is made from the most wonderful wool doubleknit, the pattern also offers a sleeveless version that would be great for summer in a substantial cotton or rayon knit.

Dresses are Butterick's strong point, in my book. I was interested in this dress as soon as it came out last winter, even though I find the model photo to be strangely blocky. I think the waistline seam hits too high on her. 


This little dress had a lot riding on it. I made it to wear to my husband's office holiday party. Not just any spousal holiday party, mind you, though that is hard enough--the first holiday party at his new job, with his new co-workers, none of whom I had met. This company has such a long-term cast of characters, he is the newest employee by five years!

Oh, I agonized over what would make just the right impression. I wanted to look great, but in a quiet way that  avoided being too anything (colorful, tight, youthful, mature, dowdy, frivolous). And I wanted to be comfortable and warm. Cutting to the chase, I was happy with it, but I was nervous during construction that the end result would not be just the right thing.


Though I usually don't take full advantage of my sewing friends' help with fitting (they do this for a living, and I hate to pile work on top of work for them), I did in this special case ask for some mid-project pinning and advice. What a difference it made. I had already tweaked a lot of things in the pattern and cutting stage (mostly shortening through the bodice and narrowing the shoulders), but those little tucks and adjustments made by someone else were invaluable. I need a personal dressmaker, not to sew for me, but to walk around me and pin things.

My friend and sewing idol Linda took tiny tucks at the neckline and brought the back waist up a good 3/4". I think we also took a tuck in the armscye, which I removed at the front shoulder.


It's so difficult to get a good picture of the back of a garment. I hope it fits well. I think this is about as good as it gets with my swayback.


My topstitching, the main feature of this design, is so far from perfect. There were three main reasons for this: 1. Skill, or lack thereof; 2. Thickness of fabric + interfacing and 3. Time constraints. I was under the gun and finally decided to forge ahead and accept the results. Changing the order of construction from what Butterick recommended may have helped, but I'm not sure. They have you topstitch each component separately, then assemble the pieces, matching the seam intersections. Another way to do things could be to assemble the pieced sections, then topstitch the seams, pivoting at the angles. Without trying it, I'm not sure which is the better approach.

The neck and sleeve bands, with their facings and interfacing, were really challenging to feel satisfied with but, again, I just had to call it good and move on.


One note on the fabric: Marc Jacobs wool doubleknit from Fabric Mart. What a dream piece of goods--substantial with a bit of lycra, wonderful stretch and recovery, great color (well, it's gray, but a beautiful rich gray) and something under $15 per yard. A great find, long gone from their website. Sometimes I win with them, sometimes I lose, but this piece was terrific.

Friday, March 16, 2012

Flowers are Pretty

Playing with my new camera, in my newly-planted garden.


Friday, March 9, 2012

Book Review: How to Use, Adapt and Design Sewing Patterns


A serendipitous library find, this smallish book presents familiar information in a way that really works for me. Written by Lee Hollahan and published by Barron's Educational Series, it seems to be an introductory fashion text that might be used in a classroom setting.  The book doesn't attempt to be encyclopedic or particularly linear in its approach, which makes for excellent browsing. The technical drawings are simple and yet convey large amounts of information.

The first chapter, Tools and Materials, is probably fine but is of little interest to me, since I seem to have pretty much everything covered in the chapter. I would have thought the next chapter, All About Commercial Patterns, would be similarly basic from the title, but I actually found its sections on measuring, selecting a size, layout, cutting and marking to have lots of interesting tips.

Chapter 3, Simple Alterations for Commercial Patterns and Chapter 4, Designing Your Own Patterns, are the meat of the book. So many great ideas for fitting and altering patterns! 


I used the technique for decreasing sleeve cap ease seen at the bottom of the page for taming the excess ease in my Vogue 8747 blouse.


I'm definitely planning to try this alteration instead of my usual approach to narrowing the shoulders of my patterns, which has been to trim off the seam allowance at the armhole. This method seems as though it would do a better job of preserving the original shape of the armhole.


This one is notable for its diplomatic wording (and for the fact that I need it myself): Adding in extra room for rounded figure shapes. What I like about the illustrations is that one clearly sees the conceptual approach as well as the step-by-step instructions for the particular alteration.


Again, so tactfully expressed: adding in extra room for a rounded stomach or backside. So much better than other books' terminologies, such as "prominent abdomen" or "large buttocks."

The alterations techniques are followed up with a section on actually creating patterns for design elements such as sleeves and cuffs, skirts, dresses, collars, facings, waistbands and pockets. Hollahan also covers dart manipulation very well. I have a hard time focusing on drafting design elements from scratch since it seems as though commercial patterns offering the elements I am looking for are readily available. But if drafting it yourself is your cup of tea, this book offers lots of straightforward suggestions and advice.

Next up is a set of pattern blocks and a description of developing your own sloper. This is something I'd like to do, but I will use a commercial block when I attempt it.

Finally, Hollahan offers nice compendium of core sewing techniques. Again, it's not exhaustive, but it's nicely presented and fun to look through.


I really enjoyed this book. It feels more accessible than Adele Margolis' Make Your Own Dress Patterns, considered a classic on the subject. Worth checking out from the library, or maybe adding to your own!

Wednesday, March 7, 2012

Vogue 8747 Blouse with Gathers

Shirtmaking is definitely on my long list of sewing skills to master. Even though I've probably made ten or twelve shirts or more, I feel like a very beginning shirt maker when I sit down with a new pattern.

The plan for Vogue 8747 is just to keep making it until I have it down.


Today I'm showing the second of three versions I've yet made. This one happens to be in the best quality fabric of the three, a German-made fine cotton purchased at Asheville's House of Fabrics.


Many alterations, and more to do yet, though I am not unhappy with the fit. I started out with a size 6 in the neck and shoulders, tapering out to the 10 at the waist and hip. I may yet straighten out the lower torso a bit more for a roomier silhouette on at least one future version.

I recommend trimming the front and back princess seams to 3/8" seam allowances rather than 5/8". Using the smaller allowances makes sewing the curved seams much easier (no staystitching necessary) and the results look smoother. I am still tweaking the front princess seam at the armhole. This is a challenging area for me. I took all the petite adjustments marked on the pattern, but these were all below the armhole. I may need to remove length at the middle of the front armhole and also adjust the sleeve accordingly. My sewing pal Gretchen advises to adjust the curve at the bottom of the armscye upward to correspond to the length I will remove from the front pattern piece. Ugh.

My biggest beef with this pattern was the insane amount of ease in the sleeve cap. I can't even tell you exactly how much ease I removed. On the first version I just kept trimming and trimming and eventually got enough of the ease out of there to make a somewhat acceptable job of inserting the sleeve. For this version I took a tuck across the top of the sleeve cap of about 1/2" and then still needed to trim more. For the third version  I kept that tuck in place and made  an additional adjustment to lower the sleeve cap by another 1/2" using a more proper slash and spread approach. That was almost enough, but not quite! Suffice it to say, this sleeve has excessive ease.


The back fit well without an additional swayback adjustment!

Another view of the front.