Tuesday, April 29, 2014

Adjusting the Sweetheart Neckline for a Narrow Chest

I promised you the lowdown on how I solved my sweetheart neckline problems for my Sew for Victory dress. As I've mulled over how to explain my process, I have been seized with anxiety on two fronts: first, can I explain what I did clearly enough and second, will my adjustments work for someone else? So I present my notes with this caveat: I hope they will be helpful, but I can't claim the backing of a sewing authority for this approach.

On the other hand, I've tried the approaches suggested by the sewing authorities for this problem, and they didn't work for me!

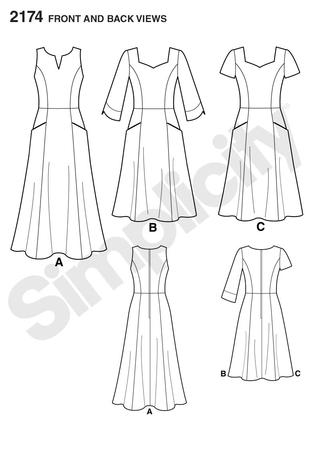
First, here is what I am thinking of when I say "sweetheart neckline" for the purposes of this discussion:


Whether the bodice is shaped by princess seams or darts, the "sweetheart" neckline shape is one that comes to a slight point at the center front and then opens out to the sides. The designers of the 1940's favored a much more demure opening than we see on modern versions of this neckline.

Because I am narrow from armpit to armpit (12" at the most), the opening on the modern sweethearts is just too wide for me. By comparison, most patterns seem to be assuming an armpit to armpit measurement of 13" to 13 1/2" in size 8. With a garment chest measurement that is 1" to 1 1/2" wider than my chest, an open neckline exposes my bra straps, gapes and falls off my shoulders. I have the same problem in RTW. I would never try to buy a dress like the lace and pink one above, because I know that there is no way that it would fit and no way that it could be altered to fit. Even a size 0 or size 2 would be too wide in the upper chest and comically small everywhere else.

Square necklines and wide scoops present similar problems, but they don't appeal to me as much. Also, these shapes are easier to adjust at the pattern alteration stage because we don't have to try to preserve that nice curving point in the center.

The usual fitting advice for "narrow shoulders" is to reduce the shoulder width by taking in at the armhole, but this just makes the shoulder section tiny and pulls it outward, giving it nothing to hold on to and no power to cover my bra. 

Working up the resolve to counter this problem was a challenge. Even though I am drawn over and over again to sweetheart necklines, I have at least two painful failures in my past: 

The first Simplicity 2174. Can you see how I made the shoulders too small to try to counteract the gaping? Even standing still, this is very uncomfortable.

Vogue 9668 from 2009. It's been so long that I don't really remember all the ins and outs, but I never once wore this dress. In my second blog post on this dress,  I say that I removed an inch on each side of the neckline to make it cover my bra!

So I did the right thing and made a muslin of the change I had in mind.

May I present...the world's ugliest fabric? It was part of a free bundle from FabricMart. It's actually quite cool how the print frames the neckline, but overall it looks hideous on me. I cut the peplum on the bias to try to encourage a little drape, but the quilting cotton is so stiff that using the bias made little difference.


For this version, I drew a long line from the middle of the central part of the neckline to the lower part of the princess seam. Then I drew a second line 3/4" away from the first at the neckline, tapering to the same point at the princess seam. I cut on the first line to a hair away from the point on the seamline and overlapped that cut edge, matching the second line.

The two lines are highlighted in red.
The important point here is that this line cannot go through the center front fold, as it changes the angle of the seam it terminates in. For the moment, ignore the white wedge opening toward the shoulder above. You might also notice that I've marked a 3/8" seam allowance at the princess seam. I trimmed away 1/4" from the standard 5/8" allowance after I had made all my pattern changes. It is possible to sew a princess seam without first staystitching or notching if the seam allowance is 3/8", but not if it is 5/8".


You might wonder why I couldn't just remove this width all the way down the center front fold. I could do that, but then the point of the V would be higher and I would have that much less room at the waist as well (which is the opposite of what I actually need at the waist).

So, this wedge-removing alteration took care of the gaping but resulted, again, in binding at the armhole!! It finally struck me: I need to reduce the width right where I am extremely narrow, and then add it back in again toward the top of the shoulder line. My shoulders are narrow side to side but at least normally deep from front to back, and narrowing the upper chest was also removing all my ability to move my arms.


Before we move on, I should point out that I made the same adjustment to the center back pattern pieces as to the center front (removed a 3/4" wedge tapering to the princess seam). Because this alteration goes through the neckline and does not reduce the actual length of the shoulder seam, I didn't necessarily have to do the same thing on the back as on the front, but I happen to know I need to narrow the back as well as the front.

Thus, the breakthrough was to do the opposite alteration at the shoulder line as I had done at the neckline: draw a line to the princess seam from the shoulder seam and then spread it 1/2".


Above you see the added wedge at the shoulder, and you also seen that I have overlaid the side front pattern piece onto the center front piece. I drew the armhole seam line in red so that you can see how the measurement from the center front to the bottom of the armhole  (as if you were looking at me straight on, and saw me from armhole to armhole) is 6", or 12" total from side to side. Depending on exactly where I measure, the dimension might be a little more, but the point is that I have narrowed the center but replaced that width at the top of the armhole to allow for arm movement.

Another benefit for me of this alteration is that it places the princess seams over my bust apexes rather than out to the sides.


Of course I had to make the same change to the back pattern piece at the shoulder line, since now the shoulder seam had grown longer in the front, and of course I also had to alter the neckline facings to work with my changes. To alter the facings, just lay them over the pattern pieces and, in this case, cut off the excess at the appropriate angle. The facings are only involved with the shape of the neckline, so the changes at the shoulder seam did not affect them.

Next time I feel like expanding on this progress, I might take on an even wider sweetheart neckline to see how much openness I can preserve while still staying covered and managing to move my arms. But for now I am happy with one sweetheart neckline pattern that finally fits.

Thursday, April 24, 2014

Sew for Victory: Triumph Over the Sweetheart Neckline!


Crazy that I didn't manage to take part in Sew for Victory last year! I'm always sewing things that would fit right in with Rochelle's wonderful theme and I loved seeing what other bloggers made for the sew-along.


So I'm very happy to have made something for this year's event.

My big challenge was to triumph over the sweetheart neckline, a quintessentially 1940's style that I adore but have never quite managed to make work for my frame. And by "frame" I mean narrow upper chest. Even when I have made the smallest size in the neck and shoulder area, the cut out area of the sweetheart neckline has been much too wide and has gaped, exposed my bra and/or its straps and just generally slipped around and looked bad.

Last June I made this same pattern...and it was a failure. It looks okay in the photos, but I've never actually worn it: it's terribly uncomfortable! To solve the gaping on that dress, I took in the princess seams and the armhole seams. That was somewhat effective to stop the worst of the gaping, but it made moving my arms a tortuous proposition.


A more technical post about how I solved the gaping problem for this version of Simplicity 2174 is coming soon, but today I just wanted to celebrate my victory and join in the parade of lovely makes.


The fabric is rayon challis from the latterly-out-of-business Waechter's Silk Shop. Rayon challis is my favorite summer fabric: it is light, it breathes and it doesn't much mind if you sweat on it. I have memories of a different sort of rayon in the 1990's. There was one very pretty top and skirt that I wore to a garden party. When a summer rain shower passed through, everyone got soaked--and my outfit immediately started shrinking right on my body! But today's rayon challis seems to handle gentle washing, line drying and pressing with grace. Of course I prewashed my fabric...just to be sure!


Besides the sweetheart neckline, I was also drawn to the cute pockets on this dress. I discovered when I made my previous version, and then again on this one (oh, why isn't the first time enough?) that these pockets are drafted to sit a little bit open from the main body of the dress. A very close look at the technical drawing confirms that this was the designer's intention. The top of the pocket sections are wider than the underlying dress sections, creating ease at the top.

See that tiny little bulge at the side seam where the pocket meets the dress? That's the ease I'm referring to.
Once the dress was stitched up, I found I didn't like that draping effect at the pocket. It just looked saggy and maybe a little...unprofessionally constructed? So I took them loose and resewed the pockets to lie flat against the body of the dress. Now I like the way they look and they are perfect for toting a cell phone. Or food ration coupons. Or war bonds.


I used a self-drafted tulip sleeve in place of the boring one provided by the pattern. You can read all about the tulip sleeve and find a tutorial for drafting your own in this post. The one thing I feel I should repeat about this type of sleeve is that it is SO comfortable! And sometimes it catches the breeze just so!


This dress fits the bill for a practical and feminine 1940's summer garment in my book--comfortable, cool and modest! Thanks, Rochelle, for the inspiration!

Wednesday, April 23, 2014

Welcome Home, Juki!

A couple of months back I was sewing along on my main sewing machine, a Juki F600 Exceed, when the machine made a faint clunk, snarled the thread, and sewed no more.


For a little while, I thought I might be able to figure out a repair myself. I've dabbled more than I ought in messing around with vintage and modern sewing machines and I have developed an inflated sense of my mechanical capabilities. Even armed with the service manual for the machine, however, I had no success in even diagnosing the problem. Down in the area of the hook, things looked and acted just plain wrong. I admitted to myself that this problem exceeded my fix-it skills.

But what to do? The nearest Juki dealer is an hour away, and I hadn't bought the machine from them, since they did not and still do not carry this model. Four years ago, I purchased the machine online from Sewing Machines Plus in California.

I had been aided and abetted in selecting this particular Juki by a lively and extensive discussion about the machine on Pattern Review. Luckily, I returned to the Sewing Machine discussion thread for ideas on how best to proceed. Member Nonette, who lives in Hawaii, suggested that I call Juki directly (through JUKI USA's website). She had also had an issue with her F600 about four years after purchase, and Juki allowed her to ship the machine directly to their technician, who had fixed it at no cost to her and had returned it to her good as new.

And that's just what I did, and just what happened with my machine! I would never have thought to go directly through the company so long after the purchase if not for Nonette's advice. If I had gotten the machine serviced locally by a non-authorized Juki dealer, the remaining warranty would have been voided and I'm sure it would have been at least $150.

The machine came back to me on Monday and is once again sewing like a dream. Even though I have a sizable stable of vintage machines, including a Pfaff 130 that is set up alongside the Juki in the sewing room and that I use regularly, I really feel a need for a modern electronic machine for many projects and tasks. I missed the Juki for sewing knits, for topstitching and edgestitching and for its excellent buttonhole capabilities. I kept sewing, but some of my projects didn't come out as well as they would have with the Juki on the job!

What was the problem? A broken hook drive cam, something I would never have been able to fix myself, since it required a replacement part. The bad news is that it broke--boo, plastic parts!--the good news is that Juki stood behind its product and made it like new again. All in all, I've enjoyed this machine quite a lot, and I'm very satisfied with Juki's service in this situation.

Saturday, April 19, 2014

McCalls 6503 in Liberty Lawn

There is new sewing to show you, but gray skies and rain are conspiring to prevent me from photographing a couple of recently-completed garments.

So how about a few pictures from my lovely mother's surprise 70th birthday party a few weeks ago? That day was also a grey and rainy Saturday, but a very happy occasion, nonetheless.


My mother does not look within a decade of seventy, right?

Big birthday parties have not really been a thing in my family, but my stepfather and I decided the time to change that tradition had come. My mother is the last person who would agree to have a big party to celebrate her own big birthday, so we had no choice but to make it a surprise. And do you know, it came off without a hitch and she absolutely was surprised and delighted!

We told her she'd be having lunch with my husband, my son, me and her two sisters at a local resort. In reality, there were about forty friends and family members waiting to surprise her. Although I generally despise party planning, I threw myself into this one and I was so thrilled when it was a success.


I wore one of my favorite dresses made at the end of last summer, McCall's 6503 in a beautiful art nouveau Liberty Lawn print. The fabric came from Waechter's, which I memorialized in my last post, as did the hand-dyed bias silk ribbon trim.


I did change out the sleeve on this dress for a shorter puffed sleeve from another pattern. And I added inseam pockets. But otherwise it's a faithful make of this trusty pattern. Some day I'd like to show you better photos of the dress to brag about how I centered and aligned the motifs all the way around.

This dress is wonderfully comfortable to wear and the print does suit me well, if I do say so myself! With the hat, it felt suitably festive for our happy occasion. 


Wednesday, April 16, 2014

So Long, Waechter's Silk Shop


When a town loses any fabric shop, it's a sad day for those who sew. When my town, Asheville, North Carolina, loses a fabric shop with a ninety-year history and a unique focus on dressmaking, it's much sadder.


I don't think the demise of Waechter's Silk Shop points directly to any large trends in the sewing world. As far as I could tell, the shop seemed to be thriving to the extent that a brick-and-mortar plus online specialty retailer can reasonably expect to do. Not that selling fabric is what anyone would do simply to make money. But the immediate motivating factor for the end of this tradition seemed to be that the current owner, Joyce, decided to retire and made the business decision to close rather than to sell the shop.


It's one of my family's apocryphal stories, how my great-great Aunt Ethel, a professional dressmaker, saw Waechter's as the height of quality and selection. She visited the Asheville store, then on Wall Street, back in the 1950's and 1960's on behalf of her wealthiest and most discerning clients. I heard from Lucille Neilson, the owner of Asheville's other shop catering to sewers (The House of Fabrics, still in operation), how Waechter's used to keep the fine fabrics under lock and key, behind the sales counter. To see a certain piece of cloth, one had to apply to the snooty salesmen and have the bolt brought out ceremoniously for inspection.

In recent years, under Joyce's direction, Waechter's had maintained its focus on high-end, unique fabric, and had differentiated itself with a particular emphasis on sewing creative and special occasion garments for children. While sewing for children is not a particular interest of mine, I thought it was perhaps a canny area of specialization (what with all the doting sewing grandmothers and such).

Somehow I managed to visit the shop three separate times during its closing sales, resulting in the purchase of some nice fabric and, what's even more exciting for me, some terrific new tools and notions. For example, the display dress form on the left in the picture above. And a tailoring board. And a superior vintage tailoring point presser/clapper, ham and seam roll, from June Tailor. I think the June Tailor tools must date from the early 1980's, and cost the princely sum of $3 for all. Plenty of office supplies, the most enviable of which is a vintage postage scale.


The new display form looks right at home.


My thread collection has been fortified, I have 400 yards of black twill tape and I brought home more loot besides. Probably none of that makes up for the loss of the local store, but I do understand that things change and businesses come and go.

Waechter's will certainly be missed.