Monday, September 30, 2013

Butterick 5244 Tunic


One of those garments that...I like, but not on me. Also one of those garments that...I'll probably wear often, despite my reservations.

This project started with the fabric, a poly sweater knit print from FabricMart, now sold out. This was one of their small-yardage listings; they probably only had one bolt of the fabric. Though the print is large and bold, I like it and love the combination of the colors of blue, lime, black, orchid and emerald green. It is a lightweight knit and, though sweatery in texture, not something that will provide much warmth. Because polyester garments mostly hang unworn in my closet during the winter (I need all the warmth I can get), I thought it would be smart to go ahead and make this up as a transitional piece for fall.

To get a handle on the many possible pattern choices, I made a quick-ish story board, which I hope will help me plan future tunic or tunic dress projects as well.
Storyboard of Tunic Options

Butterick 5244 likely won mostly because it has been taking up space in the pattern cabinet for a few years (it's now out of print) and because I like to try out new shapes. It wasn't apparent to me that this dress is, well, it's essentially a muu-muu. That wasn't apparent, I mean to say, until it was all finished and had been worn for a few hours.

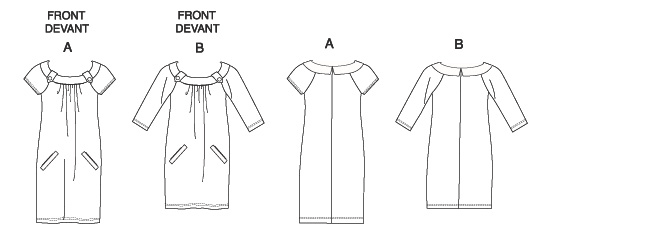
Butterick 5244, view A. Dresses A, B in two lengths have front gathers, welt pockets, self-faced yoke, collar, tabs with non-functioning buttons and raglan sleeves in two lengths. A length is 3" above mid-knee.


The neckline is the best, and essentially the only, feature of the dress. It is fun and easy to make. The rolled collar, tabs and self-covered buttons are cute. The bustline gathers are not great for me. Actually, this would be a great nightgown pattern without the collar details. The raglan sleeve, gathers and easy fit would be perfect for sleepwear.

Center back seam, back collar detail and raglan sleeves

Definitely not the best angle for this dress!
Fitting
I used size 6 with no additional alterations at the neckline, yoke, collar and sleeves, transitioning below the armhole to size 12 at the hip. I did not make any length adjustments, though I might yet decide to shorten it. Would that be a better proportion? Probably. The pattern specifies the longer length as 3" above mid knee, while mine is about 1" above the knee. I want to keep the dress appropriate for wearing to substitute teach, and I don't think I fancy wearing it with pants.

Construction
The welt pockets were omitted because the knit is too thin to support them, and because I worried that they would add bulk. I used Pam Erny's wonderful Pro-Tricot fusible knit interfacing and it was just perfect. If you make this, remember that there are multiple layers at the neck edge: yoke, collar, under-collar, yoke facing and tabs. The fabric and interfacing could get very bulky here if either were thick.

I fully lined the sleeves with some thin black knit, which was a good idea (lining short sleeves nearly always is!) because the back of the sweater knit is white, and the inside of the sleeve does show a little bit when the dress is worn.

A thread tack at the center front of the collar holds it in place without distorting the collar roll. The hem is stitched by hand. That just seemed simplest and best for this light fabric.

I definitely need to wear a slip with this dress, which is no trouble. Once I make or procure a black turtleneck, I plan to wear it under the dress along with black tights and boots--maybe my vintage green Roper lace-ups!


Wednesday, September 25, 2013

Three-Pattern-Mashup Dress


My version of Colette's Ceylon has been a long time coming. It's one of those patterns that I ordered immediately upon its publication (three or more years ago?), and that I subsequently developed serious reservations about.

The good: Yoked bodice! Neckline darts! Strong early forties vibe!

The bad: That infernal midriff section. It's portrayed as a nice smooth expanse of fabric in the illustration, but I could never fool myself that it would flow effortlessly over the topography of my abdomen and upper hips. It's so long! It runs from right under the bust to several inches below the natural waist. I'm also becoming less enthusiastic about dresses with full length button bands down the front--that would be shirtdresses, I suppose--because even when they are well-fitted with plenty of ease, there is always that awareness of the closure and how buttons can open up or pop off.

So I had to wait for my skills to catch up with my love of the best elements of the design to make a version of this dress that suited my preferences.

Bodice: Colette Ceylon + Waistband: McCall's 6503 + Skirt: Colette Parfait
My little sketch of the pieces together

To my surprise, assembling the different components of the dress really didn't turn out to be very difficult, probably since I had already fit the waistband and skirt.

Bodice: Ceylon
Fitting and sewing the bodice took a good bit of time. I worked in my fashion fabric, a rayon challis from FabricMart, right from the beginning of the project. I had at least an extra yard of fabric (three yards of 60" wide fabric total), so I figured I could start over on the bodice if my first attempt went far wrong. As it happened, the first try worked out, so the dress used about 2 1/4 yards of fabric, including facings and inseam pockets.

Size 0 was used at the upper shoulder and along the yoke edges, transitioning to size 2 at the bottom of the armhole and then up to the width for size 6 at the lower edge of the bodice. I checked the length of the bodice, which I had expected to be too short, and found that it was actually a little long compared to the recently-made bodice of McCall's 6503. So I shortened the bodice about 1/2" generally and 1" at the center back (which was too blousy).

Because I was using a side invisible zipper rather than a full length button opening, I had to change the order of construction to allow me to complete the bodice, stitch the buttonholes and overlap the front placket before attaching the bodice to the waistband.

The yoke sections were underlined in silk organza (scraps), which turned out to be a little less stiff than ideal. If/when I make this bodice again, I will add interfacing before cutting out the yoke pieces (to avoid distortion in cutting) and then mark the curved stitching lines on the wrong side. This time around, I found the inner edges of the yoke to be too wide for my narrow shoulders; the edges met my neck and flared out unbecomingly. I removed them and reshaped the curve, making a paper template and tracing the seamline on both sides to achieve a symmetrical result.


Colette's instructions for stitching the yoke to the bodice sections are ridiculous. They have you turning under that front curved edge and edge stitching it to the lower front bodice section. Luckily no color of thread looked good for topstitching on this fabric, so I had to find another way. I don't think I have a good step-by-step description of this in me, but it boils down to sandwiching the lower front piece (with its facing piece already attached) between the yoke and the yoke facing and stitching the whole business together in a more conventional enclosed seam.

In any future versions, I plan to gather the upper edge of the lower front bodice pieces more, thus moving the outer edges of the V further toward the armhole. This would narrow the front a bit, which I need, and would also make the V more dramatic.

The buttons are 1 1/8" faceted black plastic from FabricMart. They probably cost as much as the fabric for the dress, but I love them.


The back details are hard to make out in this print, so you'll have to take my word for it: they are nice. The back neck darts do their job and make for a trim and comfortable fit. The back neck facing is long enough to reach the yoke seam. I hand tacked the facing to the yoke seam allowance, so it is totally secure and cannot flip up. There is a little blousy-ness at the center back, created by gathers at the bottom of the shoulder yoke and at the center of the lower edge of the back right above the waistline. This looks pretty and allows for movement.


As Zoe points out in her post on making the Ceylon, the sleeve is drafted oddly. There is not provision for turning up a hem smoothly (the angle at the lower edge is wrong for it) and the gathers are concentrated heavily to the front side of the sleeve, which is unusual if not an actual mistake. I didn't worry too much about it and all worked out okay, but in a solid color the unbalanced nature of the gathers would be more visible. I would either decrease fullness in the upper section of the front of the sleeve or add fullness to the upper section of the back of the sleeve. Do not simply reposition the location of the notch at the top of the sleeve! That will make your sleeve hang off-grain.


Waistband: McCalls 6503
Not too much to tell about the waistband: it fitted nicely with the bodice pieces and the skirt pieces. I interfaced the waistband (and the front placket facing) with sew-in woven cotton interfacing, which I worried might be too stiff, but it ended up being perfect. Plenty of support and, since the waistband is fitted loosely (size 12), not constricting. The shape of this waistband is nicely curved to be a bit higher at the center front. Oh! That's why I had to remove more from the center back of the bodice than from the sides! Blogging realization.

Overall, I need to reduce the height of the waistband 3/4" to 1" for future versions. For this garment, I deepened the seam attaching the waistband to the skirt by 3/8", for a full seam allowance of 1". That also shortened the skirt length (unwelcome side effect), and it would have been a better proportion to shorten the waistband.

There is an invisible side zipper which is, well, invisible, so you really can't see it. It isn't very long at all, just 10" or maybe even less. I don't like the zipper going over the fullest part of my hip.

Skirt: Colette Parfait
This is a pretty six-gore skirt with a fairly slim cut. It has a vintage, we-are-using-narrow-widths-of-fabric feeling to it, but it is comfortable and allows free movement. I used the pattern pieces for size 4, since they were already cut out from a previous make of the Parfait dress. Perhaps I could have taken 1/2" seam allowances rather than 5/8" to give just a bit more ease to the skirt. That would make the invisible side seam pockets lay more nicely. That, and/or I could omit the pockets next time. It's nice to have them, but they do add a bit of bulk and I wish I had saved myself the trouble on this somewhat dressy dress.

The hem is finished with a vintage rayon bias binding tape, turned up and topstitched. I was ready to be done with the dress and decided I wasn't bothered by a bit of visible stitching in that location. There was not enough length for a turned-up hem. Another 1" to 2" of length would have been welcomed.


Sketch for a future variation without a buttoning placket. Need to find a sleeve like this one!


Monday, September 23, 2013

Altering for Narrow Chest and Butterick See & Sew 5203 Tunic


I've often mentioned being narrow in the shoulders and upper chest, and some commenters have asked me to elaborate on my method for altering for this issue. 

Big disclaimer: what I am describing today are some strategies I have tried and what seems to be working for me now. Like many of the sewing bloggers I follow and learn from, I don't have any particular training in pattern drafting. I only have the standard-issue level of interest/obsession, plus some insights gained over the course of my sewing career, which included a very helpful stint working in a fabric store.

Please let me know if you have a different method or a critique of mine!

So. I am pretty short at 5'2", and I seem to be fairly evenly proportioned top to bottom. I don't have an especially short or long waist, or short or long legs. The length of my arms is in proportion to my height. But where I deviate is in the shoulders and upper chest. Though I have a fairly full bust (though modest in comparison to what it was in younger days, thank goodness), my upper chest is unusually narrow.

For years I tried to correct for this problem using the advice given for "Narrow Shoulders," which basically boils down to removing width at the edge of the armhole, from midway up the armscye through the shoulder.

Singer Sewing Library The Perfect Fit


Palmer & Pletsch Fit for Real People
The problem with this method for me is that it removes the most width at the top of the shoulder, and very little, if any, at the middle of the chest. It makes my garments fit too tightly at the shoulder and upper arm, but they still gap at the neck. And it gives less coverage at the upper edge of the neckline of the garment than the original width of the shoulder did (because the neckline is pulled to the outside), often exposing my bra straps.

The owner of the fabric store where I worked, Lucille, finally made me see the light. One of the first measurements Lucille takes on a new client is the width of the chest above the bust, from armpit to armpit.

This is very difficult to photograph! But the upshot is, my armpit to armpit measurement is 11 1/2".

Now we compare my measurement to the pattern. This is a Butterick size 8, which I know from experience is too wide for me, even though pattern's circumference measurement corresponds to my high bust measurement. From the seamline (marked with red dots) to the center front fold is 6 1/2", or a total width of 13 inches. Since I am only 11 1/2", the pattern is a whopping 1 1/2" too wide for me from armpit to armpit. Thus, I need to remove 3/4" per side.

Unaltered pattern is 13" wide from seamline to seamline at the armpit. I need to remove 3/4" per side.

I draw a line from the middle of the neckline to a seam that is not the armhole and is not the center front fold. The shorter line you see here didn't actually help this alteration on the front, but it did on the back.

Cut from the neckline to the very edge of the garment on the long line, and then (unnecessarily in this case) from the first cut line to the very edge of the neckline, leaving a tiny hinge at both seamlines.

Overlap front cut edge toward the center until I have the armpit-to-armpit width I need, which in this case is 5 3/4" (half the finished width of 11 1/2").


Move small triangular portion to give the smoothest neck curve. In this case the change to the neckline is too great for the triangular piece to be able to compensate for it entirely. Tape all pieces into place.

Using a french curve (or drawing freehand), reshape neckline. Trim pattern.

Now the back. I also need to reduce its width. I can draw my line from the neckline to the center back because there is a center back seam (not a fold). Moving the excess width away from the center back is good because it makes the center back seam more curved, which fits better over the curve of my upper back.

Cut and overlap. In this case I am simply eyeballing the amount, knowing that I need a similar amount of reduction in the back as in the front.

Slash from the cut line to the edge of the neckline. Angle the resulting triangular piece up until the neckline curve smooths out. Tape in place.

Do you see how this alteration lets me remove the width I need at the center of the chest while retaining all of the coverage at the shoulder? The length of the shoulder seam did not change. The width of the body below the chest did not change. Only the width of the chest and the width of the neckline changed. Obviously any facings, plackets or bindings that involve the neckline will also need to be altered accordingly.

I chose this pattern to demonstrate this alteration for two reasons: first, I wanted to make it anyway! and second, I thought it would be easier to demonstrate on a very simple garment. I have used this method on more complicated shapes, including wrap styles and gathered styles. The principles are the same: draw a line from the neckline through a garment edge which is neither an armhole or a fold. Slash and overlap until the width of the chest corresponds to your armpit-to-armpit measurement, plus seam allowances. Tape in place. Reshape neckline. Finished.

Over the course of the last few years I have learned that I can use a size 6 or size 8 bodice pattern without requiring any length adjustment. Perhaps if there is a smidgen of extra length, it gets taken up by my bust. Generally I taper outward one or more sizes from the bottom of the armhole through the waist, and I don't require any additional FBA. Sometimes I do need to shorten at the center back, though, depending on the style.


I really lucked out on the striped sleeves and cowl! I wanted something other than the dot fabric to tone down the 101 Dalmations vibe, and I thought my only option was a solid black. When putting away some laundry, I saw a little Ann Taylor waterfall cardigan my mom had bought me last year. Though I liked the stripes and the fabric, somehow the cardigan just wasn't me and I had rarely worn it. The sleeves were cut from either cardigan front, which were already pieced in this chevron.


The cowl is made from the entire back piece of the cardigan. A cowl takes a surprising amount of fabric.


A very quick tunic, and I think it's so cute! I did shorten the length 1", and otherwise used the size 8 throughout. This is so voluminous there was no need to size up through the waist and hips. Wouldn't you agree that the bodice would be much too sloppy if it were 1 1/2" wider from armpit to armpit?!

Tuesday, September 17, 2013

Colette Parfait...in Leopard

So, this is one of those blast-from-the-past, long-completed-but-never-blogged projects. I was thinking about this dress as I was making a whole new thing, a mashup of the Colette Ceylon, Colette Parfait and McCall's 6503. I'll be posting about that dress soon--it came out a treat!


Anyhoo, in considering skirt possibilities for the most recent dress, I remembered how nice I thought the six-gored skirt from the Parfait was. Which made me think of the Parfait and how much I like it and how I'd never blogged about the dress (though I did show a pair of overalls with the Parfait bodice) and why exactly that was. Ah yes--because I had never been completely happy with the shoulder straps and wanted to fix them before posting about the dress.

Which led to me working on those straps. And now they are better but not perfect still. I have very very narrow shoulders and the little buggers were forever sliding down (despite my already having shortened them several inches at the pattern alteration stage). With this round of alterations I unpicked the back neckline and moved the straps a bit closer to the center back. Moving them even closer together turned out to show my bra straps, so that was out. I also shortened the straps another 1 1/2".

The result? Now the straps don't slip or slide one bit, but the back waistline is pulling upwards. If it isn't one thing it's another. If I were in the process of making this bodice again right now, I'd apply my brain to the question of how to fix both problems but, since I'm not, I'm just glad the straps stay up!


With the straps fixed, I remembered another problem. I don't much like wearing strappy dresses. This is not related to advancing age. Until a couple of years ago, I never ever wore sundresses. Now I do, but the occasions I feel comfortable with that much skin showing are few. Being so pale, wearing a sundress in the sun is asking for trouble. And at indoor events, there is usually sufficient air conditioning to make a strappy dress feel too cool, so I often end up adding a cardigan sweater. That looks cute, but it hides the sweet details of the dress.

I thought a lace tee might be a nice way to add some coverage, and I remembered a failed effort at a lace tank from earlier in the summer. Out it came. Sleeves were cut, edges were trimmed and a new, improved outfit emerged! The tank/tee originated with Kwik Sew 3740, but it got fairly banged around in the various iterations. Suffice it to say, any tee pattern would yield a similar result.


One thing I found interesting about making a lace tee: I worried a lot about seam finishes, and when I was trying to make this as a tank, I used french seams. When I took it out to turn it into a tee, I couldn't be bothered with French seams or with changing the thread on the serger, so I just sewed the seams on the sewing machine with a narrow zigzag. On the outside, I swear I can't see the difference between the French seam and the zigzag. With a more delicate lace there might be a difference, but in the future, I won't bother with the French seams unless there's a real need.

Other points about the Parfait: to deal with my very narrow upper chest, I used the size 0 at the top of the neckline and narrowed it yet another 1/2" per side. I tapered from the size 0 to size 4 by the waistline, and used the size four for the waistband downwards. The straps, and the problems therewith, we have already discussed at length.

Many sewers noted that the facings are pretty puny at the neckline, and I would not disagree. Fully lining the bodice would be a nicer way to go, but it does work as designed. Adding a little bit of double-sided fusible interfacing to hold the back facing down eliminated issues I had with that bit flipping out (and me not realizing it, since I couldn't see it!).


Actually, the most difficult part of making this dress was figuring out how to lay out the rayon challis animal print. I definitely did not want to cut it randomly, but rather I wanted the different parts of the print to line up and to be mirrored across the front and back of the dress. It took hours to think that through and cut each piece individually, but I was pretty thrilled about how it worked out in the end. I can never learn this lesson enough: almost every print needs careful layout and attention to look its best. Every time I think a print is totally random and cut it without planning how the motifs will line up, I am disappointed when I see the outcome in the mirror.