Monday, March 24, 2014

Souvenir T-Shirt Lady Skater Dress

Oh, to love jeans as much as most people do!  Life would be easier. Sometimes I like them okay (usually when I'm on the thinner side of my varying body composition), but honestly, even then they aren't my favorite. And for swing dancing, they make me extremely sweaty.

You've got to understand: I am usually cold. I haven't reached that time of life when overheating at random moments becomes a problem. I'm the one piling two sweaters and a shawl over silk long underwear and a t-shirt. So if I get too hot wearing jeans for swing dancing, I just don't understand how lots of folks do this very physical activity dressed in our culture's casual uniform.

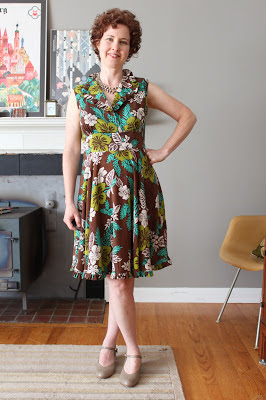
For evening dances, of course I am going to wear a nice dress or a skirt, but for daytime classes at weekend workshops I need something casual, comfortable, packable, reasonably cute and, ideally, not too mom-like. Lots of the dancers at these events are in their twenties and thirties. I could actually be the mother of most of them. And I'm fine with that, but I just don't want it written all over my outfit.


Since I find a dress so much nicer to wear than separates, I made up a swing-dance-themed Lady Skater dress using an event t-shirt stolen from my husband. I've written about the swing dance mecca that is Lindy Focus before: a five-day extravaganza with nearly 1,000 attendees and culminating with a huge New Years' Eve celebration. I have my own t-shirt from the event, but it wasn't nearly enough fabric to recut into something else. Good thing his shirt was an XL. Any smaller and I wouldn't have been able to get the Lady Skater size 3 bodice out of it.


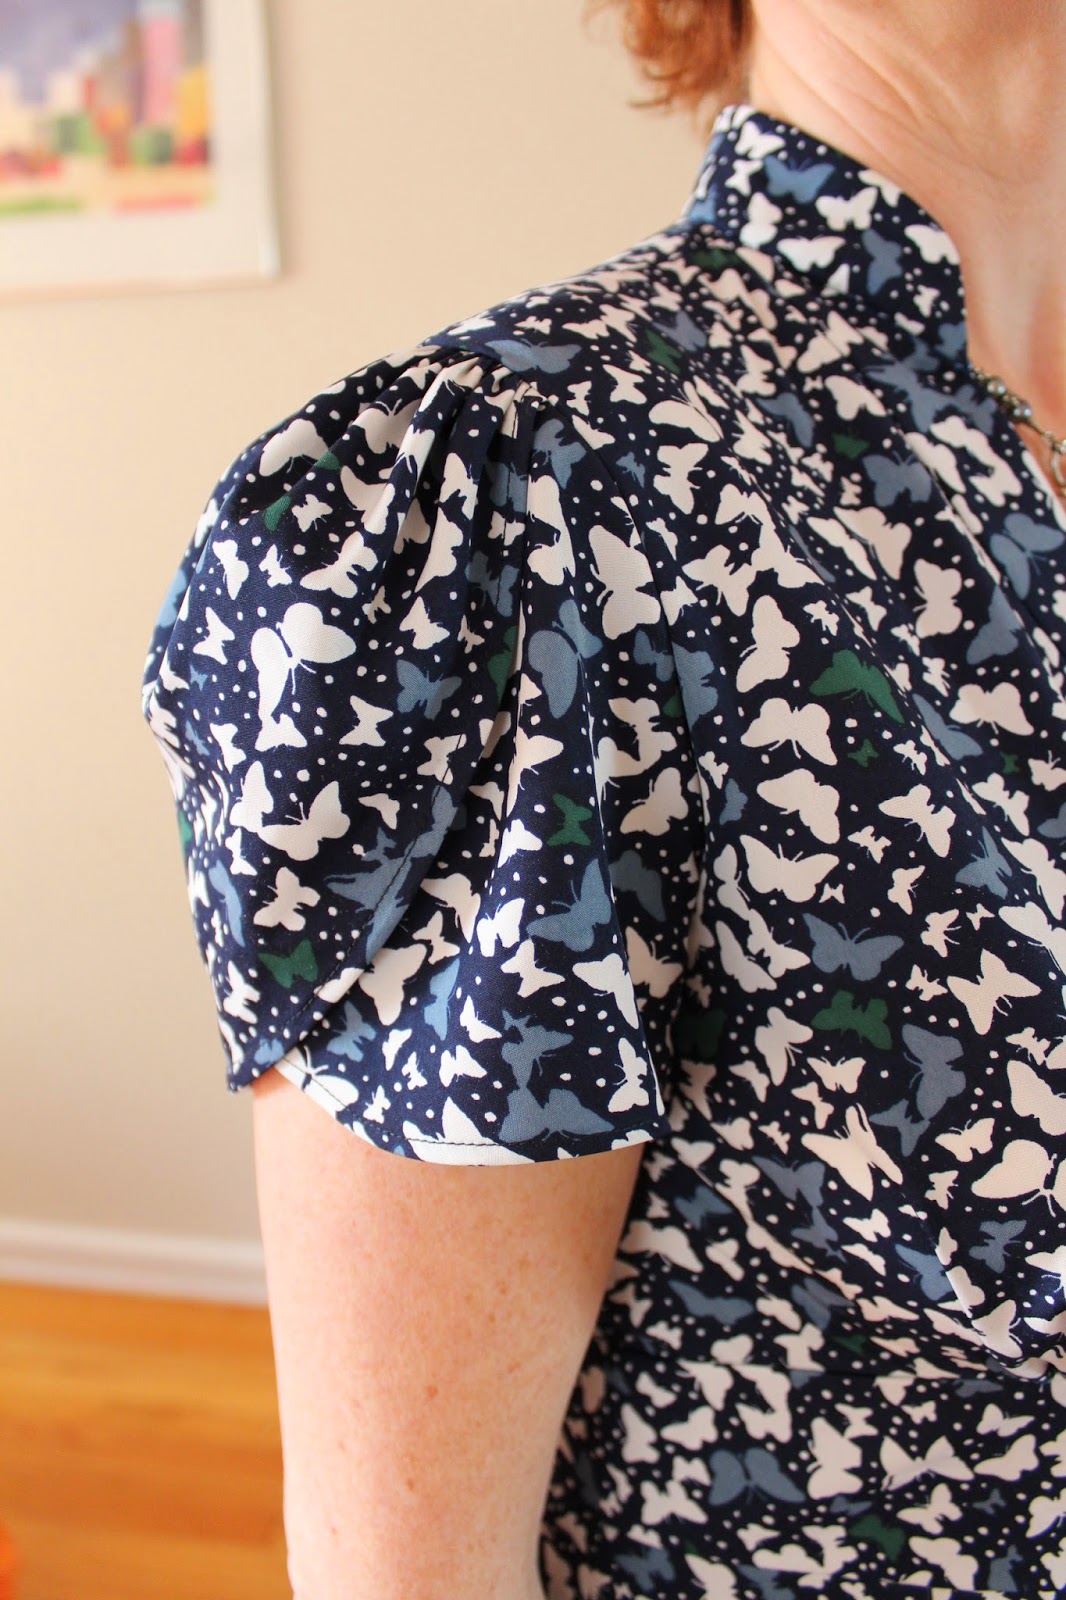
The non-Lady-Skater addition (I always have to tweak something, it seems!) is the sleeve, which was borrowed from an Ottobre Woman t-shirt pattern from the 2/2007 issue. I picked this sleeve because I have used it before and liked it. The binding at the bottom of the sleeve is eked out of the ribbing from the neckband of my husband's shirt.

Ottobre Woman 2/2007 Rose Top sleeve. This one is gathered both at the cap and the hem.
I've had good success with swapping in a gathered sleeve for another type of sleeve on a range of patterns. If they don't fit exactly, I tinker with the gathering until they go in. Probably not technically correct, but it usually works out well enough for my satisfaction.


The skirt portion is made from an active wear polyester knit with a high (12%) spandex content from Hancock's. I bought several yards of this at 40% off, and I am hoping to make some more basic items from it. With all that stretch, it is very, very forgiving and I hope it will perform better in terms of wear and pilling than a ponte-type of knit.

Since this dress is all about its activewear purpose, I had to include an action shot!

The leopard print leggings are McCall's 6360, and are blogged about here.

Saturday, March 22, 2014

McCall's 6503 Butterfly Print Dress


Really, sometimes I think I should just stick with making this dress, McCall's 6503. 

First version, using the 6503 bodice with the ruffled turnback collar and waistband, with a 3/4 circle skirt:

Love the colors of this dress. It is very comfortable, too.
Mashup dress using the 6503 waistband:

Same basic shape overall as McCall's 6503, but the bodice here is Colette Ceylon and the skirt is Colette Parfait
The second full version, not shown, of the dress is really the best so far, made from a beautiful Liberty of London print and using the 6503 pleated skirt. Unfortunately it is yet to be photographed! I suppose I am hung up on wanting to do the dress justice.

So, this version is view D with a pleated skirt and a banded, stand up collar:


One new-to-me element is the neckline treatment. Isn't it nice how it opens up and frames a necklace?


At the back, the neckline hugs the back of the neck but doesn't get tangled up in my hair.


And, the full view of the back:

 The second new element for this dress is the self-drafted ruffled tulip sleeve.


If you'd like to develop a tulip sleeve of your own, I highly recommend this wonderful tutorial by Sew Many Seams. She does a thorough job of explaining the benefits of this sleeve type, construction options and clear drafting tips. I chose to make my sleeves both gathered and tulip shaped (covered in the tutorial), but next time I'd like to try an ungathered version (also covered in the tutorial). What I most like about this sleeve, as a now-mid-forties woman, is that it provides plenty of upper arm coverage with great freedom of movement. Actually, I've always liked my upper arms to be covered. With my narrow shoulders, some type of sleeve seems to add the illusion of greater breadth to the shoulder line. Also, I am so fair-skinned and burn so easily that covering the shoulders makes a dress more wearable for me, even and especially on the hottest days.

As you can see from the tights and boots, it's not warm enough yet to threaten much of a sunburn. Here is how I wore it for my substitute teaching stint yesterday, with a denim jacket:


I was dutiful and added inseam pockets, which I really appreciated during my teaching day. Unlike my first two versions of the dress, I installed the side invisible zipper this time. The dress can pull over my head, but it's probably a better policy to add the zipper and save the aggravation of the messed-up hair and possible strain on the dress over time.

The only thing I don't like about the dress, and it's not insignificant, is the fabric. Specifically, the tendency of this 100% polyester print to generate enormous amounts of static. I bought the piece from Hancock Fabrics for its charming butterfly print and nice navy, cream and green color palette. As I began to cut it though, I realized just how "charged" it was. Aside from its inclination to cling viciously to itself and anything else, it was easy to work with (it pressed well, and frayed only slightly).

 If you have any great tips for managing static cling, I'd love to hear them!

Thursday, March 20, 2014

Not Quite Vintage: Burda Petite Fashion Blouse from 1996


Though I don't know when Burda stopped putting out its Petite Fashion magazine, I have happy memories of sewing from this publication back in the mid-nineties. Sadly, over the course of several moves, I must have decided that my old issues were obsolete, and I threw them out. When I spotted an Autumn/Winter '96/'97 issue on eBay, I bought it for old times' sake and also because I thought it might have some good basic styles.


I'm no expert in what's current, but these patterns really don't look dated to me. In addition to the 809 blouse I just made, I'd like to try out the trouser, A-line skirt, tunic blouse and raglan-sleeved dress patterns.  I've seen a lot of long woven t-shirt style tops lately. Here is one of the three versions of that "current" silhouette from this magazine:


I've written about my liking for the convertible collar a couple of times: DuBarry 5265 and Simplicity 9816. I'm influenced in this liking by insightful, hilarious Barb at Sewing on the Edge. In this great post, she talks about the convertible collar blouse as a distinctly feminine style that flatters a lot of women.

Barb also points out that a convertible collar pattern with some shape to it is hard to find, and that is certainly true. My DuBarry blouses have been successful, but I wanted to try a darted pattern rather than one with princess seams. The Simplicity 9816 has darts and looked good when I was standing still, but somehow I made it much too constricting in the arm and shoulder area--very uncomfortable. So I was looking for a fresh start with a darted pattern.

In the Petite Fashion magazine, Burda shows this blouse in a crisp white, in a blue and black bold polka dot, in powder blue silk and in a floral print cotton with a tiny ruffle around the collar edges. There are also (rather boxy) dress and nightshirt versions, demonstrating that this is a very versatile pattern.


Here is my version:


While I appreciate that Burda offers a petite range, I have found that these patterns still require significant alterations to the shoulder area to give me a good fit. After tracing the pattern pieces in size 19 (the smallest size this pattern was offered in, equivalent to a Burda 38) at the shoulder line to size 21 at the hip, I reduced the shoulder width in the front and back by 3/4". Fitting as I went, I discovered that I needed to take another 1/4" out of the shoulder width, for a total of 1". That's a big reduction!


The blouse is quite roomy. I may have gone overboard in tapering out through the waist and hip area, but I wanted the blouse to have an easy fit. I'm all tucked in for these photos, just because that seemed to look right with the skirt (and because I was headed out dancing, and wanted everything to stay covered). I also plan to wear the shirt untucked with pants.

I scaled the collar down somewhat. It had quite a pointed, nineties shape, so I blunted the front collar edges by about 5/8".


Trustingly, I didn't measure the sleeve armscye seam against the garment armhole seam and was subsequently disappointed to learn that the sleeves had a large amount of ease, far too much to set in smoothly. I still haven't gone back to alter the pattern, so I'm not sure of the exact amount of extra ease, but it may have been close to 3". I trimmed and basted and unstitched and trimmed and basted some more to get to a sleeve which could possibly be sewn into the armhole.

Next time, I will adjust the dart positions: the horizontal dart is too high and too long, and the two vertical darts need to be shortened at the top.

The fabric is a Burberry mini-houndstooth cotton shirting bought a couple of years ago from FabricMart. Back in the days when I spent actual money on buying clothing for my former professional wardrobe, I purchased a couple of Burberry shirts and their quality was amazing. I hope this shirt holds up as well as those (which are over 15 years old and still very wearable). I used silk organza as a sew-in interfacing on the collar, facings and cuffs.


The trickiest part of sewing a convertible collar is finishing the back neck edge. I've taken to making a short bit of self-bias binding and applying it to the neck seam. This has worked better for me than the current pattern instruction standard procedure of staystitch the back section, clip, turn in, trim and then try to get it all to line up at the shoulder.


I had several button choices on hand and nearly went with a standard cream shirt button. But then I decided these green plastic buttons--which are probably about the same vintage as the 1996 pattern--from my stash would be a little kickier. I made the whole shirt on my vintage straight stitch Singer 201 (and modern Juki serger), so I used the Singer buttonhole attachment to make the buttonholes. They came out very nicely, though my choice of thread color wasn't too great. It was the best I had on hand.