Saturday, December 6, 2014

New Look 6298: My New Bestie


You know how I (and lots of other bloggers) am always like, this dress is nice, but if I had done this, or if the fabric were that, or next time I will change this? Yeah, I'm not going to say any of that stuff today! I am happy with this dress, without qualification.

I have some very, very similar patterns (including another New Look raglan top which could easily be lengthened), but I liked the pattern illustration and the general vibe of this dress so much, I went ahead and coughed up the extra $4 to have the best possible chance for success.


Normally I avoid the New Look patterns that start at size 10, as this tends to be too wide for me at the shoulder. This time I cut the 10 through the waist, tapered out to 14 at the hip through the hem, and did a 1" swayback adjustment. After putting the pieces together, the shoulder area was indeed too wide, and I took in the center back about 3/4" and back raglan sleeves 1" each--for a total reduction in shoulder width of a huge 2 3/4". But it was an easy change and everything else suited me fine. It would be possible to take in the side seams as much as 1" per side for a closer fit, but at the moment I feel satisfied with the roominess.

Could definitely be more fitted, but I like the looseness for now.
The shoulder dart worked well for me.
One reason I was eager to make a success of this version was my fondness for the fabric, a quilted polyester doubleknit from FabricMart (recent, but sold out). On the website, only the striped side of the knit was shown. I was so thrilled when it arrived to find that the "wrong" side had an adorable pattern of "x" shaped cross stitches. Both sides were so appealing that I wanted to find a fun way to use them both. The possibilities are endless, but I am happy with this combination. Wish I could get more of the fabric!


The one change I made was to the neckband. New Look included a different kind of pattern piece than the type I have seen before. Instead of a straight band seamed in the back, it was a notched pattern piece meant to be sewn together in a mitered v-shape in the front. That went together fine, but then I couldn't get it sewn onto the garment edge well. I needed two more tries to get the neckline to work out using the more common method (with a little pleat to form the vee at center front). First I used a narrower band like the pattern, just with the joining seam in the back. With the bulkiness of my double-layered fabric, though, it was just too narrow. I cut another band wider, and used a wider seam allowance. The pattern specifies 3/8" for the neckline, which would normally work great, but not in this fabric; 5/8" worked much better.

Pockets!
We all love pockets, and these are big! I didn't sew them exactly as directed--that would have made them stand away from the body slightly. I know from previous experience that I don't like that. But pinning them flat was no trouble and it worked out fine. These pockets have a stitched hem on the top edge and turned under edges on the side fronts and bottoms. The side seams are sewn into the garment side seams.

I've already made another version...in fleece! I did change the pockets in that one, since I didn't want to turn under an edge in fleece. The biggest disadvantage of the fleece version is that, once I have it on, I will not want to take it off until May. It's a slanket to end all slankets. I'll show it to you soon.

Monday, November 10, 2014

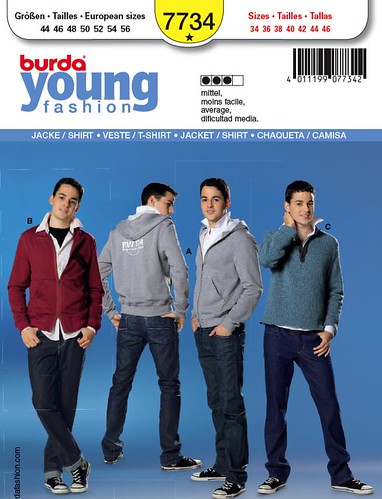
Burda 7734 Hooded Sweatshirt in Fleece


My son has never been a great one for posing for photos, but I think he's getting less cooperative as the birthdays go by. Here he is in his mom-made 15th birthday present, a fleece hoodie.

There might be more to say about the shopping for the supplies to make this garment than about the sewing. The Polartec fleece came from FabricMart for a great price. In addition to the main blue color, it has some faint fibers of black, which was very fortunate when it came to pairing the fleece with notions like a separating zipper, ribbed cuffs and waistband and the cord for the hood.

Real, honest-to-goodness ribbing is something I don't usually source or incorporate into my projects, but in this case it seemed that having a nice stretchy fabric with great recovery at the cuffs and hem would make the shirt much more polished and therefore more exciting to a 15 year old boy (or to my forty-something husband, if the boy turned out to not like it). I looked out a source at The Rain Shed, which is based in Oregon. They have two weights of ribbing, both of which look very nice on the website, but since my fleece is a regular weight, I went with the Standard Ribbing rather than Heavyweight. I also ordered the coordinating seamless ribbed cuffs. The quality is nice and the weight is perfect. There are quite a number of colors to choose from, but in this case black was the best choice.

The 24" separating jacket zipper and the black cord at the neck also came from The Rain Shed. I was a bit concerned about the time required for shipping, since the supplies would be traveling from coast to coast, but I ordered on Saturday morning and had my package early Monday afternoon. One thing to mention is that you cannot order directly from The Rain Shed's website: you must call in your order. The phone staff was friendly and efficient, though.


Online reviews indicated that this sweater runs small and short, so I made the next-to-largest men's size, a 42. It looked very large while I was working on it, but it seems like a pretty good fit on a rapidly-growing teenage boy.


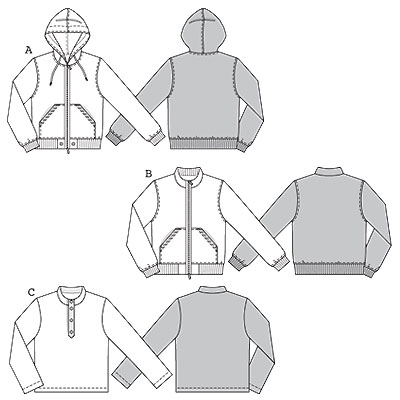
Instead of turning a hem to the wrong side on the pocket edges, I fully lined the pocket with a thin black polyester ITY knit, which made a better edge on fleece. The pocket was turned right side out, topstitched along the angled edge, and then edgestitched into place along the top, side and bottom edges. The pattern's instructions for the zipper edge were odd to me: it asked you to turn the center front seam allowances to the outside, baste in place and trim to 1/4". The zipper tape was to be applied on top of those seam allowances, enclosing the raw edges. That might be good for a sweatshirt knit, but the fleece would have made a very bulky edge, so I applied the zipper in the "normal" way and then topstitched it.

You can't see it in these photos, but I taped the hood/neck seam edge with black twill tape, a finish I copied from an RTW hoodie.

My son is always asking me to sew more for him. He didn't have a whole lot to say about this sweater, but he's hardly taken it off since I gave it to him, so I guess that means it's a success! I hope to make him and my husband more of this style, since it is so ubiquitous and popular.

Here is the pattern, Burda 7734, which is out of print:


Thursday, October 30, 2014

Wonder Woman Revealed!


This shot somehow makes me look a lot taller and thinner than I actually am. Any ideas how to get this effect without a camera?!

I think the Wonder Woman costume was a success. I did enjoy the gratifying phenomenon of having my friends look at me without recognizing me!

Next time, I would go for shorter cuffs with grommets. The elastic loops didn't hold up very well. Everything else performed great.

I appreciate all your cheering about the contest, but I was one of the judges and therefore ineligible. One winner was an adorable sewing friend who made herself into a letter (vintage slip with love phrases written on it) in an envelope (square tunic with airmail markings and address) worn over the slip. I hope to get a picture to share with you!

Would you believe it, I think I am going to have another opportunity to wear this costume tomorrow?

Friday, October 24, 2014

Knit Tunics: I'm Collecting 'Em


And here's a quick one! Another Butterick 5954, this time the un-crossed-over version. Basically a long roomy t-shirt. I need, like, about 70 of these.


Side view, showing how the hem is longer in back.


And the back view, showing all kinds of imperfections in pattern alignment/matching/sleeve fit, but my God, it is a t-shirt. What I would like for you to notice is that the center back seam allows for a lot of flare over the booty without a lot of looseness above the waist. In fact, the pattern has so very much flare that I took bunches of it out (four inches out of the center back seam at the hem, and another inch on either side seam).

I chose not to use a cowl neck on this top so that I can wear scarves with it and layer it. For the cleanest neck finish, I used a technique which is included on a few patterns I own. For this technique, you apply a neck binding in the standard way, but then you understitch the seam allowances to the binding and turn the binding completely to the wrong side. The binding is then topstitched in place close to the folded edge.


Even though this fabric, an ITY knit I just received from FabricMart, is not very sheer, I still thought the dots might show through if I used the same fabric for the neck binding. I had a little piece of white lycra knit left over from my Halloween costume, which has the additional attribute of being stretchier than the fashion fabric.


This binding technique should really be used more often, because it looks neat and it is very durable. It puts a whopping five layers of fabric into the neck edge, so it is not good for bulky or thick fabrics.

I used a narrow band to finish the cuffs. The lower edge was tricky to hem (stitches were skipping badly), so I had to use some strips of very lightweight knit fusible interfacing to stabilize and fuse the hem into place before topstitching with a twin needle.


Only 69 to go--good thing they are quick!

Thursday, October 23, 2014

Wonder Woman Boots With Jalie 2448


Of course I wanted Wonder Woman boots to go with my Wonder Woman costume, but footwear is generally the hardest part of an outfit for me and this costume was no exception.

Pretty fabulous Wonder Woman boots are available for purchase (though they don't come cheap), or one could spray paint some thrift store boots red and add some white details. Neither of those strategies appealed to me, though, because my event is a dancing event and thus it requires dance appropriate footwear (smooth soles and comfort, which are hard qualities to find in random shoes).

My goal was to make a decent approximation of a Wonder Woman boot using a pair of dance shoes I already had but NOT altering those shoes permanently. I looked around the web for ideas, which was very helpful but didn't yield this exact strategy.

At first I planned to make spats, and I went so far as to draft a pattern and to mock it up in a piece of scrap vinyl. And it became perfectly clear to me that Wonder Woman spats are not, and should not be, a thing.

Then I thought of Jalie 2448, a discontinued pattern which includes a pullover, tights and fleece socks. Even though the printed pattern is not longer available through Jalie, a PDF version of just the socks now is.


I had seen some terrifically awful shiny stretch vinyl knit at a local shop, Foam & Fabrics, so I decided to make some Wonder Woman socks to wear with my shoes.

At first I planned to wear the socks as socks, but then I had the bright idea to perhaps try to stretch them over my shoes, kind of like figure skaters sometimes wear tights over their skates to match the color of a costume.

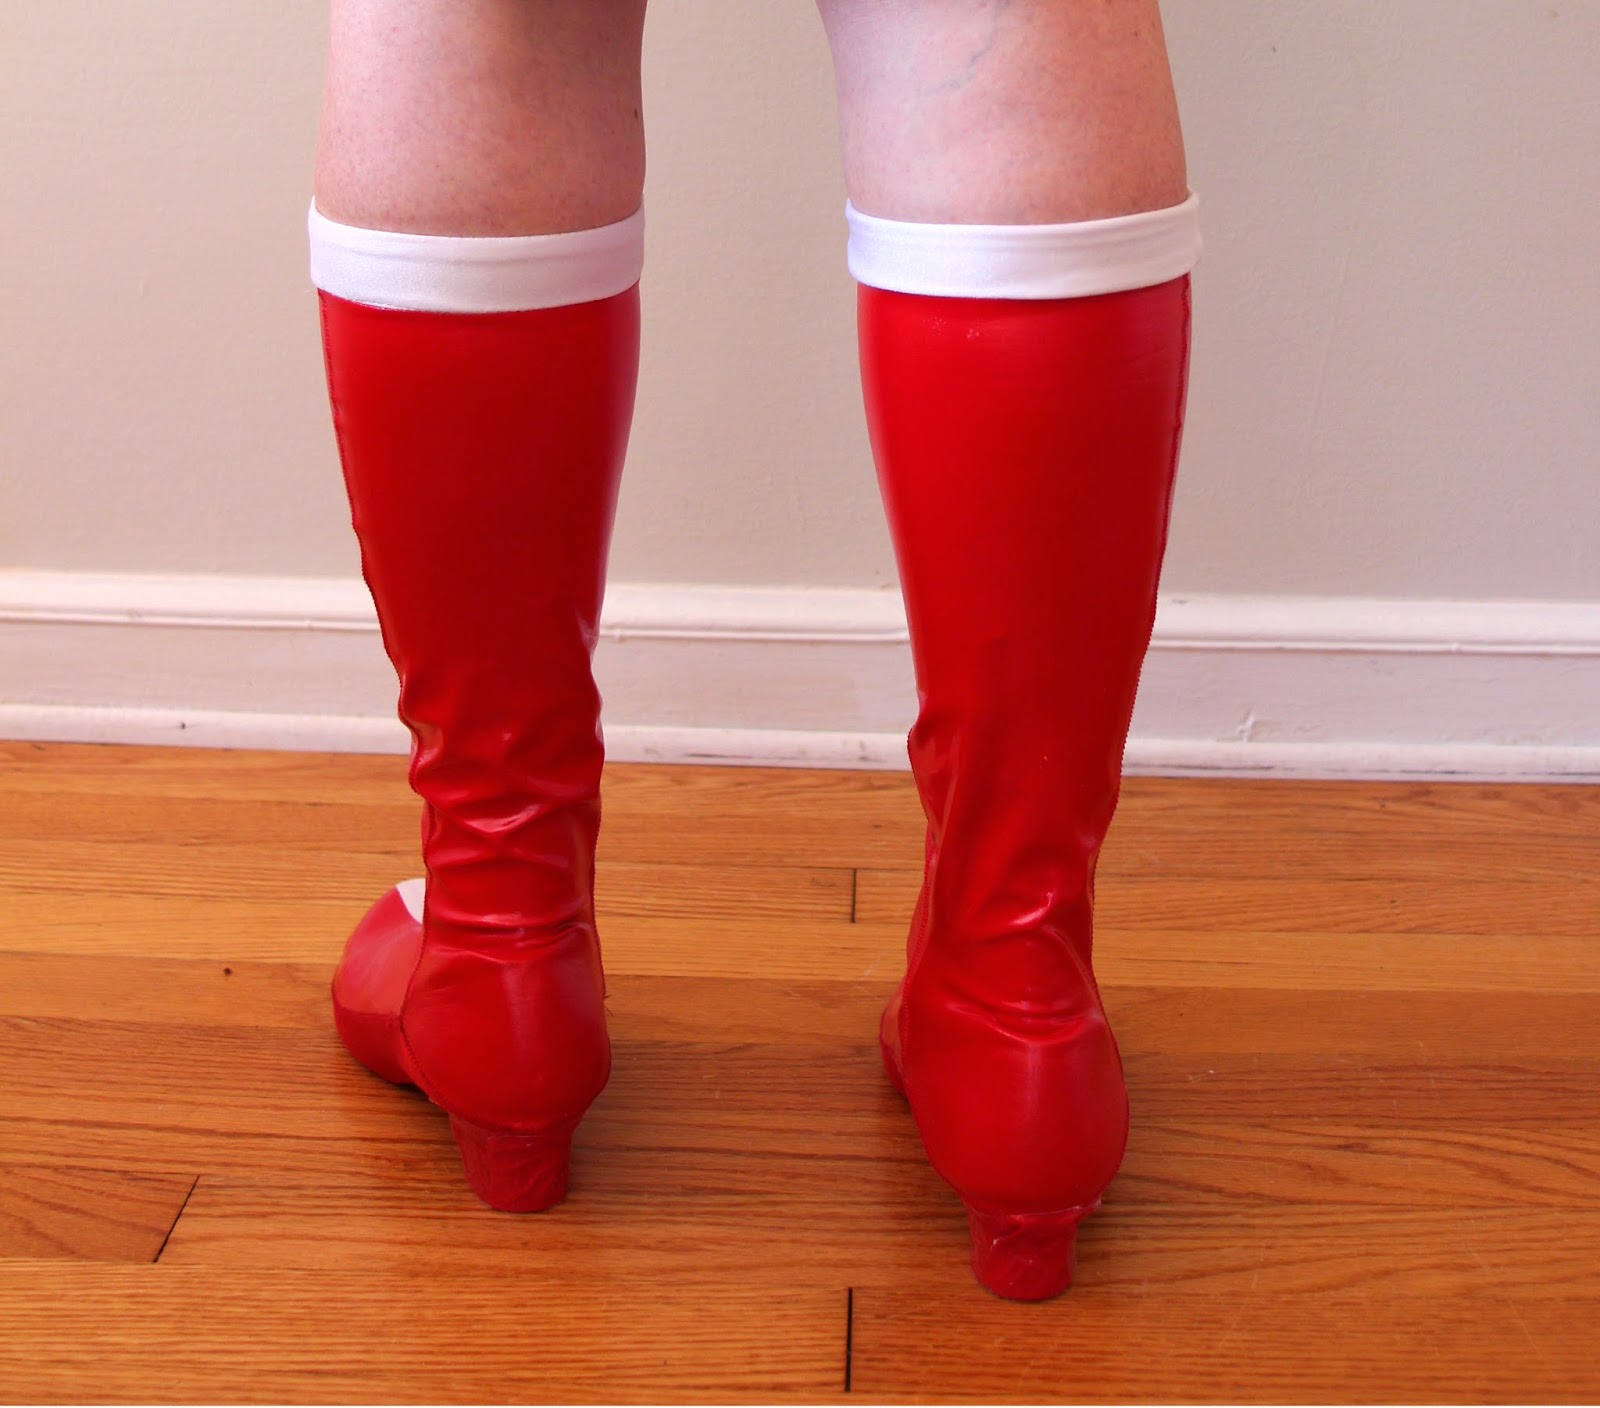
So, I made the size which corresponded to my shoe size since I had already made these socks before in fleece (and really liked them). But because of the limited stretch of my vinyl plus wearing them over shoes, I really should have made them at least two sizes bigger. Getting the shoe/socks on is no joke, but once on they are perfectly comfortable.

I used a scrap of the heavy red swimwear fabric from the top of my dress for the bottom part of the foot because it was both stretchier and more durable than the vinyl. I altered the top of the front of the sock to come to a point in the middle, and I drafted a separate shaped facing/band to be made from a scrap of white stretch fabric.

Jalie 2448 sock pattern pieces plus added shaped band
The white stripe down the front of the boots was created with a piece of foldover elastic, and the white band at the top was from a scrap of white fabric from the dress. The back part of the band was just a crosswise strip of the white fabric cut 1 1/4" wide. Two sets of facing pieces were cut for each sock. Then each set was joined into a ring at the side seams, and the two rings placed right sides together and joined along the top edges. I used a shaped piece of stiff interfacing right in the point of the right side of the facing piece to hold the pointed shape. The band was turned right sides out, and the seam was understitched to the rear to hold everything in place for a sharp edge. Then the band was attached to the sock, pivoting at the point.


I didn't want to mess up my dance shoes, but I did want everything to be red. First I covered the heels of the shoes in no-residue medical tape (masking or painter's tape would also work).


Then I inserted the shoe into the sock and cut out the heel area.


After pulling the sock up over the heel, I used red duct tape to cover the heel and to secure the cut edges of the sock.


After my costume party, it should be possible to remove the sock, remove the duct tape, remove the lower level of medical tape and, voila, my dancing shoes will be just as they were.

The reason I think it is okay in this case to have smooth fabric as the bottom of the ball of my shoe is because I will be walking and dancing on a smooth hardwood floor. Some people actually put lycra sleeves over street shoes to make them into smooth dance shoes. Smoothness is not just okay for dance shoes, it is desirable. I actually think the heavy nylon lycra fabric used on the bottom of the socks would hold up fine to a night of trick or treating, but it would be a one-time use kind of situation.


If I were making these again (and I am kind of tempted to do another pair, since I have plenty more fabric), I would make them bigger, taller and perhaps add an invisible zipper to the inside leg seam in the ankle area. Then they would be a lot easier to get on and off and would hold up better over the long run. But then again, I'm happy with the boots as they are, too--they are comfortable and very importantly, they stay up!


I could use a spot more duct tape on the heel above, but this view shows you how it all works pretty well.

This strategy could be used for making all kinds of costume "boots" when you don't want to either buy a dedicated pair of boots or permanently alter an existing pair of shoes.

Monday, October 20, 2014

Halloween 2014: Swing Dance Wonder Woman!


When I was a kid, Halloween was a low-hoopla affair all the way around. The culture was less focused on the "holiday", and that was compounded for me by living in a rural area (with no hope of pedestrian trick-or-treaters). I don't remember dressing up or going house-to-house at all past the age of eight. Even when I did go, my costumes were very last-minute productions, involving a drugstore witch hat and rubber bat.

Last year my husband had a brilliant costume idea for our Halloween swing dance, and we ended up winning the costume contest. That positive reinforcement must be the new element that has resulted in my feeling much more enthusiasm for dressing up this year (though I have declared myself ineligible for the contest).

I had planned to wait until after Halloween to blog about my costume-making, but then I thought, "Wait, who cares about Halloween costumes right after Halloween?" So I decided to chat about a few of the elements of my costume, in case they are of any help to folks in the throes of their own costuming efforts.

While I am declaring myself to be a bit of a convert to costume making, I do still retain plenty of skepticism about the time, money and effort it requires. Multiple trips to Joann Fabrics, Hancock Fabrics and the local Foam & Fabrics are not my idea of the most productive way to spend my time, and yet I definitely am guilty of taking such trips over the last week.

A further hangup is that any costume I wear must be reasonably modest and comfortable. No short skirts, bustiers or tragic shoes. With those parameters in mind, my costume theme is "Swing Dance Wonder Woman," an idea I must have originally gotten from this wonderful Lady Skater version by the pattern's designer, Kitchy Coo:


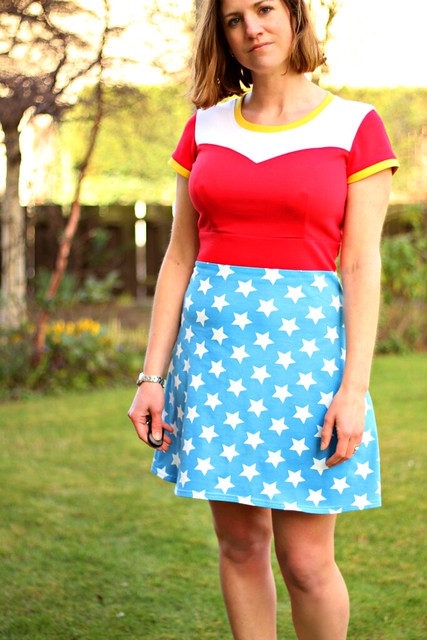
For my version, I combined the Lady Skater with McCall's 6435 knit sweetheart top. At first I used nude fabric for the yoke, to better mimic the strapless bustier from the TV show, but the nude fabric looked unflattering around my face, so I made another bodice with a white yoke.

For the skirt, I originally planned to order printed star fabric (like my inspiration), but then foolishly decided that I wanted my stars to be more like Wonder Woman's: spaced more densely toward the waist and then stopping before the lower edge of the garment.


I toyed with the idea of making the stars vary in size like in this version of Wonder Woman's costume. I cut out a full-size copy of the skirt in freezer paper and used templates of different-sized stars to trace the design. I planned to cut out each star with an Exacto knife, iron the freezer paper onto the fabric and stencil the all-over design in acrylic paint. With the whole skirt pattern spread out in front of me, I realized that so much cutting would put my wrist tendonitis into full-fledged uproar and scrapped that plan.

Instead, I purchased a Fiskars large star punch from Joanns. I don't know whether to praise or heckle the thing: it was invaluable for my purpose, but very temperamental and difficult to use. Halfway through the project it got too dull to punch any more stars, and I had to exchange it for another one. And yes, I did search the web for how to sharpen it and tried those tricks, but to not-good-enough effect. Anyway, I made little star cut-outs, then arranged them somewhat randomly, denser toward the waist and gradually becoming further apart toward the hem, ironed them on and stenciled. It took two coats of paint to get a nice bright white for the stars.

Fiskars XL Star Punch, here making the star for the crown

Right, so all that star nonsense took days of buying punches and doing successive coats and letting them dry...rather ridiculous.

In the meanwhile, I made the accessories. Right away I rejected the idea of copying the eagle over Wonder Woman's boobs, reasoning that, without that element, the dress can be worn on the Fourth of July or another patriotic occasion. Also, for crying out loud--too much work!

For the belt, cuffs and the crown, I found a wonderful gold-coated denim at Hancock's. That fabric was great to work with, since it has some substance to it, sews easily and isn't scratchy like so many metallic fabrics can be. I didn't do much experimenting with pressing this fabric, preferring instead to use understitching and copious amounts of double-stick adhesive tape (more on this in a moment) to hold it in place. It seemed to me that the possibility of discoloring the metal finish was high, even though the denim fabric itself could stand up to pressing.

The belt needed an adjustable closure at the back to accommodate weight fluctuations or different degrees of comfortable-ness. A simple laced back seemed to be the best solution, even though the belt was not very wide at that point. I do think it could be a little shorter, to provide a greater range of sizes, but it's fine. Also, I felt the belt would need at least a little boning in addition to its inner layer of stiff interfacing, to prevent it from folding over at the center front. It would have been just as easy to sew the channels for the boning on the inner side of the belt, and thus to have them invisible from the right side, but I decided a few lines of stitching would be more flattering on my not-tiny waist than a single unbroken expanse of shiny gold.


In general, the process for the gold accessories was to sketch a shape in my notebook, measure the area of the body where the item would sit and then draft a simple pattern.

To sew the belt, a stiff interfacing, cut to the finished size of the belt (i.e., without seam allowances) was first applied to the wrong side of the outer fabric piece. I used a fusible hair canvas, which was really too costly of a material for use in a costume, but it was the only stiff material I had on hand in a sufficiently long cut to make in one piece. After the interfacing was basted into place, I transferred the markings I had added to my paper pattern to the interfacing and sewed channels for the boning. Then I machine-stitched the top edges of the outer and inner fabrics  right sides together, and understitched the seam allowances to the back. At that point I sewed the short back edges together, then trimmed the seams and turned the belt right side out. At this point the boning was inserted into the channels, trimmed to sit inside the seam allowances at the bottom edge. In another fabric, the lower edges might have been topstitched together, but I thought that a more invisible method of joining would look better in this case.

Here was one of the many places I used and was grateful all over again for a notion that isn't widely used in the garment sewing space, Jodees's Sealah Tape. This stuff is an incredibly sticky, release-paper-backed adhesive that can be used in place of glue, hot glue or petroleum-based cements. It is amazing because it is easy to control and it bonds things instantly and permanently, with no drying time required. You do not want to stitch through it, because it will immediately gum up your needle. I like the absence of fumes and, again, the immediacy. Apply, burnish, remove the paper liner, press the surfaces together and move on to the next step.
The cuffs and crown also make use of the Sealah tape. Maybe my photos will be as useful as a lot of chit chat.


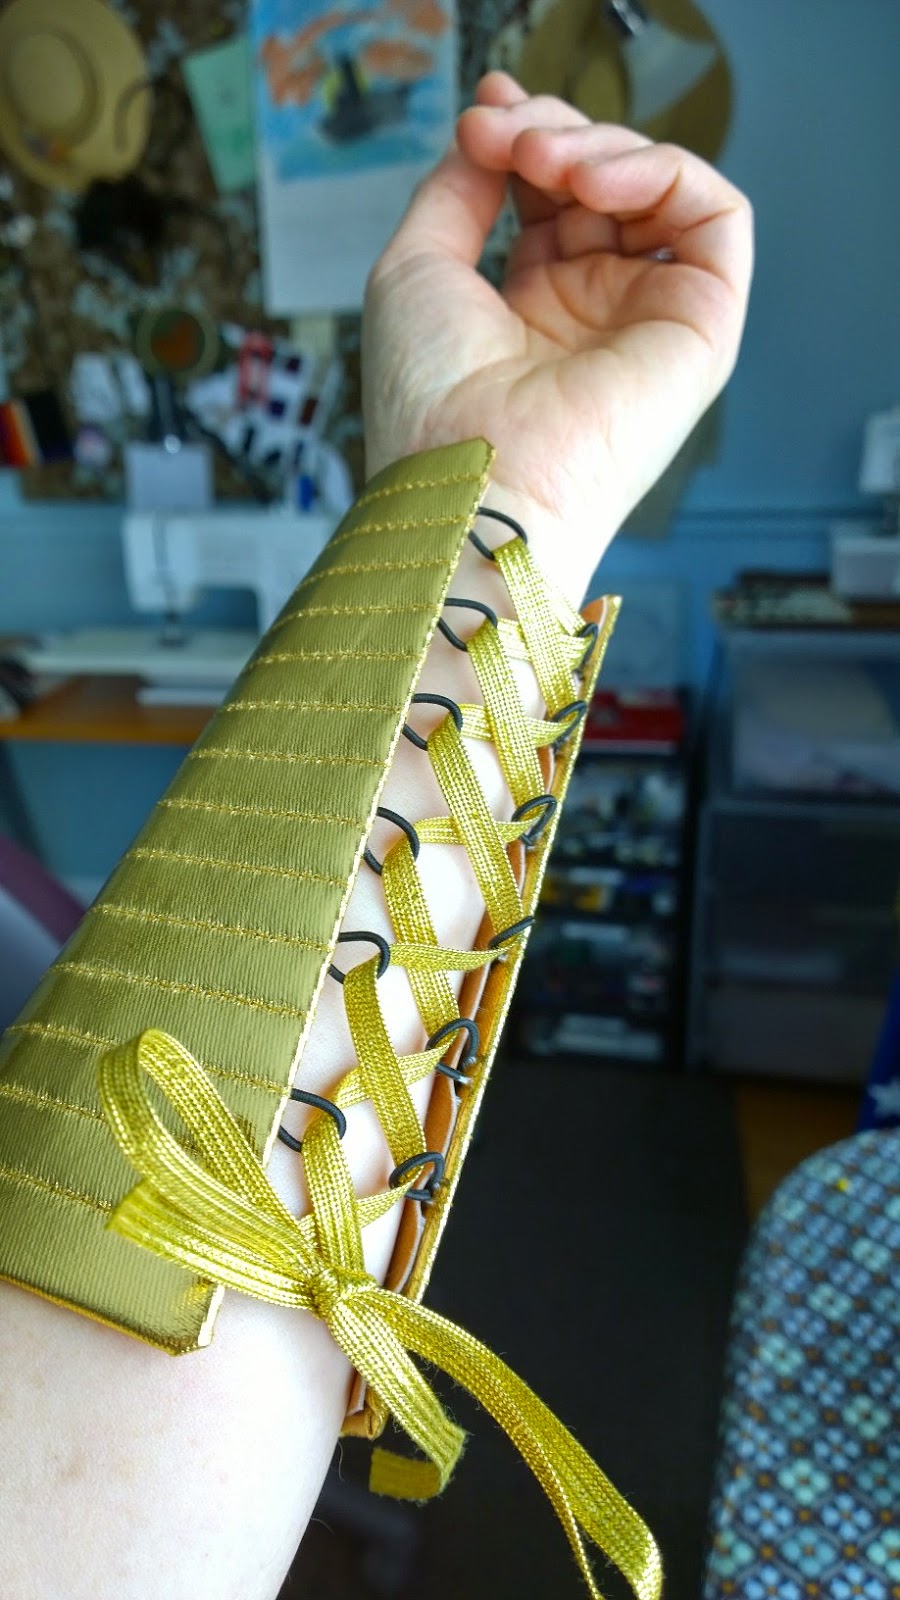
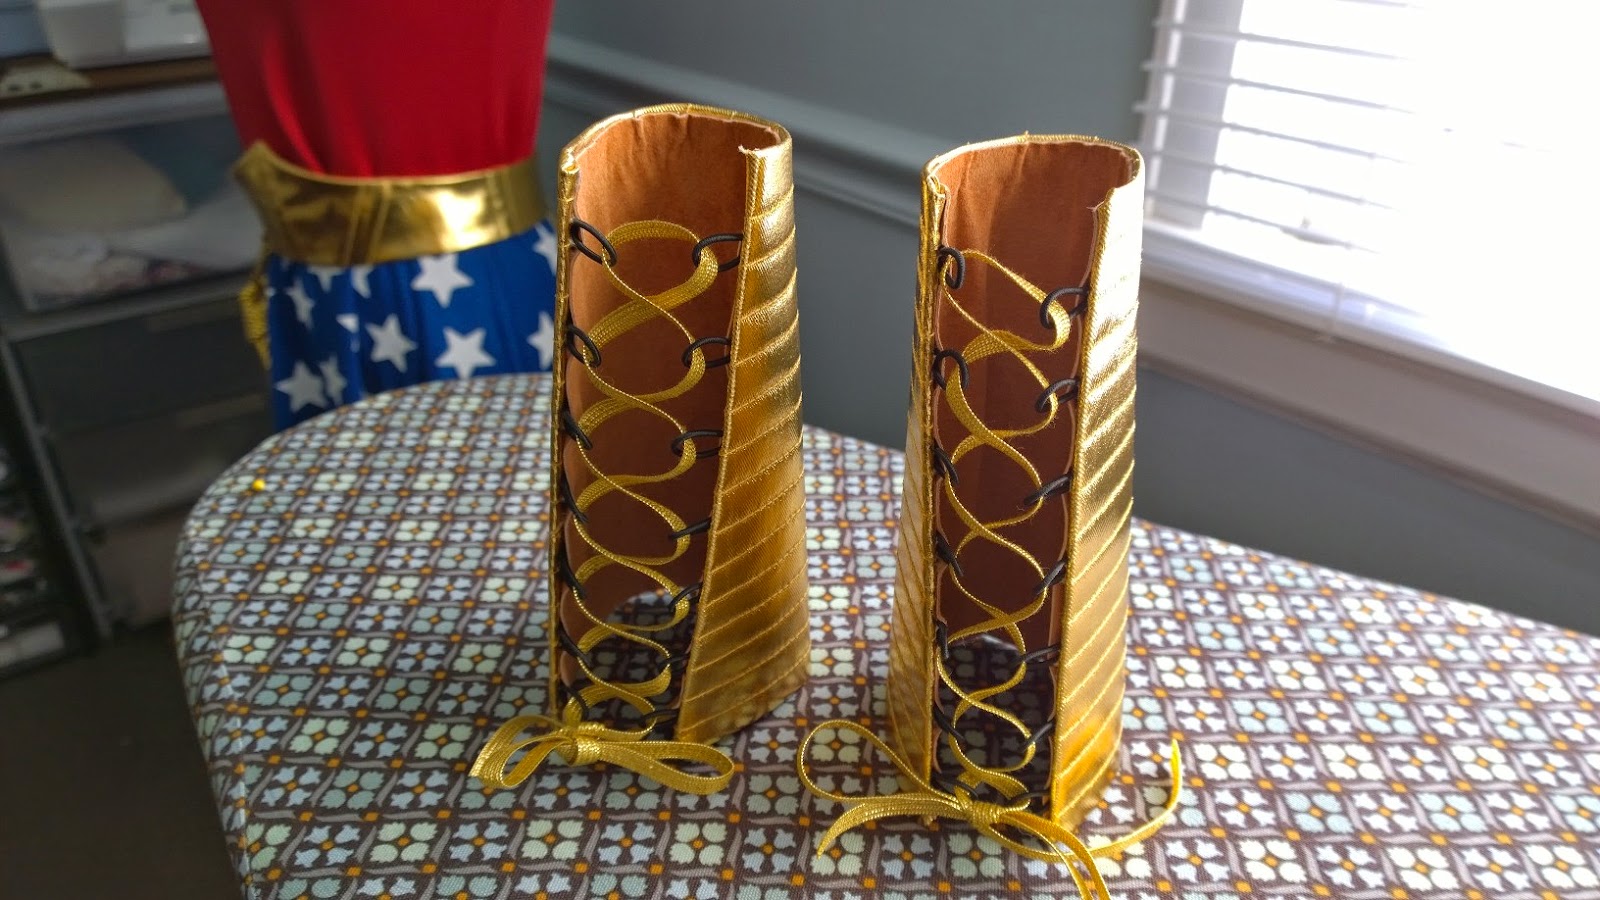
The inner layer of the cuffs is a stiff Peltex interfacing, with quilted lines 1/2" apart. Using the Sealah tape, I turned the edges of the fabric to the inside of the cuff, notching the curved edges to allow them to follow the edge smoothly. Then elastic loops were adhered to another layer of Sealah, and then the whole back side of the piece was covered with a piece of suede (recycled from a large thrift store suede jacket) using Sealah tape around the edges and craft glue (like Sobo) in the center. I did press this under a weight for a few hours to make sure all the layers would adhere together.


Eyelets or grommets would have been another solution for lacing the cuffs, but I didn't have enough of the proper size in gold, and I couldn't face another run to the store for yet another notion. I think the elastic loops will work fine and they have enough give to allow me to slip the already-laced up cuff over my arm.

I got a bit carried away with the length of the cuffs. Wonder Woman's are shorter, but I reckon I'll be able to deflect even more bullets and death rays with longer ones.


The base of the crown is a large yogurt container, cut into a crown shape and covered with the gold fabric.


In the photo above, which is a repeat from earlier in the post, you can see the small elastic loops at the back side of the crown. I will use these to mount either a comb on each side or bobby pins. The crown actually stays put pretty well on its own, because it is so very lightweight, which suits my comfort requirement perfectly!


Whew, I think I will have to finish up my description of the costume with a separate post for the boots tomorrow. I am pretty pleased with them, so I have a bit to say about how they are made, but for the moment I'm costumed completely out!

How are your costumes coming along?!!

Thursday, October 9, 2014

Butterick 5954: Another Tunic (and New Look 6228 Skirt)

But before the tunic talk, I'm excited to say that my mom is fine! Her biopsy results came back today and there is no cancer. She was fuzzy on the exact name of the diagnosis, but it has something to do with a lymph node forming a hard, fixed cyst in some sort of an autoimmune reaction. Though I felt sure she would be okay in the end, I am so very glad that she does not need to undergo cancer treatment.
Thank you for your good wishes!

And just know that this can happen: you develop a lump in your armpit, go to the doctor, who messes around for six weeks, first telling you that you definitely have a malignant metastasis from some location in your body, refusing to do the test that you are requesting (a biopsy) until several other tests have been done and then find out that your lump is quite benign after all. I am not impressed with the care she received, to put it mildly.

Now, to our regularly scheduled tunic explorations. Here we have Butterick 5954. And I like it much better than the previous tunic I showed you. I had been trying to purchase this pattern for months, but it was always sold out during pattern sales (or it was summer). Finally snagged it though, and I am glad I persevered.


Obviously, the crossover shape is the main attraction. I decided to use this rayon/lycra knit, supposedly originally from J. Crew but bought at FabricMart, because it seemed too thin and limp for a more fitted top or dress. It falls nicely but it shows everything underneath, including the seam of the crossing-under portion of the front of the top. Good thing this top is loose!

No pockets in this one, and I can't see a good way to add them.

I remembered to check some reviews at PatternReview and online and I was glad I did. Many sewers wrote about the very large amount of flare at the bottom of the tunic and how it could give the impression of a "tail" in the back. I cut out the XS, minus at least 10" of circumference at the hem. It's something of a happy accident that the resulting fullness seems just right: not too much and not too little. From the two yards of fabric (minus some prewashing shrinkage), this was as full as I could fit onto my fabric, but I wouldn't want it fuller. I also shortened the front and back pattern pieces 1 1/2" at the printed line on the pattern, and the sleeves the same amount.


The cowl is made up per the pattern and it is a little skimpy, but there wasn't enough fabric for a deeper cowl in any case.


Here is a demonstration of the potential for flipping up, which is not inconsiderable. After taking these photos, I was out in gusty wind and I did feel the need to hold the lapping side down.


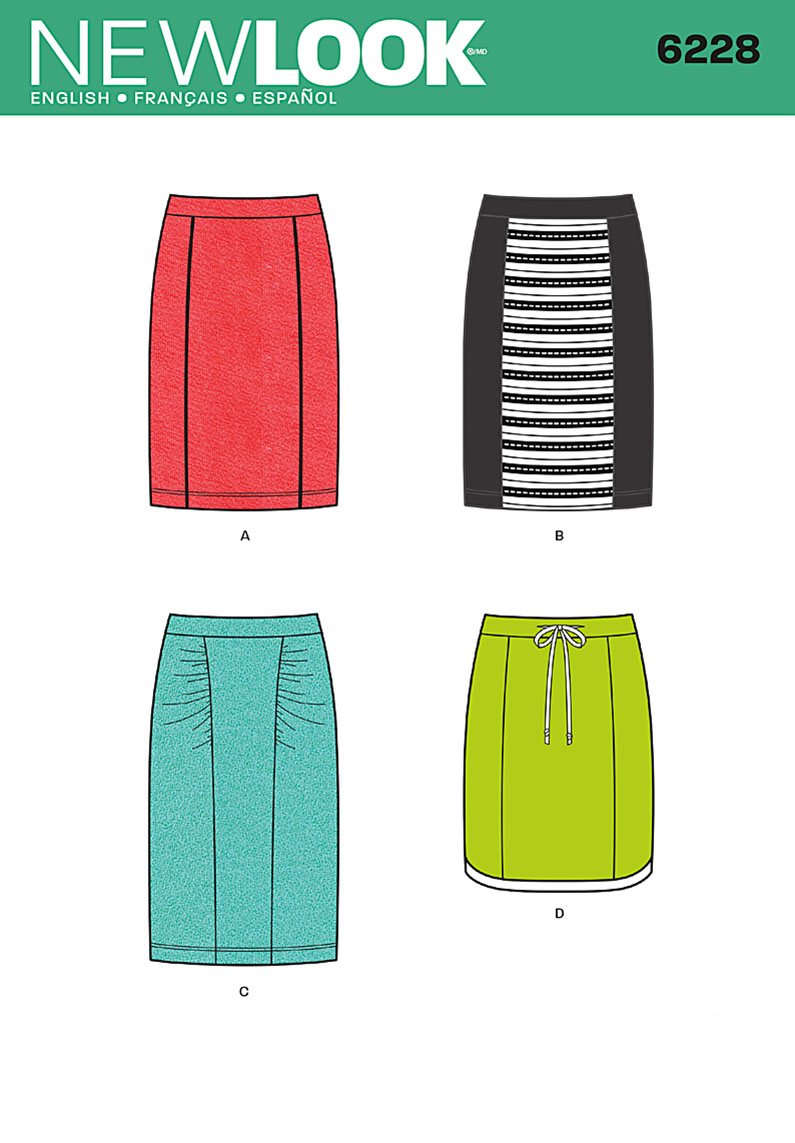
The skirt is New Look 6228, which I consider something of a ringer for the Colette Mabel. I wasn't sure whether it would be nice to even point that out, and so I was amused to find some catty sniping over at GOMI on just this topic.

Although I have made this skirt with the three panels as shown on the envelope, I didn't think they would show up in this grid print ponte. So I just used the one-piece back of the skirt for both the front and the back of the skirt. Very easy and quick.

And see, I wore a slimmer lower garment, just for you guys!

Would you like this crossover tunic, or does the potential for flashing your belly put you off it? The non-crossover view looks promising, too.